Table of Contents >> Show >> Hide
- Pick Your Tree “Recipe” Before You Craft
- Quick Supplies Checklist
- 25 Ways to Decorate Ornaments for a Custom Christmas Tree
- Personalized Vinyl Names (and the Year)
- Photo-Inside Clear Ornaments (Tiny Time Capsules)
- “This Year Was…” Memory Notes
- Glitter-Dipped Bottoms (A Little Sparkle, Not a Glitter Crime Scene)
- Decoupage With Sheet Music, Maps, or Book Pages
- Inside-Painted Swirls (Marble-Roll Method)
- Alcohol Ink “Stained Glass” Effects
- Snowy Splatter Paint
- Chalky Wash + Hand-Lettered Words
- Faux Mercury Glass (Vintage Glam)
- Beaded Snowflakes (Simple, Graphic, and Clean)
- Ribbon-Strip Fillable Ornaments
- Mini Wreath Collars on Ornaments
- Fabric-Wrapped Ornaments (No Sewing Required)
- Yarn-Wrapped Baubles
- Macramé Tassel Ornaments
- Felt Shapes With Contrast Stitching
- Salt Dough Cutouts You Can Paint Like Tiny Art
- Cinnamon “Gingerbread” Ornaments That Smell Like Christmas
- Cookie Cutter Shadowbox Ornaments
- Clothespin Stars (Surprisingly Chic)
- Pressed Greenery (A Nature-Inspired Upgrade)
- Confetti Ornaments From Wrapping Paper Scraps
- Bedazzled Rhinestone Patterns
- Handprints, Footprints, or Pet Paw Prints (Keepsake Style)
- How to Make the Whole Tree Look “Custom” (Not Random)
- Conclusion
- Bonus: Real-Life Ornament Decorating “Experience Notes” (Extra )
A “custom Christmas tree” doesn’t mean you need a celebrity decorator or a warehouse of matching ornaments. It means your tree looks like you live hereyour colors, your memories, your weirdly specific obsessions (tiny dogs in sweaters? vintage candy canes? a whole branch dedicated to your favorite hobby? absolutely).
The secret is simple: start with plain ornaments (clear, shatterproof, wood blanks, or basic balls) and decorate them with repeatable techniques. That repeat is what reads as “designer,” even if your design studio is a kitchen table and your assistant is a cat who believes ribbon is an enemy.
Pick Your Tree “Recipe” Before You Craft
Custom trees look intentional when you choose three things up front: (1) a color palette (2–4 colors max), (2) a finish (mostly matte, mostly shiny, or a planned mix), and (3) a vibe (cozy cabin, glam, nostalgic, minimalist, whimsical, etc.). Once you decide those, every ornament idea below becomes easier to personalize without turning your tree into a craft-store explosion.
Quick Supplies Checklist
- Plain ornaments (clear fillable, shatterproof balls, wood blanks, or simple glass ornaments)
- Acrylic paint + small brushes or foam pouncers
- Decoupage medium (or Mod Podge-style glue) + optional glitter
- Ribbon, twine, or ornament hooks
- Permanent marker or paint pen for names/dates
- Hot glue gun (low-temp is friendlier for beginners)
- Optional “level-up” tools: vinyl cutter, alcohol ink, stencils, tiny funnels, and a steady playlist
25 Ways to Decorate Ornaments for a Custom Christmas Tree
Personalized Vinyl Names (and the Year)
Add a clean name + year decal to a clear or matte ornament for instant “custom shop” vibes. Keep fonts consistent across the tree (one script + one simple sans serif is a safe combo). Pro move: add tiny stars or a short phrase like “First Christmas” under the name.
Photo-Inside Clear Ornaments (Tiny Time Capsules)
Print a small photo, trim it narrow, gently curl it, and slide it into a clear ornament. Pair it with a ribbon topper in your palette. These make your tree feel personal fastespecially if you do one ornament per year or per family member.
“This Year Was…” Memory Notes
Fill a clear ornament with rolled paper strips: favorite moments, inside jokes, big milestones, even the year’s top songs. Add one metallic star confetti piece so it looks intentional, not like you stuffed a homework assignment into a globe.
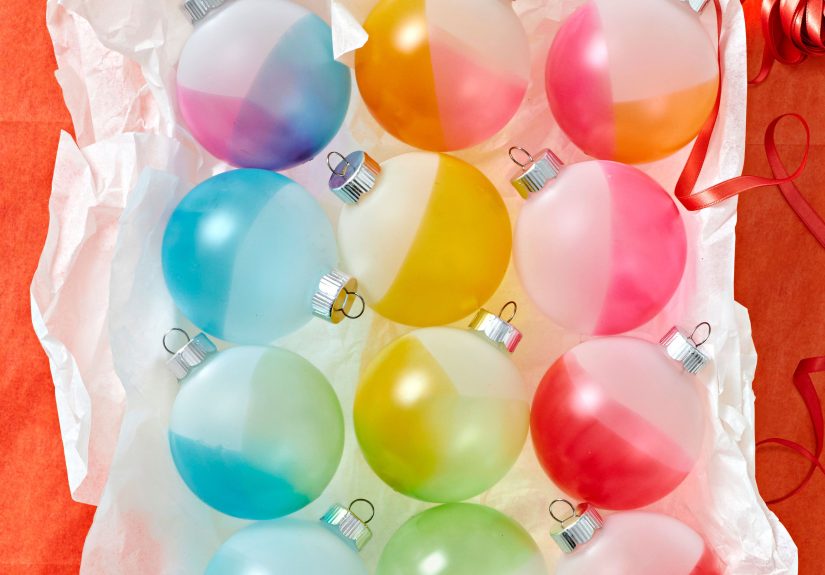
Glitter-Dipped Bottoms (A Little Sparkle, Not a Glitter Crime Scene)
Paint decoupage medium on the lower third of an ornament, dip or roll in glitter, and let dry fully. Stick to one glitter finish (fine, chunky, or iridescent) so your tree looks cohesive rather than “craft aisle bingo.”
Decoupage With Sheet Music, Maps, or Book Pages
Cut paper into small pieces, smooth them onto ornaments with decoupage medium, then seal. Sheet music looks classic; maps feel travel-themed; book pages are perfect for a cozy “library tree.” Add twine hangers to lean rustic.
Inside-Painted Swirls (Marble-Roll Method)
Drop a little paint inside a clear ornament, add a marble, close tightly, and roll until you get swirling patterns. Choose 2–3 colors that blend nicely (blue + silver, red + gold, pink + white). Let it dry upside down on a cup.
Alcohol Ink “Stained Glass” Effects
Dab alcohol ink onto clear ornaments for a jewel-toned, translucent look. Keep each ornament to one color family (blues, greens, or warm ambers) so they read as a set. Finish with a simple black or metallic ribbon for contrast.
Snowy Splatter Paint
Cover the top cap, then lightly splatter white paint (or white + metallic) for an airy snow effect. Vary the density: a few ornaments with heavier splatter become “statement pieces,” and the rest stay delicate.
Chalky Wash + Hand-Lettered Words
Create a rustic matte finish by watering down acrylic paint into a “wash.” Once dry, add words with a paint pen: family names, a favorite holiday phrase, or a one-word theme like “Joy,” “Noel,” or “Cozy.”
Faux Mercury Glass (Vintage Glam)
For a vintage-inspired look, mist the inside lightly, dab on a metallic tone in patches, and let it dry for that mottled “antique” effect. Use this style for a whole cluster of ornaments so it looks curated, not accidental.
Beaded Snowflakes (Simple, Graphic, and Clean)
String wood beads onto wire or sturdy thread to form snowflake spokes. Keep the bead colors consistent (all white, all natural wood, or all metallic). Hang with thin twine so the shape is the star of the show.
Ribbon-Strip Fillable Ornaments
Cut ribbon scraps into short pieces and stuff them into clear ornaments for a high-impact color hit. This is perfect if you’re matching a room’s decorjust use the same ribbon you used on gifts or garlands.
Mini Wreath Collars on Ornaments
Wrap a tiny ring of faux greenery (or twisted wire + mini garland) around the “equator” of a ball ornament. Add a micro bow. It looks fancy, costs little, and gives your tree dimension.
Fabric-Wrapped Ornaments (No Sewing Required)
Wrap ornaments with fabric strips, ribbon, or even a piece of cozy flannel. Secure the ends with hot glue, then add a small button or charm. Great for a farmhouse or cabin-style Christmas tree.
Yarn-Wrapped Baubles
Starting at the top, wrap yarn around a clear or foam ornament, securing with tiny dabs of glue. Use chunky yarn for cozy texture or thin metallic thread for subtle shine. These play well with knit stockings and warm lights.
Macramé Tassel Ornaments
Tie a small tassel using cotton cord or twine and hang it from a simple wood bead. Want it to feel “custom”? Repeat the same tassel color every few branches, like a pattern, so it looks designed.
Felt Shapes With Contrast Stitching
Cut stars, mittens, trees, or hearts from felt, then add simple stitches around the edges using embroidery floss. Keep your stitch color consistent (white on red, gold on green) for a boutique look.
Salt Dough Cutouts You Can Paint Like Tiny Art
Salt dough ornaments are classic for a reason: they’re easy, inexpensive, and endlessly customizable. Paint them in your palette (or do mini patterns like stripes and dots), then seal so they last for years.
Cinnamon “Gingerbread” Ornaments That Smell Like Christmas
Cinnamon dough ornaments look like gingerbread and add cozy scent to your tree. Decorate them with white “icing” lines (puffy paint works great) and hang with twine for a warm, nostalgic vibe.
Cookie Cutter Shadowbox Ornaments
Use solid-back cookie cutters as little frames: fill them with tinsel, tiny beads, or miniature holiday trinkets, then glue a loop of twine on the back. This is a great way to turn kitchen nostalgia into decor.
Clothespin Stars (Surprisingly Chic)
Take mini clothespins, glue them into a star or snowflake shape, then paint them matte white or gold. Add a small bead center if you want extra polish. They’re lightweight, inexpensive, and look great in clusters.
Pressed Greenery (A Nature-Inspired Upgrade)
Add a sprig of faux greenery or a pressed leaf inside a clear ornament, then tie a velvet ribbon at the top. Keep it simple: one botanical element per ornament looks intentional and “designer.”
Confetti Ornaments From Wrapping Paper Scraps
Punch confetti dots from leftover wrapping paper and fill clear ornaments. Choose 1–2 patterns max so your tree stays cohesive. This is also a satisfying way to use scraps you’d otherwise cram into a drawer “for later.”
Bedazzled Rhinestone Patterns
Use small rhinestones to create simple patternsconstellations, snowflakes, stripes, or a monogram outline. Tip: repeating one motif across several ornaments looks more upscale than making every ornament a different “experiment.”
Handprints, Footprints, or Pet Paw Prints (Keepsake Style)
Paint a small handprint (or paw print) onto a simple ornament and write the name + date. Keep it elegant by using one neutral color (white, gold, or black) and a matching ribbon. Sentimental doesn’t have to look chaotic.
How to Make the Whole Tree Look “Custom” (Not Random)
- Repeat your winners. Pick 5–7 ornament styles from the list and make multiples. That repetition is what looks curated.
- Use a “hero” ratio. Let about 70% of ornaments be simple (solid, matte, or minimal), 20% be medium-detail, and 10% be bold statement pieces.
- Protect the bottom. If you’ve got pets, kids, or clumsy adults (no judgment), put shatterproof and sturdier DIY ornaments on lower branches.
- Cluster for impact. Group 3–5 ornaments of similar style together so they read as a design moment instead of scattered craft samples.
- Unify with ribbon. Even mismatched ornaments look cohesive when the hangers/top bows match your palette.
Conclusion
The best custom Christmas tree isn’t the one that matches a catalogit’s the one that tells your story. Choose a palette, pick a few repeatable ornament-decorating techniques, and make enough of them to create a rhythm across the branches. Your tree will look intentional, personal, and festive… even if you’re still finding glitter in March.
Bonus: Real-Life Ornament Decorating “Experience Notes” (Extra )
Here’s the part craft tutorials don’t always say out loud: ornament decorating is 30% creativity and 70% managing tiny chaos. That’s not a complaintit’s the charm. But if you want your finished tree to look custom (and not like you hosted a paint-and-glitter Olympics), a few “learned the hard way” habits make a huge difference.
First, test your technique on one ornament before you commit to a dozen. That one test ornament is where you figure out things like: “Oh, this paint takes forever to dry,” or “This glitter is basically a rash in craft form,” or “This ribbon is beautiful but frays if you look at it.” Testing saves time, supplies, and the emotional spiral where you start bargaining with the universe over a smudged snowflake.
Second, drying is a design step, not an afterthought. Wet ornaments attract fingerprints the way cookies attract toddlers. If you’re painting inside clear ornaments, set them upside down on cups or egg cartons so excess paint doesn’t pool. If you’re doing decoupage, smooth the paper gently and let it cure fully before sealingotherwise you’ll get bubbles that look less “artisan” and more “trapped air from another dimension.”
Third, glitter management is basically home security. Put down parchment paper or a tray, and pour glitter from a small container instead of the big jar. Use the same glitter color across multiple ornaments so you don’t end up with five slightly different “silvers” that clash under twinkle lights. And when you think you’re done cleaning? Congratulationsyou’re halfway done cleaning.
Fourth, custom doesn’t mean complicated. Some of the most “expensive-looking” ornaments are the simplest: a matte wash + neat lettering, a clear globe with one beautiful filler, or a minimal ribbon-and-greenery combo. When every ornament is maximal, nothing feels special. When a few ornaments are detailed and the rest are calm, the detailed ones look intentionallike they were chosen on purpose, not adopted during a late-night craft spree.
Fifth, plan for real life. If you have pets, put fragile, sharp, or extremely tempting ornaments higher up. If you have kids, let them make a “kid zone” section with sturdy ornaments they can proudly point at. If you’re decorating with friends or family, keep a couple easy wins ready (confetti fillables, ribbon strips, simple paint splatter) so everyone can succeed. A custom tree should feel fun, not like a final exam.
Finally, store your DIY ornaments like they’re future treasuresbecause they will be. Wrap them gently, label the box by year or theme, and slip in a little note about what you did that season. Next December, you’ll open the box and instantly remember the stories behind the ornaments. That’s the real magic: not perfection, but personality.