Table of Contents >> Show >> Hide
- What a Breathe Right Strip Does (and What It Doesn’t)
- Before You Apply: Two-Minute Prep That Makes or Breaks the Stick
- How to Put On a Breathe Right Strip: 6 Steps
- Step 1: Wash and dry your nose like you mean it
- Step 2: Find the “flare line” (your placement sweet spot)
- Step 3: Peel the backing carefully and avoid touching the adhesive
- Step 4: Center the strip across your nose, just above the nostril flare
- Step 5: Press down the ends and rub gently to secure
- Step 6: Take a test breath, then decide: keep or redo
- Troubleshooting: Common Problems (and the Fixes That Actually Work)
- How to Remove a Breathe Right Strip Without Yanking Your Soul Out Through Your Nose
- Smart Safety Notes (Especially If You’re Using Strips Often)
- Making Strips Work Better: Practical Pairings for Sleep, Colds, and Workouts
- Real-World Experiences: What People Commonly Notice (and How to Adjust)
- Conclusion
Breathe Right strips look like tiny bandages for your nose, but they’re basically a little “spring bridge” that helps
gently pull the sides of your nose outward so air can move through more easily. People use them for nighttime stuffiness,
snoring caused by nasal congestion, workouts, travel, and that delightful moment when you realize you’ve been breathing through
your mouth like a surprised goldfish.
This guide is built from official Breathe Right directions plus practical guidance from major U.S. medical and sleep-health organizations.
It’s not complicated, but placement is the whole gameput it a little too high or too low and you’ll feel like you taped a sticker on your face
for absolutely no reason. Let’s fix that.
What a Breathe Right Strip Does (and What It Doesn’t)
What it does
Breathe Right strips are an external nasal dilator. They sit on the outside of your nose and use embedded, spring-like bands to
lift the nasal sidewalls and open the nasal passage. That can help if your airflow is limited mostly by your nasal valves or congestion
(think: allergies, a cold, or narrow nasal passages).
- Drug-free support: It’s mechanical, not medicated.
- Fast payoff: You usually feel the change right after applying (assuming the placement is correct).
- Short-term use: They’re typically worn for part of a day or night and then removed.
What it doesn’t do
A nasal strip is not a cure for every kind of snoring. If snoring is happening because of throat tissues, alcohol/sedatives, or
obstructive sleep apnea (OSA), nasal strips may do littleor at best, help a little without fixing the real problem.
If you suspect sleep apnea (more on that below), talk with a clinician.
Before You Apply: Two-Minute Prep That Makes or Breaks the Stick
1) Pick the right strip
Most people do best when the strip fits the width of their nose without feeling like a clamp. If you’re between sizes, you may need to
try both oncethink of it as “finding your jeans size,” except for your nose. Some versions are made for sensitive skin, and there are
different strengths (original vs. extra strength).
2) Check your skin
Don’t apply a strip over irritated, sunburned, or broken skin. If you’ve recently exfoliated like you’re prepping for a close-up on a billboard,
consider giving your nose a night off.
3) Clean and dryreally dry
Oils, sweat, moisturizer, sunscreen, and leftover foundation are the sworn enemies of adhesives. Wash your nose and dry it completely.
If your skin is naturally oily, wiping the application area with an astringent can help. Then wait a few seconds for the skin to be fully dry
before you apply.
How to Put On a Breathe Right Strip: 6 Steps
Step 1: Wash and dry your nose like you mean it
Use mild soap and water, then dry thoroughly. No dampness. No leftover lotion. If you can tap your nose and it squeaks (not literallyplease),
you’re ready.Step 2: Find the “flare line” (your placement sweet spot)
Look in a mirror and smile (not because this is glamorousjust because it helps). Notice where your nostrils begin to flare outward.
The strip generally works best just above that flare areawhere the sides of your nose start to curve outward.Quick test: take a slow inhale through your nose and watch the sides. If they collapse inward a bit, you’re likely the perfect candidate for
getting a noticeable benefit from correct placement.Step 3: Peel the backing carefully and avoid touching the adhesive
Open the pouch, take out one strip, and peel off the liner/backing. Try to hold the strip by the edges so the adhesive stays clean and sticky.
(Your fingertips are naturally oilyeven if you’re a hand-washing champion.)Step 4: Center the strip across your nose, just above the nostril flare
Position the strip so the center sits on the bridge/lower bridge area, and the ends (tabs) rest near the start of the flaring part of each nostril.
You want it level and centered, not angled like a trendy mustache sticker.If you place it too high, it won’t lift the nasal valves effectively. Too low, and it may feel uncomfortable or peel up.
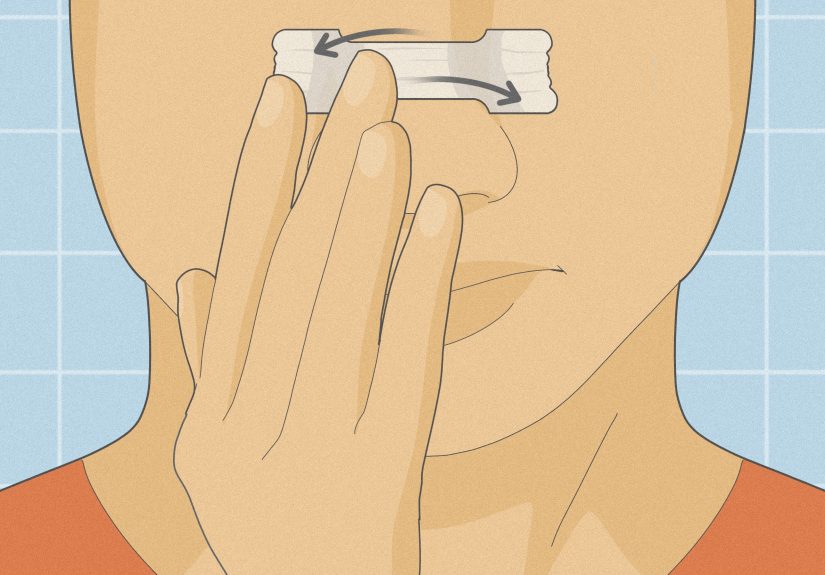
Step 5: Press down the ends and rub gently to secure
Starting at the center, smooth outward with gentle pressure. Then press down on both ends and rub lightly to lock it in place.
It’s normal to see a little lifting at the edges while it’s doing its “spring” thingwhat matters is that the strip feels secure and the
main contact points are stuck down.Step 6: Take a test breath, then decide: keep or redo
Inhale through your nose. You should feel airflow improveoften immediately. If you feel no difference, it’s usually one of these:
(1) placement is off, (2) skin wasn’t dry/oil-free, or (3) the strip size/strength isn’t right for your nose.If you need to reposition, remove it and use a new strip. Reapplying the same strip often doesn’t hold well because the adhesive loses effectiveness.
Troubleshooting: Common Problems (and the Fixes That Actually Work)
Problem: “It fell off in the middle of the night.”
- Most likely cause: skin wasn’t fully clean and dry.
- Fix: wash and dry again; skip moisturizer on the nose area before applying; consider an astringent wipe if oily.
Problem: “It’s stuck, but I don’t feel any airflow change.”
- Most likely cause: it’s too high on the bridge.
- Fix: place it just above where your nostrils flare out. Use the mirror flare-line trick from Step 2.
Problem: “It feels like it’s pinching.”
- Most likely cause: too low, crooked, or wrong size.
- Fix: try centering it more carefully and move it slightly upward; if it still pinches, try a different size.
Problem: “My skin looks red or itchy afterward.”
- Fix: stop using it and let your skin calm down. If you try again later, consider a sensitive-skin version and focus on gentler removal with warm water.
- Also: if you have known latex sensitivity, note that some packaging may contain natural rubber latex (this is about packaging exposure, not the strip itself).
How to Remove a Breathe Right Strip Without Yanking Your Soul Out Through Your Nose
The golden rule: warm water first. The easiest removal is while washing your face with warm water or in the shower.
Wet the strip area for about 10 seconds, loosen the ends, and then gently lift from both sides. Slow and steady beats fast and furious every time.
Smart Safety Notes (Especially If You’re Using Strips Often)
- Don’t wear it too long: Follow the product guidancetypically no more than 12 hours per day.
- Single-use means single-use: Don’t reuse a strip. The adhesive isn’t designed for multiple rounds.
- Avoid irritated skin: Skip use if you have sores, sunburn, or irritation on the nose.
- Kids: Many Breathe Right products are labeled not for children under 5 years old. Keep strips out of reach of younger kids.
When to talk to a clinician
If you (or someone in your house) snores loudly and also has choking/gasping, witnessed breathing pauses, significant daytime sleepiness,
or morning headaches, it’s worth asking a clinician about sleep apnea evaluation. Nasal strips aren’t intended to treat sleep apnea, and
persistent symptoms deserve real medical attentionnot just stronger adhesive.
Making Strips Work Better: Practical Pairings for Sleep, Colds, and Workouts
For snoring
If your snoring is mostly nasal, strips can help by improving nasal airflow. But if your snoring is “throat-based,” you’ll get more mileage
by combining strips with proven habits: side sleeping, addressing congestion/allergies, and avoiding alcohol or sedatives close to bedtime.
For colds, allergies, and seasonal stuffiness
Think of strips as a “door holder” for your nasal passages. If inflammation is the main issue, also consider strategies like saline rinses,
allergy management, and keeping bedroom air from getting overly dry. A strip can be used alongside common medications as directed on product labeling.
For exercise and travel
People often like strips during workouts because they can make nasal breathing feel easier when you’re pushing your pace. For travel,
they’re a simple, non-drowsy option when dry airplane air and weird hotel pillows team up against your sinuses.
Real-World Experiences: What People Commonly Notice (and How to Adjust)
First-time users usually fall into one of three camps: the “Whoa, that’s actually better,” the “I feel nothing,” and the “Why is my nose wearing a sticker?”
The difference is almost always placement and skin prep. When the strip is positioned just above the nostril flare, many people report that nasal breathing feels
smootherespecially when lying down, where congestion can feel more dramatic. If it’s too high, you might still feel the strip pulling slightly, but airflow won’t
improve much. If it’s too low, it can feel awkward, like your nose is being gently scolded for existing.
A common early surprise is the sensation itself. The strip doesn’t “open your nose” the way a decongestant might; it’s more like it prevents the sides of your nose
from collapsing inward. Some people describe it as feeling “supported,” especially if they’ve noticed their nostrils narrow when they inhale. That can be extra noticeable
during exerciselike running or cyclingwhen you’re trying to nasal-breathe but your body is begging for more airflow. In those cases, users often say the strip feels
more helpful once they’re already moving and breathing harder.
Another real-world detail: skin oils are sneaky. You might wash your face and still have skincare residue sitting right where the adhesive needs to grip.
People who apply strips after nighttime moisturizer often complain the strip slides off early or peels up on the edges. The fix is simple: keep the nose area free of product,
or apply skincare everywhere else first and leave the nose for last (clean, dry, and bare). If you’re naturally oily, a quick swipe with an astringent on the application area
(followed by full drying) is a game-changer for stick.
Removal is where experienced users develop strong opinions. The “rip it off like a bandage” method is popular but regrettable. Most people find warm water removal far more comfortable,
especially if they use strips frequently. Washing your face or showering with the strip on softens the adhesive so it releases without tugging. People with sensitive skin often do best
by loosening each end first, then lifting gently from both sides, rather than peeling from one side all the way across.
Over a week or two, users tend to get better at matching the strip to their real problem. If the main issue is nasal congestion from a cold or allergies, the strip may help airflow
but won’t remove inflammationso people often notice it works best when paired with proper congestion care (like saline and clinician-recommended treatments). If the main issue is
throat-based snoring or possible sleep apnea, users often notice only minor improvement (or none), which is a useful clue to stop guessing and talk with a professional.
Finally, a small but very real “life experience” note: strips can become part of a routine. Some people like them for travel nights, big presentation mornings (anything to avoid a
congested, nasal voice), or workouts. Others save them for “I really need sleep tonight” situations. Either way, the pattern is consistent: when people treat placement like a skill
(not a random sticker placement), they tend to be much happier with the results.
Conclusion
Putting on a Breathe Right strip is simple, but it rewards precision: clean and dry skin, placement just above the nostril flare, and firm (gentle) pressure to secure it.
If you don’t feel a change, don’t assume the strip “doesn’t work”assume it’s playing hard-to-get and adjust placement or size. And if snoring or breathing issues persist,
especially with signs of sleep apnea, bring a clinician into the conversation. Your nose can do a lot, but it shouldn’t have to do everything alone.