Table of Contents >> Show >> Hide
- Quick Start Checklist (For People Who Love a Plan)
- Know Your Plant: Hops Are Bines, Not Vines
- Choosing Hop Varieties: Start With Your Climate (And Your Patience)
- Site Selection: Where Hops Will Love You Back
- Build the Trellis Before You Plant (Future You Will Be Grateful)
- Planting Hops: Rhizomes vs. Starts
- Year 1 vs. Year 2: Managing Expectations (And Avoiding Hop Drama)
- Training and Pruning: The Secret to Taller Plants and Happier Cones
- Watering: Consistent Moisture, Not a Daily Monsoon
- Fertilizing: Feed Early, Then Ease Up
- Pests and Diseases: Prevention Beats Panic
- Harvesting Hops: When Cones Are “Papery, Sticky, and Loud”
- Drying and Storing: Keep the Aroma, Lose the Moisture
- End-of-Season Care: Set Yourself Up for Next Spring
- Troubleshooting: Fix the Root Cause (Not Just the Symptoms)
- Conclusion: Grow Hops Like a Gardener, Not a Magician
- Backyard Hop-Growing Experiences: The Stuff You Only Learn By Doing (About )
Hops (Humulus lupulus) are the dramatic, fast-growing “curtain plant” of the garden world: give them sun,
something tall to climb, and a little attention, and they’ll try to redecorate your entire zip code.
They’re famous for flavoring beer, but in the backyard they’re also a gorgeous ornamental bine for arbors,
privacy screens, pergolas, and “please stop looking at my recycling bins” fences. (We’ve all been there.)
This guide walks you through how to plant and grow hops at homechoosing varieties, building a trellis,
planting rhizomes, training bines, handling pests and diseases, and harvesting and drying cones.
Along the way, you’ll get practical examples, timing tips, and a few cautionary talesbecause hops are generous,
but they’re also enthusiastic. Sometimes too enthusiastic.
Quick Start Checklist (For People Who Love a Plan)
- Pick the right spot: full sun, good airflow, well-drained soil.
- Build support first: hops want 10–20 feet of vertical ambition (you can do shorter, too).
- Plant in spring: rhizomes or starts after hard freezes ease up and soil is workable.
- Train early: select a few strong bines and wrap clockwise on twine.
- Water steadily: consistent moisture, never soggy roots.
- Feed thoughtfully: nitrogen helps early growth; ease off by mid-summer.
- Harvest late summer: cones feel papery, smell strong, lupulin is yellow and sticky.
- Dry gently: keep temps low; store airtight and dark for best aroma.
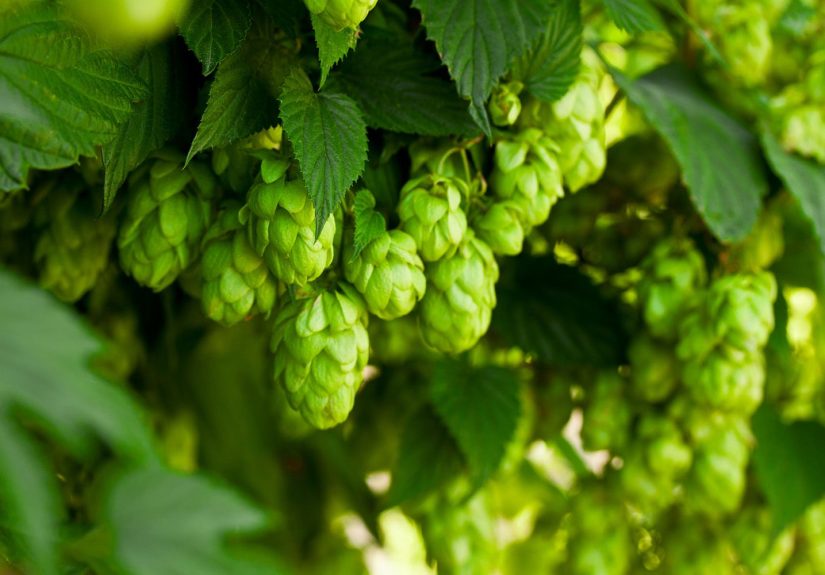
Know Your Plant: Hops Are Bines, Not Vines
Hops climb by wrapping their stems (called bines) around a support. They don’t use tendrils like grapes,
and they don’t politely “stay where you put them.” They twine, they reach, and during peak season they can grow
startlingly fast. The plant is a hardy perennial, returning each spring from a crown and underground rhizomes.
Male vs. Female (Why Your Plant Label Matters)
Hop plants are dioecious, meaning male and female flowers are on separate plants. The papery
cone-like flowers most gardeners want come from female plants. Most home-garden planting material is female.
Skip seed-growing unless you’re experimenting for ornamentalsseed-grown hops can be unpredictable and may include males,
which can lead to seeded cones.
Choosing Hop Varieties: Start With Your Climate (And Your Patience)
For backyard growers, variety choice is less about “what the pros plant” and more about what thrives where you live.
Commercial hop production is concentrated in the Pacific Northwest for good reasonssummer day length and conditions
are especially hop-friendlybut hops can still grow across many regions with smart site choice and care.
Beginner-Friendly Picks
- Cascade: a classic, widely grown, often considered forgiving for beginners.
- Crystal: another common choice, sometimes noted for decent disease tolerance.
- Chinook / Nugget (where available): vigorous growers that many gardeners enjoy for aroma.
If you’re in a very hot, humid, or low-latitude area, hops may flower earlier than you’d like (which can reduce
vegetative growth and cone yield). You can still grow them as ornamentals, but set expectations: you may get fewer cones,
and disease pressure can be higher without excellent airflow.
Site Selection: Where Hops Will Love You Back
Sunlight
Aim for full sunthe more, the better. Hops are solar-powered overachievers. In partial shade,
you may get lots of leafy growth but fewer cones and more disease issues.
Soil and Drainage
Hops prefer well-drained soil rich in organic matter. If you have heavy clay, don’t panicjust
improve drainage with compost, plant on a slight mound, or use raised beds. A soil pH around 6.0–7.5
is commonly recommended for good performance.
Airflow (Your Built-In Disease Prevention System)
Good airflow is a big deal. Crowded, damp foliage is basically an invitation for mildews. Choose a location where
breezes can move through the plant canopy, and plan to prune and train so the plant isn’t a tangled green sweater.
Build the Trellis Before You Plant (Future You Will Be Grateful)
Hops can hit 15–20 feet in a season in favorable conditions, so trellising is not optional. The good news: you don’t
need a commercial hopyard to grow backyard hops. You just need something sturdy.
Backyard Trellis Ideas (Pick Your Level of Commitment)
- Simple pole-and-twine: set a tall pole (or two) with a top crossbar or overhead wire, then drop
strong twine to the plant. - Fence or pergola training: run twine up to an eave, arbor, or pergola beam. Height matters less
than giving bines room to stretch and spread. - “V” or “A-frame” trellis: great for smaller yards; bines climb up and then can be guided along the top.
- Container hops: use a large container (think half-barrel size) plus a tall tripod or attached twine.
It’s also a nice way to limit rhizome spreading.
Use weather-resistant twine (coir, sisal, or similar) and make sure anchors are secure. Mature hop bines get heavy
and catch wind like a sail. If your trellis wobbles now, it will not magically get braver in August.
Planting Hops: Rhizomes vs. Starts
When to Plant
Plant in spring when the soil can be worked and the worst hard freezes are passing. In many regions,
that’s mid-spring; in warmer climates, earlier. You can also plant potted starts a bit later, as long as you can keep
them watered and they have time to establish.
How to Plant Rhizomes (Step-by-Step)
- Prep the bed: loosen soil, mix in compost, remove weeds. Hops dislike competition.
- Spacing: plan about 3–5 feet between plants (more space for different varieties).
- Plant depth: place rhizomes horizontally, about 2–4 inches deep,
with buds/shoots oriented upward if visible. - Water in: soak gently to settle soil, then keep evenly moist (not swampy).
- Mulch lightly: helps conserve moisture and suppress weeds.
Planting Starts (Potted Plants)
Dig a hole as deep as the pot and a little wider, loosen surrounding soil, and plant at the same depth it grew in the pot.
Water well and mulch. If your start already has long growth, install twine immediately so it doesn’t kink or sprawl.
Year 1 vs. Year 2: Managing Expectations (And Avoiding Hop Drama)
Here’s the truth that saves a lot of disappointment: year one is mostly about roots.
You may get few cones the first season. Many hop plants reach strong production in the second or third year,
once the crown is established.
Year 1 Priorities
- Build a healthy crown and root system.
- Keep weeds down and moisture steady.
- Train gently; don’t over-prune foliage early in establishment.
Year 2+ Priorities
- Prune and train for airflow and cone production.
- Fine-tune watering and feeding for vigorous but not “all leaves, no cones” growth.
- Watch closely for pests and diseases as canopy gets dense.
Training and Pruning: The Secret to Taller Plants and Happier Cones
Choose the Best Bines
In spring, multiple shoots emerge. When bines are roughly 1–2 feet long, select a few strong ones and prune off the rest.
A common home-garden approach is 2 strings per plant, training 2–3 bines per string.
This keeps the canopy productive without turning into a mildew hotel.
Wrap Clockwise (Yes, It Matters)
Hop bines naturally climb clockwise. Gently wrap them around the twine in that direction.
If you wrap counter-clockwise, many bines will stubbornly refuse to climb, and you’ll be standing there negotiating
with a plant like it’s a tiny leafy toddler.
Lower Leaf Removal for Airflow
Once bines are established on the trellis and growth is vigorous, you can remove leaves from the lower
1–3 feet to improve airflow and reduce disease pressure near the soil surface.
Watering: Consistent Moisture, Not a Daily Monsoon
Hops like steady moisture, especially during rapid spring growth and as cones develop. They do not like
waterlogged roots. Drip irrigation or a soaker hose is ideal because it waters the root zone without constantly wetting
foliage (wet leaves + warm nights = mildew’s favorite playlist).
Practical Watering Tip
Check soil 2–3 inches down: if it’s dry, water deeply. If it’s still damp, wait. Deep watering encourages deeper roots,
which helps the plant handle heat and dry spells.
Fertilizing: Feed Early, Then Ease Up
Hops are vigorous and often respond to nitrogen early in the season. Many extension-style home recommendations focus on
modest, repeated feeding in spring and early summer, then backing off by mid-summer so plants shift energy toward cone
development and hardening off growth.
A Sensible Home Approach
- Start with compost: mix compost into the bed at planting and top-dress yearly.
- Use balanced fertilizer lightly: especially in year 1; follow label directions.
- Focus on nitrogen early: but avoid heavy late-season nitrogen that keeps plants pushing leafy growth.
- Soil test if possible: it’s the fastest way to avoid guessing and overfeeding.
If you’re growing in containers, fertilize more carefullynutrients wash out faster, and it’s easier to overdo it.
Think “steady and small,” not “all-you-can-eat buffet.”
Pests and Diseases: Prevention Beats Panic
The most common hop headaches are powdery mildew and downy mildew, plus occasional insect pests
like aphids and spider mites. Backyard success is usually about reducing stress and improving airflow,
not going to war with a spray bottle every weekend.
Prevention Tools That Actually Work
- Airflow: train and prune to keep a breathable canopy.
- Water at the base: avoid soaking leaves late in the day.
- Sanitation: remove diseased plant parts; don’t compost infected material unless you hot-compost properly.
- Scout weekly: check leaf undersides for mites and aphids; look for mildew spots early.
- Resistant varieties: where available, pick cultivars known to handle disease pressure better.
Common Problems and What They Look Like
- Powdery mildew: white, powdery patches on leaves and sometimes cones; can reduce quality and vigor.
- Downy mildew: distorted, stunted shoots in spring and leaf issues later; thrives in cool, wet conditions.
- Hop aphids: sticky honeydew, clusters of small insects; can weaken plants and affect cone quality.
- Spider mites: stippled leaves and fine webbing in hot, dry weather; outbreaks can explode quickly.
If you do need treatments, look for region-appropriate guidance from local extension services and always follow label directions.
(Plants are forgiving. Labels are not.)
Harvesting Hops: When Cones Are “Papery, Sticky, and Loud”
Harvest timing is part science, part sensory test. In most U.S. regions, hops are commonly harvested in
late August through September, though exact timing depends on variety and weather.
Signs Your Hops Are Ready
- Texture: cones feel dry and papery, not soft and damp.
- Aroma: strong, pleasant hop smell when you rub a cone.
- Lupulin: yellow powder inside the cone (sticky and fragrant).
- Sound: a mature cone often makes a light “papery” sound when handled.
Pick on a dry day if you can. Gently pull cones from sidearms, avoiding crushing them too much. Handle like herbs:
bruise them a little and you’ll smell it for daysbruise them a lot and you’ll lose aroma faster.
Drying and Storing: Keep the Aroma, Lose the Moisture
Fresh hops hold a lot of moisture. If you store them wet, mold is likely. If you dry them too hot, you risk driving off
the very aromatic compounds that make hops… well, hops.
How to Dry Hops at Home
- Spread thin: lay cones in a single layer on screens or dehydrator trays.
- Use gentle warmth and airflow: aim for low temperatures; avoid high heat.
- Check for dryness: cones should feel papery and springy; the central stem should snap rather than bend.
- Cool before sealing: don’t trap warm moisture in a bag.
Storage Tips
- Go airtight: vacuum-sealed or very well-sealed bags are best.
- Keep dark and cold: a freezer helps slow aroma loss over time.
- Limit oxygen exposure: open, portion, reseal quickly.
End-of-Season Care: Set Yourself Up for Next Spring
After harvest and once the plant starts to die back, many growers cut bines down and clean up plant debris.
In cold climates, a mulch layer can help protect the crown. In warm climates, cleanup is still useful for reducing
disease carryover.
Managing Spread
Hops spread via underground rhizomes. If you want them contained, consider edging barriers, regular root pruning,
or container growing. Otherwise, your hops may decide to start a “satellite office” in the next garden bed.
Troubleshooting: Fix the Root Cause (Not Just the Symptoms)
Problem: Lots of leaves, few cones
- Possible causes: too much shade, too much late nitrogen, too many bines left unpruned.
- Try this: improve sun exposure, reduce late feeding, train fewer bines for better light and airflow.
Problem: Bines won’t climb
- Possible causes: weak twine texture, wrapping the wrong direction, bines too stiff/old when trained.
- Try this: train when bines are young and flexible; wrap clockwise; use rougher twine.
Problem: Mildew keeps showing up
- Possible causes: crowded canopy, wet foliage, poor airflow, susceptible variety.
- Try this: prune more aggressively, remove lower leaves, water at the base, and keep the area weed-free.
Conclusion: Grow Hops Like a Gardener, Not a Magician
The best hop patches aren’t complicatedthey’re consistent. Give hops sun, drainage, a strong trellis, and a little training,
and they’ll reward you with lush green growth and aromatic cones. Treat year one as an investment, year two as your learning lap,
and year three as the season where you start feeling like you “get it.”
Most importantly: don’t fight the plant’s nature. Hops want to climb, spread, and grow fast. Your job is to guide that energy
into a neat, airy canopy that’s easy to care forand easy to harvestwithout turning your yard into a botanical obstacle course.
Backyard Hop-Growing Experiences: The Stuff You Only Learn By Doing (About )
Ask a few hop growers what surprised them most, and you’ll hear the same theme: hops are both easy and ridiculous.
They’re easy because they’re hardy perennials that truly want to live. They’re ridiculous because, once they decide they’re happy,
they grow like they’re trying to win a contest you didn’t know you entered.
One of the most common first-year “aha” moments is realizing that hops don’t care about your schedule. If you plant a rhizome and
wait for polite, steady progress, you may stare at bare soil for a while… and then suddenly you have a bine long enough to trip over.
That’s why experienced growers build the trellis first. It’s not optimismit’s self-defense.
Training is another classic learning curve. Many gardeners assume the plant will “figure it out” and climb whatever is nearby.
Sometimes it will, but you’ll get better results if you pick a few strong bines and guide them early. The funniest mistake is
wrapping counter-clockwise. It feels like it should still workplants are flexible, right?and then the bine just slumps there like,
“No thanks, I’m not doing that.” Once you wrap clockwise, it’s like flipping a switch. The plant grabs the twine and starts climbing
as if it suddenly remembered it left the oven on.
Watering is where good intentions can backfire. Because hops look lush and thirsty, beginners often water too frequently.
In well-drained soil, that’s less riskybut in heavy soil, it can lead to stressed roots and more disease pressure.
The “feel the soil two inches down” habit is a game-changer. It’s simple, it’s low-tech, and it prevents the most common form of
plant over-parenting: hovering with a hose.
Then there’s the harvest window, which feels like a riddle at first. Cones look “cone-y” long before they’re actually ready.
Many growers learn to trust the sensory cues: papery texture, sticky yellow lupulin, and that unmistakable aroma that announces,
“Yes, this is the moment.” The first time you pick too early, cones can feel soft and smell faintlike you captured the idea of hops
instead of the full experience. Pick a little later (still before browning), and suddenly the fragrance is bold and satisfying.
Drying is the final “experience lesson.” It’s tempting to crank up heat to finish quickly, but gentle drying and good airflow preserve
aroma much better. Many gardeners end up doing small test batchesone tray dried slowly, one dried fasterjust to see the difference.
That kind of hands-on experimenting is where hop growing becomes genuinely fun. You stop following instructions like a robot and start
responding to what your plant and your climate are actually doing. And that’s the real secret: hops are consistent, but every backyard
is its own little ecosystem. Once you learn yours, hops become less mysterious and more like a favorite, slightly wild friend
who always shows up with way too much energy and somehow makes the garden better.