Table of Contents >> Show >> Hide
- Why DIY Headboards Are the Ultimate Budget Upgrade
- Before You Start: Planning Your DIY Headboard
- 32 DIY Headboard Ideas for a Low-Cost Bedroom Refresh
- 1. Painted Arch or Shape Headboard
- 2. Two-Tone Color Block Wall Headboard
- 3. Simple Upholstered Plywood Headboard
- 4. Tufted DIY Headboard with Buttons
- 5. Channel-Tufted Wall Panels
- 6. Fabric-Wrapped Foam Tiles
- 7. Pegboard Headboard with Storage
- 8. Shiplap-Style Wood Plank Headboard
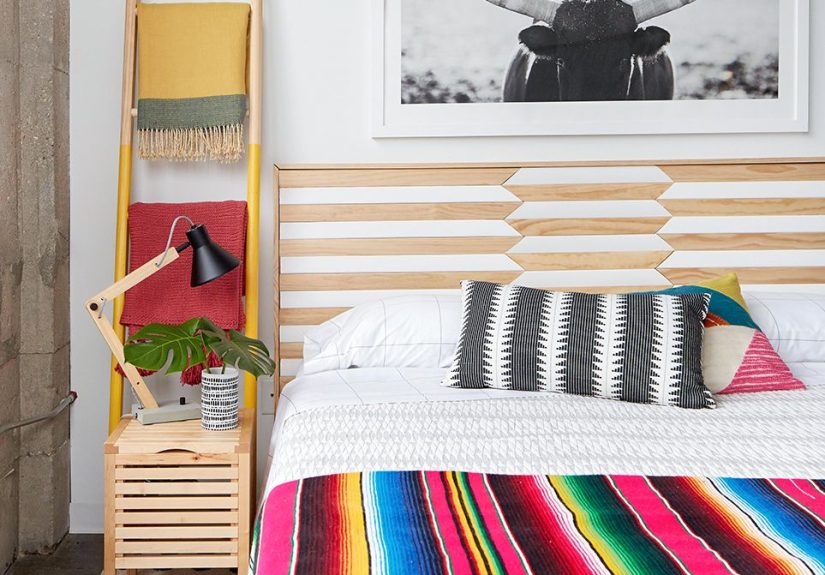
- 9. Vertical Wood Slat Wall
- 10. Pallet Wood Headboard (With Prep!)
- 11. Upholstered Headboard with Nailhead Trim
- 12. Inexpensive Drop Cloth Headboard
- 13. Curtain Rod and Fabric Headboard
- 14. Tapestry or Woven Wall Hanging Headboard
- 15. Rug-on-the-Wall Headboard
- 16. Old Door Turned Headboard
- 17. Reclaimed Shutter Headboard
- 18. Bookcase or Shelf Headboard
- 19. Picture Ledge & Gallery Wall Headboard
- 20. Oversized Single Art Piece Headboard
- 21. Painter’s Tape Graphic Headboard
- 22. Decal or Wallpaper Panel Headboard
- 23. Cane or Rattan Screen Headboard
- 24. Upholstered Headboard Using a Room Divider
- 25. DIY Upholstered Panel Squares with Wood Frames
- 26. Live-Edge Slab Headboard
- 27. Plywood Cut-Out Shape Headboard
- 28. Chalkboard or Dry-Erase Headboard
- 29. String Light Headboard Outline
- 30. Upholstered Headboard with Built-In Ledge
- 31. Plywood + Fabric Slipcover Headboard
- 32. Completely No-Headboard Headboard (Styled Wall)
- Care & Maintenance Tips for DIY Headboards
- Real-Life DIY Headboard Experiences & Lessons Learned
- 1. Comfort Matters More Than Instagram
- 2. Fabric Choice Is a Big Deal
- 3. The “Cheap” Part Comes from Planning, Not Just Price Tags
- 4. Mounting Is Half the Project
- 5. Test Height and Layout Before You Commit
- 6. Lighting and Outlets Can Surprise You
- 7. Embrace ImperfectionIt’s Part of the Charm
- 8. Start Simple, Then Upgrade
- Final Thoughts
Your bed is the star of your bedroom, but if you’re rocking a plain metal frame, it probably feels more “college dorm” than cozy sanctuary. The good news? You don’t need a designer budget to get a designer headboard. With a few smart DIY headboard ideas and some creativity, you can give your bedroom a low-cost refresh that looks totally custom.
This guide walks you through 32 DIY headboard ideasfrom painted faux headboards to upcycled doors and fabric-wrapped panelsso you can find the perfect project for your style, skill level, and budget.
Why DIY Headboards Are the Ultimate Budget Upgrade
Headboards do a lot more than just keep your pillows from escaping in the night. The right headboard:
- Creates a strong focal point so the room feels “finished.”
- Adds softness, color, and texture right where your eye naturally goes.
- Can hide awkward wall marks, uneven paint, or off-center windows.
- Gives renters a big style moment without major renovations.
Buying a designer headboard can easily cost hundreds of dollars. Many DIY versions, especially those made with plywood, paint, peel-and-stick materials, or thrifted pieces, can come together for under $50–$100, depending on size and materials. That’s a serious bedroom glow-up for the price of a fancy dinner.
Before You Start: Planning Your DIY Headboard
Measure Twice, Cut Once (Or Don’t Cut At All)
Measure the width of your mattress and frame, plus the ceiling height and any nearby windows or wall sconces. Most people like a headboard that’s at least as wide as the bed and tall enough to be seen over pillowsoften 36–60 inches high for a queen bed. Oversized, wall-mounted designs can go much taller for a dramatic look.
Set a Realistic Budget
Decide what you want to spend before you fall in love with velvet that costs more than your rent. Many projects are doable using:
- Off-the-shelf lumber or MDF
- Foam and batting
- Leftover paint
- Thrifted textiles like blankets, curtains, or rugs
Think About Maintenance
Upholstered headboards feel luxurious but attract dust and pet hair. Painted and wood headboards are easier to wipe down. If you have kids, pets, or allergies, lean toward materials you can vacuum or clean easily and fabrics that won’t show every fingerprint.
32 DIY Headboard Ideas for a Low-Cost Bedroom Refresh
1. Painted Arch or Shape Headboard
Grab a quart of wall paint and create a faux headboard by painting an arch, rectangle, or scalloped shape directly onto the wall behind your bed. Use painter’s tape, a level, and a pencil string compass for clean curves. It’s renter-friendly, ultra-cheap, and easy to repaint when you want a new look.
2. Two-Tone Color Block Wall Headboard
Paint the lower part of the wall behind your bed in a deeper or contrasting color and keep the upper section neutral. The color block acts like an oversized modern headboard and instantly makes the room feel taller and more intentional.
3. Simple Upholstered Plywood Headboard
Cut a sheet of plywood to your desired size, add foam and batting, then wrap everything in fabric and staple on the back. It’s one of the most classic DIY headboard ideas and can be done with budget fabric, a thrifted curtain panel, or even a canvas drop cloth for a casual, linen-inspired look.
4. Tufted DIY Headboard with Buttons
Take that upholstered plywood to the next level by adding tufting. Use a needle and upholstery thread to pull through covered buttons, creating cozy dimples. This gives a high-end, hotel vibe without the high-end price tag.
5. Channel-Tufted Wall Panels
Instead of classic diamond tufting, make long rectangular cushions and mount them vertically or horizontally on a plywood backing. Channel tufted headboards feel very modern and luxeespecially in velvet or faux leatherand you can build them with simple rectangular pieces.
6. Fabric-Wrapped Foam Tiles
Cut foam into squares or rectangles, wrap each in fabric, and attach them directly to the wall with removable strips or screws. Arrange them in a grid for a modular, geometric headboard that can be easily reconfigured or replaced if you change your color scheme.
7. Pegboard Headboard with Storage
Attach a large sheet of pegboard behind your bed, then paint it to match the room. Add hooks, shelves, or baskets for plants, books, or bedside essentials. It’s a functional and budget-friendly headboard that works especially well in small bedrooms.
8. Shiplap-Style Wood Plank Headboard
Use inexpensive pine boards or tongue-and-groove planks to build a wide, horizontal headboard. Stain it for a rustic farmhouse look or paint it white for coastal vibes. This style adds texture and warmth without feeling fussy.
9. Vertical Wood Slat Wall
Thin, vertical slats mounted behind the bed create a sleek, Scandinavian-inspired headboard. Space them evenly with a small gap in between, and stain them natural or dark for contrast. If you run them up to the ceiling, your room will instantly feel taller.
10. Pallet Wood Headboard (With Prep!)
Reclaimed pallets can become a charming headboard if you deconstruct them carefully, sand thoroughly, and seal the wood. Mix different boards for a patchwork, rustic look. Just be sure the wood is clean, dry, and free of chemicals before putting it in your bedroom.
11. Upholstered Headboard with Nailhead Trim
Create a classic silhouettearched, wingback, or simple rectangleand finish the edges with nailhead trim. You can use nailhead strips to get the look without having to hammer in each piece individually.
12. Inexpensive Drop Cloth Headboard
Canvas drop cloths are a DIY favorite: they’re big, sturdy, and cheap. Use one to upholster a headboard, creating casual folds and texture. Leave it natural for a neutral look or dye it for a softer color.
13. Curtain Rod and Fabric Headboard
Install a curtain rod above your bed and hang a pair of curtain panels, a tapestry, or a length of fabric. You can swap the fabric out seasonally or whenever you get bored. It’s one of the easiest renter-friendly headboard ideas around.
14. Tapestry or Woven Wall Hanging Headboard
Hang a tapestry, woven wall hanging, or macramé piece behind the bed. It adds boho texture and a soft backdrop. Layer fairy lights or a slim picture light above to highlight the texture.
15. Rug-on-the-Wall Headboard
Mount a lightweight rug or kilim on a rod or directly onto the wall behind your bed. Flat-woven rugs work best and instantly bring pattern and color to a neutral room.
16. Old Door Turned Headboard
Flip a vintage panel door horizontally, sand it, and repaint or stain it. Attach legs or mount it directly to the wall. The panels become built-in framing details, and you get tons of character for very little cost, especially if you source the door secondhand.
17. Reclaimed Shutter Headboard
Line up several old shutters side by side and secure them together. Paint them all one color for a cohesive cottage look, or lean into the mismatched patina for a charming, collected feel.
18. Bookcase or Shelf Headboard
Place a narrow bookcase or a row of wall-mounted shelves behind the bed so that the vertical section acts as a headboard. Style it with books, baskets, and decor. This is especially great for small bedrooms where every inch of storage matters.
19. Picture Ledge & Gallery Wall Headboard
Install one or two picture ledges behind the bed and layer framed art, family photos, or prints on top. The art becomes your “headboard” while the ledges make it easy to swap pieces without new holes in the wall.
20. Oversized Single Art Piece Headboard
Skip the traditional headboard and hang one large piece of art at bed height. Go for something bold and graphic or soft and calmingeither way, it sets the mood for the entire room.
21. Painter’s Tape Graphic Headboard
Use painter’s tape to outline stripes, chevrons, or geometric shapes on the wall, then fill them in with paint. Peel off the tape to reveal crisp lines and a modern DIY headboard that looks much more expensive than it was.
22. Decal or Wallpaper Panel Headboard
Apply peel-and-stick wallpaper or decals inside a defined rectangle behind your bed. This adds pattern and color without a single nail, and you can remove or change it easily when your style evolves.
23. Cane or Rattan Screen Headboard
Fold a cane room divider or rattan screen behind the bed for an instant airy headboard. You can secure it to the wall or to the frame so it doesn’t wobble. The natural texture pairs beautifully with linen bedding and plants.
24. Upholstered Headboard Using a Room Divider
Take a folding screen, add foam and fabric to each panel, and you’ve got a tri-fold upholstered headboard. It’s easy to move, so it’s ideal for renters or frequent rearrangers.
25. DIY Upholstered Panel Squares with Wood Frames
Build simple square frames, add foam and fabric, then mount them in a grid or staggered pattern. The wood frame edges stay exposed for a tailored, modern look, and you can mix fabrics for a subtle patchwork.
26. Live-Edge Slab Headboard
If you can find an affordable live-edge slab, mount it horizontally behind your bed as a natural, sculptural headboard. Seal the wood and let the organic shape be the star. Pair it with simple bedding so the wood can shine.
27. Plywood Cut-Out Shape Headboard
Cut a large shapearched, wavy, or scallopedfrom plywood. Sand and paint it in a fun color. This is a great way to get those trendy curved silhouettes without paying custom prices.
28. Chalkboard or Dry-Erase Headboard
Paint a section of wall or a piece of MDF with chalkboard paint and frame it out. You can doodle quotes, reminders, or seasonal art. If chalk dust isn’t your thing, try a whiteboard or glass board instead.
29. String Light Headboard Outline
Use wall-safe hooks or small nails to outline a simple headboard shape with string lights. It’s whimsical, perfect for teens or guest rooms, and adds soft ambient light before bed.
30. Upholstered Headboard with Built-In Ledge
Mount a shallow shelf just above a padded headboard. It gives you a spot for artwork, plants, or a reading light while the upholstered section keeps things comfortable when you sit up in bed with a book.
31. Plywood + Fabric Slipcover Headboard
Make a basic plywood headboard and sew a simple slipcover that fits over it, like a pillowcase. When you’re ready for a refresh, you can make new covers without rebuilding the structure.
32. Completely No-Headboard Headboard (Styled Wall)
Technically, this one is a cheatbut it still works. Skip an actual headboard and style the wall instead: paint a bold color, hang art at bed height, add sconces, and stack pillows. You’ll get the visual impact of a headboard without building anything at all.
Care & Maintenance Tips for DIY Headboards
Once you’ve built your dream headboard, keep it looking fresh:
- Vacuum fabric regularly with an upholstery attachment to remove dust and lint.
- Spot-clean upholstery with mild soap and water or a fabric-safe cleanertest in a hidden spot first.
- Wipe down wood and painted surfaces with a soft, damp cloth to prevent buildup.
- Use removable covers or pillow protectors if you lean against the headboard often with hair products or skincare on.
Real-Life DIY Headboard Experiences & Lessons Learned
Turning headboard inspiration into reality always comes with a few surprises. Here are some experience-based tips and “wish I’d known that sooner” lessons that can help your low-cost bedroom refresh go smoother.
1. Comfort Matters More Than Instagram
It’s tempting to pick the most photogenic design, but think about how you actually use your bed. If you love reading or scrolling at night, something cushionedupholstery, fabric panels, or a rug-backed headboardwill be much kinder to your spine than a bare board. Many DIYers start with a full-wood design and end up adding cushions later because leaning against hard surfaces gets old fast.
2. Fabric Choice Is a Big Deal
That lush velvet or creamy linen may look incredible, but ask a few practical questions:
- Do I have pets that will shed or scratch?
- Do I drink coffee in bed (and occasionally spill it)?
- Is my room naturally dusty or near an open window?
Performance fabrics, darker colors, or subtle patterns will hide everyday smudges far better than crisp white cotton. Many DIYers report that mid-tone fabricsthink mushroom, slate blue, or warm taupeage the best, staying attractive between full cleanings.
3. The “Cheap” Part Comes from Planning, Not Just Price Tags
It’s absolutely possible to make a headboard for under $30–$50 if you plan well: use one big sheet of plywood instead of multiple cuts, choose fabric that doesn’t require pattern-matching, and shop your home or thrift stores before buying new. The budget often blows up when you make lots of small unplanned trips to the hardware store for extra screws, brackets, or tools you didn’t think about.
A helpful strategy is to list everything you’ll needincluding sandpaper, staples, wall anchors, and mounting hardwareand total it up before you start. That way you can tweak the design or scale down the size to stay within your target budget.
4. Mounting Is Half the Project
One of the most common pain points people share about DIY headboards isn’t building the pieceit’s attaching it safely. For wall-mounted designs, always use proper anchors or find studs with a stud finder, especially for heavy wood or upholstered panels. If you’re renting and can’t make large holes, consider designs that sit directly on the bed frame or use legs that wedge between the wall and the frame.
An easy approach: build the headboard so it bolts directly to your existing metal bed frame using its pre-drilled holes. This avoids drilling into the wall at all, while still feeling solid.
5. Test Height and Layout Before You Commit
Before you cut wood or paint the wall, mock up your headboard with painter’s tape, cardboard, or even a bedsheet taped to the wall at the planned height. Sit up in bed with your usual stack of pillows and see where your shoulders land. This five-minute test can save you from ending up with a headboard that’s either too low (and gets hidden by pillows) or too high (and looks disproportionate).
6. Lighting and Outlets Can Surprise You
When you’re in DIY tunnel vision, it’s easy to forget the practical details behind the bed. Make sure your headboard design doesn’t block outlets, wall switches, or existing sconces. If you’re planning to add reading lights, think through wire management before attaching anything permanentlynothing ruins a beautiful headboard faster than a tangle of visible cords.
7. Embrace ImperfectionIt’s Part of the Charm
DIY projects have a way of refusing to be perfect. A seam might be slightly off, a board may have a knot, or your arch might not be mathematically flawless. That’s okay. Most people who’ve lived with their DIY headboards for a while say they stop noticing tiny imperfections within a weekbut they keep feeling proud that they created something custom with their own hands.
If you go in expecting “beautiful and unique” instead of “factory perfect,” you’ll enjoy the process and the final result much more.
8. Start Simple, Then Upgrade
If you’re new to DIY, begin with one of the easier optionsa painted faux headboard, curtain rod and fabric, or simple upholstered rectangle. Once your confidence grows, you can always add trim, tufting, built-in shelves, or bigger shapes later. Bedrooms evolve over time; your headboard can, too.
Final Thoughts
A DIY headboard is one of the fastest ways to give your bedroom a low-cost refresh with big visual impact. Whether you’re working with leftover paint, a thrifted door, or a few yards of fabric, you can create a focal point that reflects your style, fits your budget, and makes your bed feel like a destinationnot just the place you crash at the end of the day.