Table of Contents >> Show >> Hide
- Before You Build: The Big Safety Reality Check
- Project Overview: What You’re Building
- Planning Your Layout Like a Pro (So You Don’t Rebuild It Later)
- Materials & Tools (Built for Strength, Not Wishful Thinking)
- Step-by-Step: Build the Pergola for Swings (The Main Event)
- Step 1: Mark the footprint and square it
- Step 2: Call 811 and mark your dig points
- Step 3: Dig footings below frost depth (and pour solid piers)
- Step 4: Set posts plumb and brace them
- Step 5: Install the main beams (the “don’t mess this up” layer)
- Step 6: Add knee braces for sway control
- Step 7: Install rafters and shade slats
- The Swing Beam: How to Hang Swings Safely (And Sleep at Night)
- Build a Fire Pit Zone That’s Cozy (Not Chaos)
- Fire Pit Pergola Design Options (Pick Your Risk Level Wisely)
- Finishing Touches That Make It Look “Magazine-Worthy”
- Maintenance Checklist (Because Outdoor Builds Don’t Maintain Themselves)
- FAQ: Quick Answers Before You Grab the Post Hole Digger
- of Real-World “Experience” (What DIYers Learn the Hard Way)
- Wrap-Up: Your Backyard’s New Favorite Destination
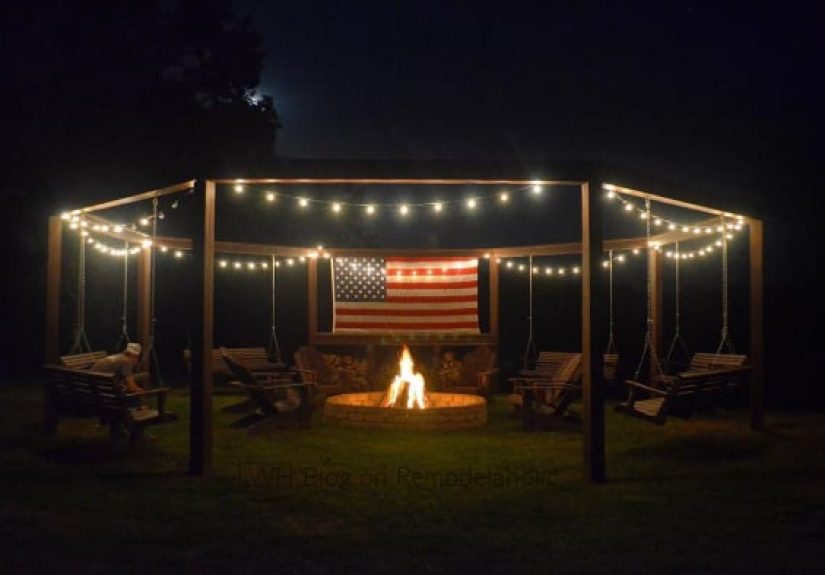
Picture this: a couple of porch swings gently rocking, a warm glow from a fire feature nearby, and youliving your best “I totally built this” backyard life. A DIY fire pit pergola for swings is one of those projects that looks fancy (read: expensive) but is absolutely doable with careful planning, solid footings, and hardware that isn’t pretending to be strong.
This guide walks you through a sturdy, good-looking pergola designed specifically to support swings and frame a fire pit hangout zone. We’ll cover layout, materials, build steps, and the unglamorous-but-critical stuff like fire clearance, footing depth, wind bracing, and why “close enough” is not a structural engineering strategy.
Before You Build: The Big Safety Reality Check
A lot of people search “fire pit pergola” and imagine a fire roaring directly under a wood structure. In many places, that’s a no-go. Fire codes and local ordinances often require recreational fires to be well away from combustible structures. Translation: your pergola (wood) and your open flame (fire) need some personal space.
Smart approach: build the pergola as the swing lounge and set the fire feature outside the pergola footprint at a code-friendly distance. If you want flame closer, consider a listed gas fire table or a portable outdoor fireplaceand still follow local rules and manufacturer instructions.
Project Overview: What You’re Building
- A freestanding pergola (post-and-beam style) designed for real swing loads
- Two swings (or one swing + one hammock chair) hung from a reinforced swing beam
- A fire pit zone nearby with a noncombustible base and a comfortable seating radius
- A cohesive “outdoor room” that looks intentional, not “I had leftover lumber and feelings”
Planning Your Layout Like a Pro (So You Don’t Rebuild It Later)
1) Pick a pergola size that fits swings comfortably
For two standard porch swings (4–5 ft wide each), a pergola around 12′ x 16′ is a practical starting point. You want clearance so chains don’t rub posts, elbows don’t collide with beams, and nobody gets launched into landscaping when a kid decides the swing is actually a carnival ride.
2) Decide where the fire feature goes
Design the pergola first, then “float” the fire pit location where it’s safe and comfortable. A common comfort layout:
- Swings face the fire feature, not directly over it
- Walking lanes stay clear (no one should have to shuffle sideways with a plate of hot dogs)
- Wind direction matters (smoke has a talent for finding your favorite hoodie)
3) Check permits, HOA rules, and utility lines
Many areas require permits for new structures, especially if you’re setting posts in concrete. And before digging, contact your local utility locate service (811) so you don’t turn “DIY pergola” into “DIY neighborhood blackout.”
Materials & Tools (Built for Strength, Not Wishful Thinking)
Lumber options
- Posts: 6×6 pressure-treated (ground-contact rated if embedded) or cedar with proper bases
- Main beams: double 2×10 or double 2×12 (depends on span, load, and design)
- Rafters: 2×6 (decorative end cuts optional but highly satisfying)
- Purlins/shade slats: 2×2 or 2×3 (or skip for an airier look)
Hardware (don’t cheap out here)
- Concrete + sonotubes (or approved pier forms)
- Post bases/anchors (or embedded post method where permitted)
- Structural screws/bolts, washers, and nuts (rated for exterior use)
- Joist hangers/angles/straps for clean, strong connections
- Swing hangers rated well above expected loads (dynamic loads are higher than body weight)
Fire pit zone materials
- Gravel base (compacted)
- Pavers or retaining wall blocks
- Fire ring insert (recommended for durability and safety)
- Heat-resistant leveling sand / polymeric sand (as appropriate)
Tools
- Post hole digger or power auger
- Level (4′ is your best friend)
- String lines, stakes, measuring tape
- Circular saw / miter saw
- Impact driver + drill bits
- Socket wrench set for bolts
- Shovel, tamper, wheelbarrow
Step-by-Step: Build the Pergola for Swings (The Main Event)
Step 1: Mark the footprint and square it
Set stakes at the corners and run string lines. Measure diagonals corner-to-corner; when both diagonals match, your layout is square. This step feels slow. It is also the step that prevents your pergola from looking like it was built during an earthquake.
Step 2: Call 811 and mark your dig points
Do this before you dig. Not after. Not “once I’m already halfway committed.” Mark post locations and confirm they’re aligned with your swing spacing plan.
Step 3: Dig footings below frost depth (and pour solid piers)
Footings typically need to be below local frost depth and on undisturbed soil. Use sonotubes, level the top of forms, and brace them so they don’t shift during the pour.
- Place gravel at the bottom if needed for drainage (site-dependent)
- Pour concrete, check level, and set post base anchors while wet (if using cast-in-place bases)
- Allow full cure time before loading the structure
Step 4: Set posts plumb and brace them
Install 6×6 posts into post bases (or as your engineered plan specifies). Use temporary diagonal braces so each post stays perfectly plumb while you build the top structure. If a post is off now, it will be off foreverlike a tattoo of regret, but made of wood.
Step 5: Install the main beams (the “don’t mess this up” layer)
For strength, many pergola builds use double beams bolted to posts. Lift beams into position, clamp, pre-drill, and bolt with washers. Keep beam height consistent by marking your posts and measuring twice.
Step 6: Add knee braces for sway control
Swings create lateral movement. Wind does too. Knee braces (45-degree braces between posts and beams) dramatically increase stiffness and help prevent racking. Think of them as the “core workout” your pergola didn’t know it needed.
Step 7: Install rafters and shade slats
Set rafters across beams at consistent spacing. Add decorative cuts if you want that polished pergola look. Then install purlins/shade slats if desired for partial shade, string lights, or climbing plants (the ones that behave… if such a plant exists).
The Swing Beam: How to Hang Swings Safely (And Sleep at Night)
Choose a swing layout
- Two swings facing the fire feature: classic, social, photogenic
- One swing + one hammock chair: great for mixed seating styles
- One large swing bed: maximum lounging, maximum “do not disturb” energy
Reinforce where the swings hang
Swings introduce dynamic loads (motion amplifies force). Build in reinforcement:
- Use a dedicated swing beam sized appropriately for span and load
- Add blocking/lamination where hangers attach
- Use through-bolts where possible instead of relying only on screws
Install swing hangers and test progressively
Follow the hanger manufacturer’s instructions. Then test smart:
- Hang the swing without anyone on it and check level
- Add weight gradually (bags of sand work great)
- Gently push and watch for movement, creaks, or hardware shifting
- Only then let a human hop on and start living their porch-swing dreams
Build a Fire Pit Zone That’s Cozy (Not Chaos)
Build a noncombustible base
Whether you go in-ground or above-ground, a stable, compacted base matters. A common approach is excavating and adding compacted gravel, then setting blocks/pavers level. Avoid materials that can trap moisture and crack or pop under high heat.
Keep spacing comfortable
Plan for a safe, practical radius around the fire feature:
- Room to walk around without bumping knees
- Space for a spark screen, tools, and a water bucket or extinguisher
- Seating placed so faces feel warm, not roasted
Fire Pit Pergola Design Options (Pick Your Risk Level Wisely)
Option A: Code-friendly “nearby fire pit” layout
The pergola is your swing lounge, and the fire pit sits outside the pergola footprint at a safe distance. This is the most broadly compatible design with typical fire code language and local ordinances.
Option B: Gas fire table with manufacturer-approved clearances
If you want flame closer to the pergola, a listed gas fire table may be an option if your local code allows it and you follow all clearance requirements. Do not freestyle this partfire doesn’t reward creativity.
Finishing Touches That Make It Look “Magazine-Worthy”
- Lighting: string lights, sconces on posts, or low-voltage path lights
- Heat + comfort: outdoor pillows (stored dry), throw blankets, side tables
- Privacy: slat wall, curtains, or tall planters
- Weatherproofing: stain/sealant appropriate for your wood species
Maintenance Checklist (Because Outdoor Builds Don’t Maintain Themselves)
- Inspect swing hangers and bolts monthly at first, then seasonally
- Tighten hardware as needed (wood can shrink/swell with weather)
- Re-seal or re-stain every couple of years depending on exposure
- Keep the fire area swept clear of leaves and debris
FAQ: Quick Answers Before You Grab the Post Hole Digger
Do I need a permit?
Often, yesespecially for structural posts set in concrete. Always check local requirements.
Can I build this on an existing patio?
Yes, with appropriate anchors and a plan for footings (some builds core-drill and pour piers). The key is that posts must be securely connected to a structure that can handle the loads.
What’s the best wood?
Cedar looks great and resists rot, while pressure-treated lumber is budget-friendly and tough. Either way, match your fasteners/connectors to your lumber type and exposure conditions.
How far should the fire pit be from the pergola?
Many jurisdictions follow fire code language requiring significant separation from combustible structures. Use your local ordinance as the rule, then design for comfort and prevailing wind on top of that.
of Real-World “Experience” (What DIYers Learn the Hard Way)
When people build a fire pit pergola for swings, the first surprise is almost always the same: the planning takes longer than expected. Not the cutting. Not the drilling. The planning. You’ll spend an entire evening moving stakes around the yard like you’re directing a tiny outdoor theater production“No, the swing needs to face the sunset… but also not face the neighbor’s recycling bins.” That time is not wasted. The layout decisions you make up front determine whether your finished space feels like a backyard resort or a mildly confusing lumber museum.
The second thing DIYers often notice is how quickly “a pergola” becomes “a structural project” once you add swings. A standard shade pergola can sometimes get away with lighter framing. A swing pergola cannot. People commonly report that the moment they hang the first swing, they become hyper-aware of movementtiny wiggles, faint creaks, a suspicious vibration that makes them stare at a bolt like it just insulted their family. The good news is that most of this is solved by bracing (knee braces are magic) and by using proper hardware installed correctly. The not-so-good news is that if you skipped those things, your pergola will remind you every time someone swings with enthusiasm.
Then there’s the fire pit “vibe check.” Many homeowners imagine the fire feature as the center of everything, but in practice, the best setups respect two truths: smoke follows feelings, and wind changes its mind constantly. DIYers who place the fire pit slightly off-centerso people can rotate seating, adjust for wind, and avoid direct smoketend to use the space more often. And the ones who add a simple wood storage spot, a poker tool hook, and a dedicated place for a spark screen feel like geniuses by week two.
Comfort tweaks become the unexpected winners. People often say the “small” add-ons made the biggest difference: a tiny side table for drinks, a low-voltage path light so nobody trips, and cushions that are actually outdoor-rated (because soggy pillows are the enemy of joy). One common lesson: plan a dry storage solution earlydeck box, storage bench, or even a waterproof binbecause you will absolutely forget to bring the cushions in “just this once,” and weather will treat that as a personal invitation.
Finally, DIYers frequently mention how satisfying the first real evening feelswhen everything is tightened, the swings hang level, the lights turn on, and the space works the way you pictured. It’s the kind of project where you’ll catch yourself saying, “We should do this every weekend,” even though you know you’ll still be finding sawdust in your socks next month. But that’s part of the charm: you didn’t just build a pergola. You built a backyard ritual.
Wrap-Up: Your Backyard’s New Favorite Destination
A DIY fire pit pergola for swings is equal parts structure and experience. Build it strong, space it safely, and finish it like you mean it. Do that, and you’ll have a backyard feature that pulls people outsidewhether it’s for marshmallows, morning coffee, or a quiet five-minute swing break you definitely earned.