Table of Contents >> Show >> Hide
- What “Built-In” Really Means (And Why It Looks So Good)
- Choose Your Path: Three Ways to Get the Built-In Look
- Plan First, Demo Never: Layout Decisions That Make It Look Custom
- Safety Stuff (Because “Built-In” Shouldn’t Mean “Built to Burn”)
- Materials That Sell the Built-In Illusion
- Design Tricks That Make a Freestanding Grill Look Built In
- A Practical Example: A Rolling Grill Station That Still Looks Permanent
- DIY Weekend Blueprint: Faux Built-In Surround for a Freestanding Grill
- Details That Make It Look Like a Pro Did It
- Cost Reality: What You Might Spend (and Why)
- Maintenance Tips: Keep It Looking Built In (Not Beat Up)
- Wrap-Up: Built-In Style Without the Built-In Stress
- Experience Section: What People Learn After They “Just Build a Simple Grill Island” (About )
A freestanding grill is a beautiful thing… until it’s sitting out on your patio like a lonely metal suitcase,
begging for a place to land the tongs. If you’ve ever tried to prep burgers on a wobbly TV tray while
your grill cart door keeps bonking your knees, congratulations: you’re ready for the “built-in” look.
The good news? “Built-in” doesn’t have to mean “new kitchen addition, please send invoices.”
With smart planning, the right materials, and a few optical illusions worthy of a stage magician,
you can make your grill look like it was always meant to live therecustom, cohesive, and
conveniently surrounded by actual workspace.
What “Built-In” Really Means (And Why It Looks So Good)
A built-in grill setup usually includes a fixed island or run of cabinetry with a countertop, storage,
and an opening sized for a grill head (or a “parking spot” for a freestanding grill). Visually, it works
because everything lines up: consistent counter height, finished sides, concealed tank or gas line,
and a layout that feels intentional instead of improvised.
Practically, it’s a big upgrade in how you cook. Outdoor kitchens are all about workflow:
prep space next to heat, storage within arm’s reach, and a “landing zone” for hot trays that isn’t
your neighbor’s patio chair.
Choose Your Path: Three Ways to Get the Built-In Look
1) The True Built-In Island (Grill Head + Permanent Structure)
This is the classic outdoor kitchen move: a built-in grill head dropped into a noncombustible island
with access doors, vents, and countertop. It’s the cleanest look and often the most durableespecially
if you’re planning for years of weekly grilling (and the occasional heroic Thanksgiving turkey attempt).
2) The “Faux Built-In” Surround (Your Freestanding Grill, Upgraded)
If you already own a perfectly good grill, you can still get the built-in vibe by creating a surround:
a countertop that spans beside (or even partially over) your grill cart, plus finished side panels and a
back wall/backsplash that visually anchors the station. Think: “custom grill nook,” not “temporary parking.”
3) Modular Outdoor Cabinets (Fast, Flexible, Surprisingly Polished)
Modular systems are the grown-up version of building blocks: pre-made cabinets that line up to create
an island, often with grill cutouts, storage, and utility drawers. This route can look extremely high-end
when you keep finishes consistent and plan the layout like a real kitchen.
Plan First, Demo Never: Layout Decisions That Make It Look Custom
The built-in effect starts before you buy a single stone veneer panel. A gorgeous island in the wrong spot
is still… in the wrong spot. Here’s what to map out:
- Traffic flow: Keep the cooking zone out of the main walkway. Nobody wants to sidestep a grill lid mid-flip.
- Wind direction: If your patio turns into a wind tunnel, smoke will follow your guests like a dramatic movie villain.
- Sun exposure: Grilling at high noon can feel like cooking inside a toaster. A bit of shade goes a long way.
- Proximity to the house: Close enough for easy trips inside, far enough to keep smoke from drifting into open doors.
- Utilities: Decide early if you’re staying with propane, running natural gas, or adding electrical outlets and task lighting.
Safety Stuff (Because “Built-In” Shouldn’t Mean “Built to Burn”)
Outdoor kitchen projects look simple on social media because nobody posts the part where they read
installation manuals and learn new feelings about clearance requirements. But this is the part that keeps
your setup safeand keeps your grill working the way the manufacturer intended.
Clearances: Give Heat the Space It Deserves
Grills produce intense heat, and built-in structures can trap it. That’s why manufacturers specify
minimum clearances from combustible materials and sometimes require noncombustible construction
around the grill cutout. These numbers vary by model, so the rule is:
follow your specific grill’s installation manualeven if your neighbor insists “it’s probably fine.”
In practice, many manuals specify clearance zones measured from the cookbox or the grill’s edges,
and some built-in guides call out minimum distances in the range of roughly
18–24 inches from combustibles (again: check your manual for the exact requirement).
The goal is to prevent heat damage and reduce fire risk.
Ventilation: Your Island Needs to Breathe
If a gas grill lives inside an enclosure, ventilation is not optional décor. Proper venting helps prevent
heat buildup and reduces the risk of gas accumulating inside the island.
- Propane (LP) is heavier than air, so vent openings are typically placed low on the enclosure.
- Natural gas is lighter than air, so venting strategy can differ, often favoring higher vent placement.
- Use purpose-made vent panels sized appropriately for your island and grill configuration.
Access and Service: Don’t Seal Up the Stuff You’ll Eventually Need
Built-in-looking doesn’t mean “entombed forever.” Plan for access doors and service clearances so you can:
shut off gas, inspect connections, clean out grease, and repair components without turning your island into a demolition project.
And if you’re running a new gas line, consider hiring a licensed professional. It’s one of those upgrades
where “peace of mind” is a feature, not a slogan.
Materials That Sell the Built-In Illusion
The secret sauce is consistency. When the counter, cladding, and hardware look intentional, your grill
stops looking like an appliance and starts looking like part of a designed outdoor room.
Framing Options
- Concrete block (CMU): Durable, noncombustible, and great for stone veneer or stucco finishes.
- Metal studs: A popular choice for outdoor kitchen frames; stable and compatible with cement board.
- Treated wood: Sometimes used for portions of structures, but requires extra attention to heat protection, liners, and clearances.
Cladding That Looks Custom (and Doesn’t Hate Weather)
- Stone veneer: Instant “architect-designed patio” energy. Also hides minor sins like uneven framing.
- Stucco: Clean, modern, and great for Mediterranean or contemporary homes.
- Tile: Best as accents (backsplash, counter edge) unless you’re committed to grout maintenance.
Countertops Built for Real Life
Outdoor counters need to handle heat, weather, and spills. Popular choices include granite, concrete,
and outdoor-rated porcelain. Concrete can be a DIY-friendly option and gives that seamless, custom look
when finished well. (Bonus: it makes your grill station look like it belongs in a magazine spread titled
“People Who Definitely Have Their Lives Together.”)
Design Tricks That Make a Freestanding Grill Look Built In
If you’re keeping your current grill cart, you’re going for a “built-in look,” not a “built-in lie.”
The goal is to visually integrate the grill into a station so it feels intentional. Try these tactics:
Match Counter Height and Create a Continuous Run
Most outdoor kitchen counters land around standard kitchen height. The closer your countertop aligns
with the grill’s side shelves (or the grill lid clearance), the more seamless it looks. A continuous counter run
next to the grill instantly reads “built-in,” even if the grill can still roll.
Add Finished Side Panels (The “No More Exposed Cart” Move)
Exposed wheels and a dangling propane tank scream “portable.” Cover the sides with panels that match
your island finishstone veneer, stucco, or even weatherproof composite panelsleaving clearance for airflow
and access where needed.
Give It a Back Wall or Backsplash
A short backsplash in matching stone or tile makes the station feel anchored. It also protects your home’s
siding and keeps grease splatter from becoming a modern art installation.
Hide the Visual Clutter
Route hoses neatly, choose matching hardware, and add an access door for fuel storage (where appropriate).
The more “stuff” you conceal, the more built-in it feels.
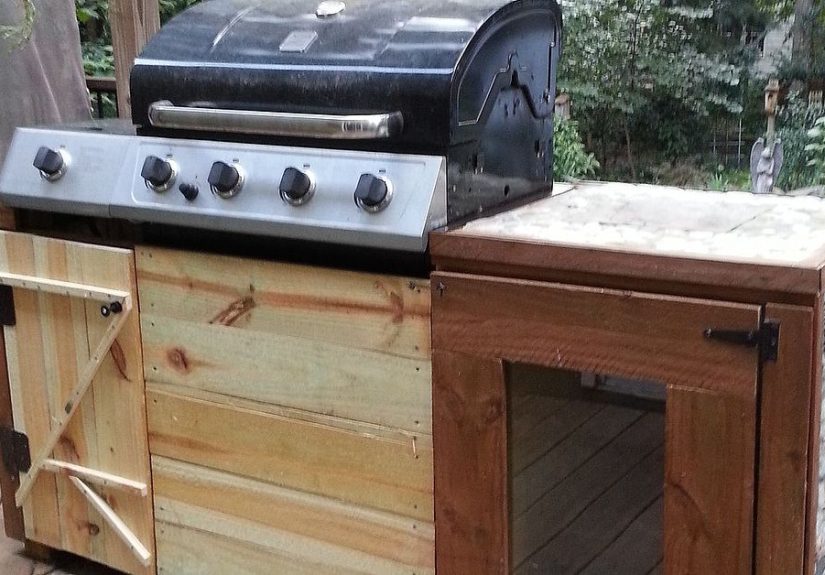
A Practical Example: A Rolling Grill Station That Still Looks Permanent
One popular DIY approach is building a grill station with a sturdy frame, a concrete (or stone-look) countertop,
and storage belowsometimes even mounted on wheels so you can reposition it. The trick is making the
station look architectural: square corners, consistent materials, and a countertop that looks like it belongs
next to the grill, not like it wandered over from a laundry room.
You get the built-in aesthetic, plus flexibility for cleaning, seasonal storage, or rearranging your patio layout.
It’s the outdoor-kitchen equivalent of wearing a blazer with sneakers: polished, but still practical.
DIY Weekend Blueprint: Faux Built-In Surround for a Freestanding Grill
Here’s a realistic path that can dramatically upgrade the look without committing to full masonry:
- Measure everything twice: Grill width, lid opening arc, side shelf clearance, and hose routing.
- Pick your “station footprint”: Decide how much counter space you want on each side (at least one decent prep zone).
- Build a sturdy base: Use weather-rated framing methods and sheathing appropriate for outdoor use.
- Create the counter span: Leave safe clearances around the grill and plan for heat-resistant surfaces.
- Add side and front panels: Finish them to match your patio stylestone veneer, stucco, or outdoor-rated panels.
- Plan ventilation: If any enclosure surrounds gas components, include proper venting.
- Install storage: Add shelves, drawers, or access doors where they won’t interfere with heat or service needs.
- Finish with “built-in cues”: Matching hardware, consistent lines, task lighting, and a clean backsplash.
Details That Make It Look Like a Pro Did It
- Repeat materials: Match your countertop tone with pavers, a nearby bar top, or a patio seat wall.
- Add lighting: Under-counter lights or a simple overhead fixture makes the station feel “room-like.”
- Create a trash solution: A hidden bin is a luxury you’ll appreciate every single cookout.
- Include a landing zone: A heat-safe spot for trays prevents the “where do I put this?” dance.
- Think seating: Even one overhang with two stools turns the grill into an entertaining hub.
Cost Reality: What You Might Spend (and Why)
Costs vary wildly based on materials, utilities, and whether you’re building a permanent island or a surround:
- Faux built-in surround: Often the most budget-friendly path, especially if you keep your existing grill and focus on panels + counter space.
- Modular cabinets: Mid-range to higher-end depending on materials and appliance add-ons.
- Full masonry island with built-in grill head: Typically the biggest investment, especially if you add gas lines, electrical, and premium counters.
If you’re adding a gas line, electrical outlets, or anything that needs permitting in your area,
budget for professional help. It can cost more upfrontbut it’s often cheaper than “fixing it later.”
Maintenance Tips: Keep It Looking Built In (Not Beat Up)
- Clean stainless regularly: Wipe with the grain, avoid harsh abrasives, and keep salty air and grease from camping out on surfaces.
- Protect countertops: Use trivets for hot pans and seal porous materials like concrete as recommended.
- Don’t ignore vents: Keep vent openings clear of spider webs, leaves, and the mysterious mulch migration of spring.
- Cover smartly: Use a quality cover that fits your setup without trapping moisture like a raincoat made of cling wrap.
Wrap-Up: Built-In Style Without the Built-In Stress
Making your grill look built in is really about designing a “home base” for outdoor cooking:
a station with clean lines, useful workspace, and finishes that match your patio like they were planned together.
Whether you build a full island or create a surround for a freestanding grill, the winning formula stays the same:
plan for workflow, respect safety clearances and ventilation, and use consistent materials that can handle weather.
Do it right, and your grill stops being a standalone appliance and becomes the centerpiece of your outdoor hangout zone
the place where dinner happens, friends gather, and someone always says, “Okay, this is NICE.”
Experience Section: What People Learn After They “Just Build a Simple Grill Island” (About )
Most grill-island projects begin with pure optimism and a sketch that looks suspiciously like a rectangle labeled “GRILL.”
Then reality shows upusually carrying a tape measure and a strong opinion about wind.
One of the most common “aha” moments is realizing that the grill lid needs space to open without smacking a wall,
pergola post, or that cute backsplash you were so proud of. People often plan the footprint for the grill body,
not the choreography of actually using it: lid up, side shelves extended, trays moving in and out, someone standing nearby
asking if the burgers are “almost done.”
The next lesson is heat. Even when a finish looks ruggedstone veneer, tile, stuccoheat management still matters.
Many homeowners report that the first time they grill hard (think: searing steaks or running a rotisserie),
they notice hot spots in places they didn’t expect: inside doors, under counters, around trim pieces.
That’s usually when “decorative” becomes “functional,” and ventilation stops being a detail and starts being a priority.
Storage is another surprise. You think you need one drawer. Then you own: a grill brush, a spatula collection,
heat gloves, wood chips, skewers, a thermometer, foil, trays, rubs, sauces, and a lighter that vanishes like a magic trick.
People who love their built-in-looking stations almost always have one thing in common:
they planned at least one “junk” cabinet on purpose. It’s not junkit’s sanity.
A big, relatable moment happens with countertops. Folks imagine a gorgeous slab and then discover the daily reality:
hot pans, spilled marinades, sticky tongs, and the “where do I set this?” panic when food comes off the grill.
The happiest setups include a designated landing zone that’s heat-safe and easy to wipe down.
It sounds boring until you use it once and feel like a person with their life together.
Finally, there’s the entertaining factor. Many people start the project thinking it’s just about cooking,
but the station becomes a gathering magnet. Guests naturally hover near the grill, so layouts that include
a little bar ledge, a place to set a drink, or even just enough standing room feel far more “high-end.”
The best “built-in” look isn’t only visualit’s social. It makes the whole yard function better.
In other words: yes, the built-in aesthetic is great. But the real win is building a setup that works the way you
actually grillmessy, fun, and occasionally heroicwhile still looking like it belongs on your patio permanently.