Table of Contents >> Show >> Hide
- What Makes a Nature-Inspired “Trick Of The Eye” Food Actually Work?
- Core Tools and Edible “Art Supplies” (No Fancy Studio Required)
- 30 Nature-Inspired Trick-Of-The-Eye Foods (Entirely Edible, Entirely Sneaky)
- 1) Chocolate “Bark” Shards
- 2) Pebble Truffles
- 3) “Geode” Candy Rocks
- 4) Isomalt “Ice” Cubes
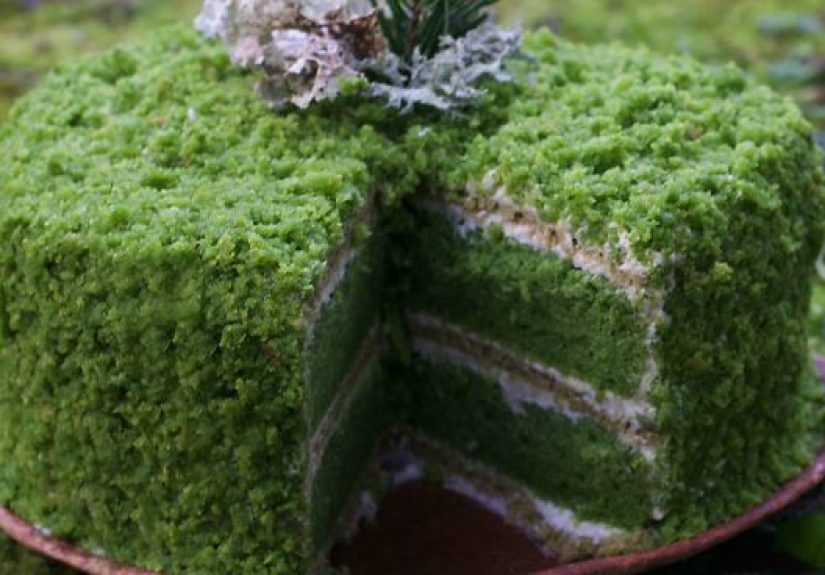
- 5) “Moss” Cupcake Tops
- 6) Mushroom Meringues
- 7) Chocolate “Soil” Dessert Cups
- 8) Citrus That Isn’t Citrus (Molded Fruit Illusions)
- 9) Strawberry “Stone” Cheesecake Bites
- 10) Seashell Chocolates with “Pearl” Centers
- 11) “Driftwood” Eclairs
- 12) Leaf Vein Cookies
- 13) “Acorn” Doughnut Holes
- 14) Pinecone Pastry Puffs
- 15) “Stone” Bread Rolls
- 16) Avocado That’s Actually Cake
- 17) “Riverbed” Panna Cotta
- 18) Coral Reef Cupcakes
- 19) “Cactus” Desserts
- 20) “Stone Fruit” Macarons
- 21) Mushroom “Log” Cake
- 22) “Volcanic Rock” Brownies
- 23) “Sand Dollar” Shortbread
- 24) “Birch Tree” Cake Slices
- 25) “Stone” Mochi
- 26) “Ladybug” Chocolate-Covered Strawberries (Nature’s Cutest Lie)
- 27) “Nest” Meringue Bowls
- 28) “Pine Needle” Focaccia
- 29) “Fallen Leaves” Pastry Chips
- 30) The Ultimate Illusion: “Rock Collection” Dessert Board
- How to Design Your Own Nature-Inspired Edible Illusion
- Serving and Photography Tips (Because These Deserve Proof)
- Common Mistakes (And How to Fix Them Without Crying)
- Extra : The Real “Experience” Behind Making Trick-Of-The-E-Eye Foods
- Conclusion
Warning: This article may cause harmless, snack-related confusion. You will look at a “rock,” feel proud of your outdoorsy instincts, and then realize it’s chocolate. That’s the whole point.
“Trick of the eye” food (also called trompe l’oeil) is culinary mischief with a delicious payoff: you make something that looks like it belongs on a hiking trail, in a tide pool, or under a mushroom log… but it’s 100% edible and usually 200% brag-worthy. It’s part art class, part pastry science, and part “Waitwhy is that pinecone on a dessert plate?”
Nature-inspired edible illusions work because our brains are lazy (affectionately). We recognize textures fastbark, stone, moss, pebbles, petalsso if you nail the surface, people will believe the illusion even before the first bite. The best versions don’t just look convincing; they also taste great, because nobody wants to be fooled into eating a “rock” that tastes like disappointment.
What Makes a Nature-Inspired “Trick Of The Eye” Food Actually Work?
1) Texture beats perfection
Real rocks aren’t smooth. Bark isn’t symmetrical. Leaves have veins and tiny tears. Great illusions copy those “imperfect” details on purpose: cracks, speckles, matte dusting, uneven edges, subtle color shifts.
2) Shape is the skeleton
Before you paint and decorate, you need a believable base form. In cake-art circles, makers often build shapes using sturdy, edible structures (think cereal-treat modeling or sculptable chocolate) so the final piece holds up while you detail it.
3) Color is the “believability tax”
Nature rarely uses one shade. A convincing “stone” usually needs at least three tones: a base color, a shadow color, and a highlight speckle. For edible color, stick to food-safe options and follow labeling rulesespecially if you’re serving others.
Core Tools and Edible “Art Supplies” (No Fancy Studio Required)
Edible building materials
- Modeling chocolate: Sculptable, tasty, and great for smooth surfaces like fruit skins, stones, and shells.
- Fondant: Great for clean coverage and crisp edges (and you can texture it with anything from a toothbrush to crumpled foil).
- Buttercream: Ideal for “moss,” bark ridges, and organic swirlsespecially if you want everything soft and sliceable.
- Isomalt sugar: Perfect for glassy water, ice, crystals, and translucent effects (humidity is the enemy).
- Chocolate: The MVP for bark, soil crumble, stones, driftwood, and glossy shellstempering helps it set with shine and snap.
Edible coloring and detail tools
- Cocoa butter colors / oil-based colors: Great for chocolate and glossy shells.
- Gel colors + vodka/extract: Quick edible “paint” for fondant and dry surfaces (the alcohol evaporates).
- Edible markers: Shockingly useful for tiny veins, speckles, and line work.
- Dusts (petal dust, cocoa, powdered sugar): Adds matte realismbecause real nature rarely looks like it’s been polished.
Reality check: safe handling matters
If you’re using color additives or specialty dusts, make sure they’re labeled as edible/food-safe (not just “non-toxic” or “decorative”). In the U.S., color additives used in foods are regulated, and labels must list certified colors when used. Keep your “art” delicious and safe.
30 Nature-Inspired Trick-Of-The-Eye Foods (Entirely Edible, Entirely Sneaky)
Below are 30 best-in-class ideas you can recreate or riff oneach one designed to look like something from the natural world, while staying fully edible. Consider this your menu of beautiful lies.
1) Chocolate “Bark” Shards
Looks like: Tree bark flakes. Tastes like: Chocolate with crunch. How: Spread tempered chocolate thin, drag a fork to make grooves, dust with cocoa for a matte finish.
2) Pebble Truffles
Looks like: River stones. Tastes like: Ganache truffles. How: Roll truffles irregularly, coat in cocoa + powdered sugar mix, add tiny speckles with edible paint.
3) “Geode” Candy Rocks
Looks like: Crystal geodes. Tastes like: Hard candy + chocolate. How: Mold a hollow “rock” shell in chocolate, fill with sugar crystals or rock candy shards, paint edges with metallic dust (edible).
4) Isomalt “Ice” Cubes
Looks like: Real ice. Tastes like: Sweet, clean sugar. How: Pour isomalt into cube molds, crack edges slightly for realism, store dry (humidity melts the magic).
5) “Moss” Cupcake Tops
Looks like: Forest moss. Tastes like: Cake + buttercream. How: Crumble green-tinted cake scraps or pistachio crumbs over frosting; add tiny “lichen” dots with white chocolate.
6) Mushroom Meringues
Looks like: Little woodland mushrooms. Tastes like: Crisp vanilla meringue. How: Pipe stems and caps, dust caps with cocoa for earthy realism.
7) Chocolate “Soil” Dessert Cups
Looks like: Potting soil. Tastes like: Oreo-cookie crumble or cocoa streusel. How: Layer mousse, then top with crumb “dirt” and a mint sprig “seedling.”
8) Citrus That Isn’t Citrus (Molded Fruit Illusions)
Looks like: Lemon/orange. Tastes like: Mousse entremet. How: Use a fruit-shaped mold, glaze for shine, then add “pores” with fine splatter painting.
9) Strawberry “Stone” Cheesecake Bites
Looks like: Pink granite pebbles. Tastes like: Strawberry cheesecake. How: Shape chilled cheesecake, coat with white chocolate tinted pale pink, speckle with darker pink dust.
10) Seashell Chocolates with “Pearl” Centers
Looks like: Shells. Tastes like: Filled bonbons. How: Mold shells in chocolate; add a glossy candy “pearl” or a round truffle.
11) “Driftwood” Eclairs
Looks like: Washed-up wood. Tastes like: Choux pastry + cream. How: Texture the glaze with streaky cocoa butter colors and a fine brush; add knots with darker tones.
12) Leaf Vein Cookies
Looks like: Pressed leaves. Tastes like: Butter cookies. How: Press a clean leaf into dough lightly (or emboss fondant), paint veins with edible color, dust edges for realism.
13) “Acorn” Doughnut Holes
Looks like: Acorns. Tastes like: Cake doughnuts. How: Dip tops in chocolate and roll in chopped nuts for the cap; add a tiny pretzel-stick “stem.”
14) Pinecone Pastry Puffs
Looks like: Pinecones. Tastes like: Chocolate pastry + almond. How: Snip almond slices into the surface like scales; dust heavily with cocoa.
15) “Stone” Bread Rolls
Looks like: Rustic rocks. Tastes like: Fresh bread. How: Coat shaped rolls with flour and bake for crackled “rock” crust; use charcoal powder carefully if you want gray tones.
16) Avocado That’s Actually Cake
Looks like: Avocado halves. Tastes like: Vanilla cake + mousse. How: Sculpt halves, cover in green-tinted fondant or chocolate, and add a round “pit” truffle.
17) “Riverbed” Panna Cotta
Looks like: Pebbles under water. Tastes like: Vanilla panna cotta. How: Add edible “stones” (dragees, jelly pebbles) and top with a clear gelatin layer.
18) Coral Reef Cupcakes
Looks like: Coral branches. Tastes like: Cake + sugar crunch. How: Pipe coral in stiff royal icing or use isomalt pulls; keep it airy and irregular.
19) “Cactus” Desserts
Looks like: Mini cactus garden. Tastes like: Cake + buttercream. How: Pipe cactus ribs in green buttercream, add “spines” with tiny sprinkles or thin chocolate lines.
20) “Stone Fruit” Macarons
Looks like: Apricots/peaches. Tastes like: Almond shells + filling. How: Airbrush or paint gradients; add a seam line and fuzzy dusting (edible) for realism.
21) Mushroom “Log” Cake
Looks like: A woodland log. Tastes like: Sponge + cream. How: Use bark-textured buttercream; add meringue mushrooms and crumb “soil.”
22) “Volcanic Rock” Brownies
Looks like: Lava stone. Tastes like: Fudgy brownies. How: Crackle the top, dust with cocoa, and drizzle a thin “lava” line of red-tinted glaze sparingly for drama.
23) “Sand Dollar” Shortbread
Looks like: Sand dollars. Tastes like: Buttery shortbread. How: Stamp a simple star/flower pattern; dust with powdered sugar for beachy matte texture.
24) “Birch Tree” Cake Slices
Looks like: Birch bark. Tastes like: Vanilla cake. How: White fondant with thin gray/black streaks and little “bark marks” drawn with edible marker.
25) “Stone” Mochi
Looks like: Smooth pebbles. Tastes like: Chewy mochi. How: Tint mochi lightly, then dust with toasted soybean powder or cocoa for a natural matte finish.
26) “Ladybug” Chocolate-Covered Strawberries (Nature’s Cutest Lie)
Looks like: Ladybugs. Tastes like: Strawberries + chocolate. How: Red coating, black dots, tiny white eyessimple, fast, and cartoon-cute.
27) “Nest” Meringue Bowls
Looks like: Bird nests. Tastes like: Crisp meringue + fruit. How: Pipe thin strands into a nest shape; fill with “eggs” (mini candy-coated chocolates or fruit spheres).
28) “Pine Needle” Focaccia
Looks like: A forest floor. Tastes like: Olive oil bread. How: Top focaccia with rosemary “needles,” flaky salt “minerals,” and thin sliced olives “stones.”
29) “Fallen Leaves” Pastry Chips
Looks like: Crispy autumn leaves. Tastes like: Flaky pastry + cinnamon sugar. How: Cut leaf shapes, bake until blistered, paint edges with warm-toned edible color.
30) The Ultimate Illusion: “Rock Collection” Dessert Board
Looks like: A geology display. Tastes like: Many tiny desserts. How: Mix pebble truffles, mochi stones, chocolate bark, “geodes,” and sugar “crystals” on a board with cocoa “soil.” People will take photos. Then they will take everything.
How to Design Your Own Nature-Inspired Edible Illusion
Step 1: Pick one natural reference photo
Choose a single reference: one rock, one mushroom, one leaf. Don’t combine five different photos at onceyou’ll end up making a “leaf-rock-mushroom” that looks like it escaped from a craft store aisle.
Step 2: Build the shape first
For sculpted desserts, start with a stable form: cake + frosting, cereal-treat modeling for structure, or modeling chocolate for smooth surfaces. Chill between steps so you’re sculpting, not smearing.
Step 3: Add texture intentionally
Texture tricks that read as “nature” instantly: crumpled foil impressions (stone), dragged fork lines (bark), toothpick veins (leaves), and soft stippling (fruit pores).
Step 4: Color in layers (like real life)
Think base coat → shadows → highlights → speckles. Start lighter than you think you need; you can always deepen shadows, but it’s harder to erase a paint job that turned your “river stone” into “wet parking lot.”
Step 5: Choose the right finish
- Matte: Rocks, bark, soil, leaves (use cocoa/powdered sugar/dusts).
- Glossy: Fruit skins, wet stones, shells (use glaze, cocoa butter color, or polished chocolate).
- Translucent: Ice, water, crystals (use sugar work like isomalt, stored dry).
Serving and Photography Tips (Because These Deserve Proof)
Trick-of-the-eye food is half flavor, half theater. For maximum “Wait… WHAT?” impact:
- Use simple plates: White plates make details pop. Busy patterns fight your illusion.
- Light from the side: Side lighting reveals texture (bark grooves, rock speckles, leaf veins).
- Give scale cues: Add a fork, a tiny herb sprig, or a small crumb trail so the viewer understands size.
- Reveal with a cut: One sliced piece showing the inside is the most satisfying “aha” moment.
Common Mistakes (And How to Fix Them Without Crying)
Your “rock” looks like a potato
Add sharper cracks, more speckles, and a less uniform color. Potatoes are smooth and consistent; rocks are chaotic little show-offs.
Your bark looks like chocolate frosting (because it is)
Increase contrast: deepen the grooves, add dry dusting, and keep highlights thin. Real bark has depth and dryness.
Your “fruit” looks like a toy
Reduce saturation, add tiny blemishes, and soften shine. Nature is rarely neon and never airbrushed (except on social media).
Extra : The Real “Experience” Behind Making Trick-Of-The-E-Eye Foods
If you’ve ever tried making nature-inspired edible illusions, you quickly learn that the biggest challenge isn’t talentit’s patience. Realistic food art is basically a series of small, calm decisions made while you’re surrounded by sugar, chocolate, and the urge to skip straight to the fun part. The funny thing is: the “fun part” is the slow part.
Most makers discover early that chilling is not optionalit’s a lifestyle. You shape, chill, refine, chill again, then add detail, then chill because you touched it with warm hands and now it has fingerprints. The process feels a bit like building a tiny edible sculpture that keeps trying to melt back into “regular dessert.” The win is learning to treat cold time as productive time. While something chills, you’re mixing your next color, planning your next texture, or setting up your “illusion moment” for serving.
Another common experience: you stop seeing food the same way in real life. A walk outside turns into a texture field trip. You notice how stones are speckled, not striped; how leaves fade at the edges; how bark has both deep grooves and softer areas where the light hits. These tiny observations become your secret weapons. The better your reference, the less you have to “invent,” and the more convincing your edible illusion becomes.
There’s also a very specific emotional rollercoaster that happens right before the finish line. At about 80% done, your piece often looks worse than it will look finished. The base is there, but it’s flat. The color is there, but it’s one-note. This is the moment when people abandon a projector when the project finally becomes great. The trick is adding realism in layers: shadows first, then highlights, then tiny speckles and scuffs. Those last details are what transform “nice dessert” into “why is there a rock on my plate?”
And yes, you’ll mess up. Everyone does. A glaze might drip. A “stone” might crack. A “leaf” might look like a sad tortilla chip (still edible, still lovable). The best mindset is treating mistakes as texture opportunities. Drips become natural streaks. Cracks become believable fractures. Over-dark paint can be softened with dusting. You’re not aiming for perfectyou’re aiming for believable.
Finally, the most satisfying moment is always the same: watching someone hesitate before taking a bite. That tiny pauseconfusion, curiosity, then laughteris the reward. It’s proof your illusion worked, and it turns dessert into a shared experience, not just a sweet thing on a plate. Nature-inspired trick-of-the-eye foods aren’t just edible art. They’re edible stories, and every bite gets to be the plot twist.
Conclusion
Nature gives you unlimited inspiration: stones, bark, moss, mushrooms, shells, leaves, crystals, and everything in between. With the right structure, layered color, and intentional texture, you can turn everyday ingredients into “Wait, is that real?” momentswithout sacrificing flavor. Start small (pebble truffles and bark shards are beginner-friendly), then level up to molded fruit illusions and sugar “ice.” And remember: the goal isn’t to trick people forever. The goal is to trick them just long enough to make the first bite extra fun.