Table of Contents >> Show >> Hide
- Why Rope + Knots Make a Mirror Look Expensive (Even When It’s Not)
- Pick Your Mirror “Vibe” First
- Materials and Tools
- Rope Selection: What to Use (and Where It Misbehaves)
- Knots That Look Ornate Without Making You Regret Your Choices
- Step-by-Step: Rope + Knot Mirror Makeover (A Reliable Hybrid Method)
- Adhesive Strategy: Clean, Strong, and Not a Sticky Disaster
- Make It Look “Ornate,” Not “Rope Accident”
- Hanging and Placement: The Safety (and Style) Check
- Troubleshooting: Fix the Stuff That Drives DIYers Nuts
- Conclusion
- of Realistic DIY Experience: What Usually Happens When You Actually Make This
A plain mirror is like plain toast: useful, dependable, and absolutely begging for a little something extra.
The good news? You don’t need a woodworking shop (or a second mortgage) to make a mirror look like it came
from a coastal boutique or a boho design studio. With the right rope, a few good-looking knots, and a
smart plan for attaching everything cleanly, you can build an ornate mirror frame that feels intentional,
textured, and surprisingly “designer.”
This guide walks you through two crowd-pleasing stylesnautical rope-wrapped frames and macramé-inspired
knotwork halosplus a “best of both worlds” approach that combines rope wrapping with decorative knots for
a seriously upgraded finish. Along the way, you’ll learn which ropes behave nicely, which knots look fancy
without being fussy, and how to keep the final result from turning into a fuzzy lint donut.
Why Rope + Knots Make a Mirror Look Expensive (Even When It’s Not)
Ornate décor usually relies on a few visual tricks: depth, repetition, and texture. Rope gives you all three.
When you coil rope around a mirror, you create a thick, dimensional edge that catches light and shadow.
When you add knotsespecially repeating patterns like square knots or braided rimsyou get rhythm and detail,
the same “handcrafted” signal you see in high-end woven baskets, leatherwork, and traditional maritime décor.
And unlike a fragile plaster frame, rope is forgiving. If you don’t love a section, you can often adjust it,
tighten it, or cover it with the next row. Rope is basically the “Ctrl+Z” of home décor.
Pick Your Mirror “Vibe” First
Before you cut anything, decide what you want the mirror to say when people walk by. Here are three reliable
styles that work in real homes (even the ones with laundry piles and mystery cords behind the TV).
Option A: Nautical Rope Wrap (Fast + Classic)
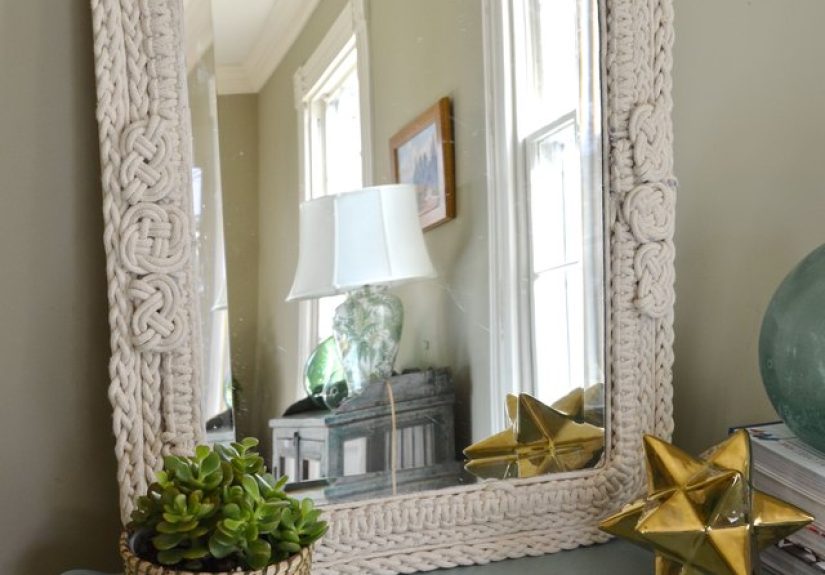
This is the iconic “rope mirror” look: a clean rope border wrapped around the mirror’s edge, often with jute
or sisal for a beachy feel. It’s simple, graphic, and works great in bathrooms, entryways, and coastal-themed rooms.
Option B: Macramé Knot Halo (Soft + Boho)
This style uses cotton cord and repeating knots to create fringe, diamonds, or scallops around the mirror.
The result is airy and texturedlike your mirror joined a yoga retreat and came back with healthy boundaries.
Option C: Knotwork Rim (Ornate “Braided Crown”)
If you want a more “crafted” look, add a decorative band such as a braided rim or a Turk’s head-style edge.
It reads like a woven frame rather than a wrapped oneperfect for a statement piece.
Materials and Tools
You can customize the supply list depending on your style, but here’s a practical setup that covers most builds.
Mirror + Base
- Mirror: round mirrors look especially good with rope, but rectangles work too.
- Backing ring or base: plywood ring, MDF ring, foam board (for lightweight mirrors), or an existing frame.
- Painter’s tape: to protect the glass edge while you work.
Rope / Cord
- Jute or sisal rope: rustic texture, strong “coastal” signal.
- Cotton clothesline or macramé cord: soft, clean, best for knot patterns and fringe.
- Synthetic rope: smoother, often brighter white, more moisture-resistant.
Adhesives + Fasteners
- Hot glue gun: great for quick tacking and keeping rope in place while you build.
- Stronger adhesive: a flexible craft/contact adhesive for long-term hold (especially in humidity).
- Optional nails/brads: useful if you’re attaching rope to a wood ring and want extra security.
Finishing Tools
- Sharp scissors or utility knife (cord can be surprisingly stubborn).
- Clamps or heavy books to hold sections flat while adhesive cures.
- Clear sealer or fabric stiffener to reduce fraying and protect natural fibers.
- Optional dye/paint for color effects or ombré rope.
Rope Selection: What to Use (and Where It Misbehaves)
Rope isn’t just rope. Choose based on texture, stiffness, and where the mirror will live.
A steamy bathroom needs different choices than a hallway mirror that only sees the occasional hair flip.
| Rope Type | Best For | Watch Outs |
|---|---|---|
| Jute | Rustic/coastal frames, thick wraps | Frays, can fuzz in humidity unless sealed |
| Sisal | Very textured nautical look | Rough on hands; can shed fibers |
| Cotton clothesline | Clean, bright frames; macramé knots | Can stain; may need stiffener for crisp patterns |
| Macramé cord (3–5mm) | Decorative knotwork, fringe halos | Uses lots of length (buy extra) |
| Synthetic (nylon/poly) | Moisture resistance, smooth modern look | Can look shiny/plasticky if you want “natural” |
Knots That Look Ornate Without Making You Regret Your Choices
You don’t need a sailor’s résumé. A few knots do the heavy lifting for most decorative mirror projects,
especially when combined with repetition.
Lark’s Head (Cow Hitch): The “Attach Everything” Knot
This is the go-to for anchoring cords onto a ring or dowel (perfect for macramé mirror halos). It’s quick,
neat, and creates a clean row of “heads” that already looks decorative.
Square Knot: The Classic Macramé Building Block
Square knots form tidy, symmetrical “boxes.” Repeat them and you can build grids, diamonds, and bands that
instantly read as intricatewithout being complicated.
Double Half Hitch: Crisp Lines and Curves
This knot is great for shaping borders (straight, diagonal, or curved). If you want a scalloped halo or a
“sunburst” pattern around the mirror, this is one of the best tools.
Clove Hitch: Use It, But Don’t Trust It Alone
Clove hitches are handy for temporary holds and quick wraps, but they can slip if they aren’t backed up.
In décor, that’s finejust secure the ends (glue, stitching, or a finishing wrap) so the knot stays put.
Turk’s Head-Style Rim: The Braided “Crown” Effect
If you want your mirror to look like it belongs on a fancy ship (or in a fancy café pretending to be a ship),
a braided rim is a showstopper. You can build a decorative braided band around the mirror’s outer edge and
tuck the ends underneath for a seamless finish.
Whipping: The Secret to Clean Rope Ends
Whipping is basically “cord hemming.” Wrap thin twine tightly around a rope end to stop fraying and make it
look finished. It’s small, but it’s the difference between “handcrafted” and “craft exploded.”
Step-by-Step: Rope + Knot Mirror Makeover (A Reliable Hybrid Method)
This method creates a thick rope frame (nautical base) and adds a decorative knot band (ornate detail).
It works for round or rectangular mirrors and doesn’t require special woodworking tools.
- Measure and sketch your plan.
Decide how wide you want the finished frame. For a “substantial” look, 2–4 inches of rope width around the mirror
usually reads ornate without overwhelming the wall. - Create or prep a backing ring.
If your mirror is frameless, cut a sturdy ring (plywood/MDF) slightly larger than the mirror so you have a surface
to glue rope onto. If your mirror already has a frame, you can wrap directly around it. - Clean and protect the glass.
Wipe the mirror edge so adhesive sticks well. Use painter’s tape around the perimeter of the glass to prevent
smudges and accidental glue marks. - Start the rope wrap with a clean anchor.
Begin at the bottom center (it hides seams). Add a small bead of hot glue to tack the rope in place.
Press firmly, then continue around the mirror edge in a smooth, even coil. - Build the frame thickness.
Keep coiling rope outward (like a spiral) until you reach your desired width. Work in short sections so everything
stays aligned. If you’re using natural rope (jute/sisal), keep tension consistent so the coil doesn’t “wave.” - Upgrade the bond for long-term durability.
Hot glue is fantastic for speed, but for a mirror that will live through humidity and seasons, use a stronger
adhesive under the rope as you goespecially on the outer rows that tend to get bumped.
Clamp or weigh down sections if needed while they cure. - Add a decorative knot band (optional but wow-worthy).
Here are two simple ways:- Macramé halo band: Attach cotton cords around a metal/wood ring using lark’s head knots.
Then build a repeating row of square knots and/or double half hitches. Mount that halo behind the mirror
so the knotwork peeks out like a textured sunburst. - Braided rim: Create a braided band around the outer edge (Turk’s head-style look),
then glue and tuck the ends underneath the rope coil. This creates a “crowned” edge that reads ornate.
- Macramé halo band: Attach cotton cords around a metal/wood ring using lark’s head knots.
- Finish the seam like you meant it.
Cut the rope end on a slight diagonal so it tucks neatly. Secure with adhesive. For natural fibers, consider a
whipping wrap with thin twine to keep the end tidy and fray-free. - Clean up glue strings and fuzz.
Hot glue can leave wispy strings. A gentle warm air pass (carefuldon’t overheat anything) helps.
For fuzzy rope, trim stray fibers and apply a light sealer to calm it down. - Install hanging hardware safely.
Use D-rings, a cleat system, or a rated picture-hanging method appropriate for the mirror’s weight.
If you love the nautical vibe, hang from a decorative cleat-style mount and a rope loopjust make sure
the wall anchor is solid.
Adhesive Strategy: Clean, Strong, and Not a Sticky Disaster
The best-looking rope mirrors usually use a two-stage approach: a fast adhesive for positioning, and a durable
adhesive for strength. Hot glue is quick and convenient for tacking rope in place. For long-term hold (especially
in bathrooms), add a more permanent adhesive under the rope as you work, and respect cure times.
Pro tips for better adhesion
- Prep matters: surfaces should be clean and dry before bonding.
- Work in sections: 6–10 inches at a time keeps alignment crisp.
- Don’t rush curing: if the adhesive needs a full day, give it the full day.
- Ventilation: some strong adhesives require good airflowdon’t craft in a sealed closet unless you enjoy regret.
Make It Look “Ornate,” Not “Rope Accident”
Ornate doesn’t mean busy. It means intentional. Here are upgrades that add richness without chaos.
Texture stacking
Use two rope diametersthicker for the main frame, thinner for the inner border. That subtle step-down creates
depth and makes the mirror feel designed rather than wrapped.
Color without chaos
Dip-dye cotton cord for an ombré halo. Or paint just the outermost rope row in a muted tone (sand, charcoal,
navy). Even a small color accent can make the mirror look custom.
Ornament accents (use sparingly)
- Small wooden beads woven into a macramé band
- A thin metallic cord wrapped once around the outer rim
- A minimal tassel at the bottom center (boho, but controlled)
Hanging and Placement: The Safety (and Style) Check
Mirrors can be heavy. Rope frames add bulk, and bulk adds leverage. The best approach is to use wall anchors rated
for the mirror’s weight and to mount into a stud when possible. If your mirror is large, consider a French cleat
system or professional hanging hardware.
Placement matters too. Mirrors work best where they reflect light and open up the room. A rope mirror can also
act like wall artespecially as a focal point in an entryway or above a console.
Troubleshooting: Fix the Stuff That Drives DIYers Nuts
Problem: Rope won’t lay flat
Use shorter glue sections and press firmly. If the rope is stiff, pre-shape it by gently coiling it into a circle
before attaching.
Problem: Gaps between coils
Push each row snugly against the previous one before the adhesive sets. If a gap appears, you can often “massage”
the rope into place while the glue is still workable.
Problem: Fraying and fuzz
Trim stray fibers, then apply a light sealer. For ends, use whipping or tuck-and-glue with a diagonal cut.
Problem: Knot band looks uneven
Most knot patterns look best when cords are consistently tensioned. Work slowly, tighten each knot to the same
firmness, and step back every few rows to check symmetry.
Conclusion
Turning a plain mirror into an ornate rope-and-knot statement piece is one of those rare DIY projects that’s
both approachable and high impact. Start with a simple rope wrap if you want fast results, add macramé knots
if you want softness and detail, and combine them when you’re ready for a mirror that looks like it came from
a curated shopminus the “I can’t eat this month” price tag.
If you take only one tip from this guide, make it this: plan your pattern, work in tidy sections, and finish
your ends like a professional. That’s the line between “cute DIY” and “how is this not from a designer brand?”
of Realistic DIY Experience: What Usually Happens When You Actually Make This
Here’s the truth nobody puts in the “perfect tutorial photos”: rope mirror projects are 70% confidence and 30%
you standing over a coil whispering, “Why are you like this?” The first ten minutes feel amazing because rope
is instantly transformative. You tack the starting end down, wrap a smooth curve, and suddenly your plain mirror
looks like it belongs in a beach house with suspiciously clean windows. You’ll think, “I’m unstoppable.”
That’s when you learn your first lesson: rope has opinions.
Most DIYers notice that the rope behaves differently depending on the spool. Some coils want to sit flat; others
fight you like a garden hose that remembers every kink it ever had. The fix is usually simpleshorter glue
sections, firmer pressing, and pre-coiling the rope into a circle before you commit. The second lesson is that
“just eyeballing it” works right up until you’re almost done and you realize your outer ring is slightly wavy.
Not “ruined,” just “my mirror has jazz hands.” If you catch it early, you can nudge rows closer while the glue is
still warm. If you catch it late, the best move is to embrace it as “handmade character” and distract the eye
with a decorative knot band.
Then there’s the glue situation. Hot glue is quick, but it can leave strings that appear overnight like spiderwebs
made by extremely determined house spirits. A careful cleanup pass helps, but most people find that the real win
is using hot glue mainly for positioning while relying on a stronger adhesive underneath for the long haulespecially
if the mirror lives in a bathroom. The third lesson: cure time is not a suggestion. If you hang the mirror too soon,
gravity will audition for the role of villain, and you may end up with a slightly slumped section that you’ll
notice forever (even if nobody else does).
If you add knots, the experience changes from “wrap and go” to “slow, satisfying craft.” Macramé patterns look
intimidating until you repeat the same knot a few times. Then your hands remember the motion, and it becomes
oddly relaxinglike doodling, but with cord. The only common surprise is how much length knots consume. People
almost always think they have “plenty of cord” and then realize the pattern ate it like popcorn during a movie.
The best habit is to cut longer strands than you think you need, because trimming extra is easy, but adding length
later can look messy unless you plan a join point.
Finally, you get to the finish detailsthe part that makes it look expensive. This is where you tuck rope ends
neatly, wrap a little whipping to stop fray, and make sure the back hardware is solid. Most DIYers say the last
10% of the project takes 30% of the time, but it’s also where the mirror upgrades from “nice craft” to “legit décor.”
And when you hang it up and the light hits that textured edge? That’s the moment you forget the rope’s earlier
attitude and decide you’re going to rope-wrap everything you own. (Hide the lamp cords first. We’re going for
ornate, not “nautical chaos.”)