Table of Contents >> Show >> Hide
- What Is Felted Soap (and Why Do People Love It)?
- Materials and Tools
- Step-by-Step: How to Make Felted Soap
- Design Ideas That Look Fancy (But Aren’t Hard)
- Troubleshooting: Fixes for Common Problems
- How to Use and Care for Felted Soap
- Gift Packaging Ideas (Because Cute Counts)
- FAQ: Felted Soap Questions People Actually Ask
- Experience Notes: What Making Felted Soap Feels Like (and What You’ll Learn Fast)
- Conclusion
Felted soap is the craft equivalent of putting a cozy sweater on a bar of soapand then forcing that sweater to shrink into a perfect, scrubby, stay-put jacket.
The result? A bar that’s easier to grip in the shower, naturally exfoliating, and weirdly satisfying to use (like bubble wrap, but for hygiene).
It’s also an excellent “I made this!” gift that doesn’t require owning a kiln, a lathe, or the emotional resilience needed for sourdough starters.
In this guide, you’ll learn how to make felted soap using the wet-felting method: wool roving + warm/hot water + friction + a little patience.
You’ll also get design ideas, troubleshooting tips, and a longer “experience” section at the end so you can avoid the classic beginner mistakeslike using
acrylic “wool” and wondering why your soap is wearing a Halloween costume instead of real felt.
What Is Felted Soap (and Why Do People Love It)?
Felted soap is simply a bar of soap wrapped in 100% wool that has been wet-felted into a snug covering. When you use the bar, the wool creates
a gentle exfoliating texture and helps the soap lather while staying grippable. Many crafters also like that the wool “cover” can help the bar last longer
by reducing the mushy, soggy soap-dish effect.
How Felting Works (The 10-Second Science)
Wool fibers have tiny scales. When you add warm water, soap, and agitation (rubbing), those scales open and
tangle togetherlocking into a dense fabric called felt. This is why real wool matters, and why “superwash” wool (treated to resist felting)
can be stubborn for this project.
Materials and Tools
Good news: you probably own at least half of this already.
You’ll Need
- Bar soap (store-bought or handmade; smooth bars are easiest)
- 100% wool roving/top (merino and corriedale are popular; avoid superwash if possible)
- Warm to hot water (use warm if kids are helping)
- Nylon stocking, netting, or mesh (optional, but very helpful for control)
- Towel (your counter will thank you)
- Optional: a drop of liquid soap (Castile or dish soap) to speed up felting
Optional (But Fun)
- Felting needle (for crisp designs, shapes, or initials before wet-felting)
- Textured mat (bamboo sushi mat, washboard-style surface) for faster felting
- Decor fibers (silk or colorful accentsuse sparingly)
Step-by-Step: How to Make Felted Soap
Step 1: Pick the Right Soap
Choose a bar that’s firm and not overly soft. Strongly sculpted bars can work, but smooth rectangles are easiest for your first attempt.
If the edges are sharp, lightly rounding them (even just with your hands) helps the wool wrap more neatly.
Step 2: Draft (Don’t Cut) the Wool
Pull the roving apart with your hands instead of cutting it. Drafting keeps fibers aligned and fuzzy, which helps them interlock.
You want thin, even sheetsthick enough to cover the soap without gaps, but not so bulky that it becomes a loofah brick.
Step 3: Wrap the Soap Like a Tiny Present
Lay the soap on the wool sheet and wrap it around. Then add another thin layer in the opposite direction (lengthwise, then widthwise).
Overlap seams and tuck ends in so the soap is fully covered. If you see bald spots, add wispy patches of wool and smooth them down.
Pro tip: Multiple thin layers felt better than one thick layer. Think “lasagna,” not “one giant dumpling.”
Step 4: Use Netting or a Nylon Stocking (Optional, Highly Recommended)
Slip the wrapped bar into a nylon stocking or mesh. This keeps your wool from drifting, blooming outward, or attempting a dramatic escape the moment it gets wet.
Twist the nylon snugly so the wool stays hugged to the soap.
Step 5: Wet, Warm, and Gentle First
- Dip the wrapped soap into warm/hot water and let it soak briefly.
- Gently press and pat the surfacedon’t scrub aggressively right away.
- Start rubbing lightly in your hands to create a “skin” of felt that holds everything together.
Early on, the wool is fragile and can shift. Your goal is to set the fibers before you apply serious friction.
Once the outer layer starts to look smoother and more cohesive, you can increase pressure.
Step 6: Add Friction to Fully Felt
Now rub more firmlyturning the bar frequently so all sides felt evenly. Alternate between:
rubbing, squeezing, and rolling the bar in your palms.
If you’re using a textured mat, roll the bar gently against it for faster results.
You’ll notice the wool shrinking and tightening. That’s the magic moment: the fluffy wrap becomes a fitted jacket.
Total time varies, but many bars take about 5–15 minutes depending on water temperature, wool type, and how determined your hands feel today.
Step 7: Rinse and “Set” the Felt
Rinse the bar under cool water and squeeze out excess suds. Some crafters like a brief “temperature change” (warm to cool) to help the fibers tighten.
Remove the nylon/mesh, then give the bar a final gentle rub to smooth seams.
Step 8: Dry Completely
Let your felted soap dry on a rack or breathable surface (not a puddle-forming soap dish).
Drying helps the felt firm up and keeps the bar fresh between uses.
Design Ideas That Look Fancy (But Aren’t Hard)
1) Simple Stripes
Wrap a base color first, then lay thin strands of a second color across the surface before wetting.
The accents will felt in as you rublike edible art, except please don’t eat it.
2) Color-Block Corners
Cover the soap in one color, then add a second color only on the ends (or one corner) for a modern look.
Minimal effort, maximum “I definitely planned this” energy.
3) Needle-Felted Initials
Before wet-felting, lightly needle-felt a letter onto the dry wool wrap. Then wet-felt as usual to lock it in.
Great for gifts, guest bathrooms, or families where everyone mysteriously “forgets” whose soap is whose.
4) Swirls and Confetti
Use wispy, irregular bits of colored wool on top of your base wrap. Keep it sparsetoo much decoration can reduce lather and make felting slower.
Troubleshooting: Fixes for Common Problems
The Wool Is Sliding Off / Getting Baggy
- Start gentlerpat and press first before scrubbing hard.
- Use nylon/mesh for the first few minutes to keep fibers in place.
- Check your wool: blends or superwash-treated wool may not felt well.
I Can Still See Soap Through the Wool
- Add thin patches of wool over gaps and rub gently until they attach.
- Use multiple thin layers instead of one thick wrap with holes.
It’s Taking Forever to Felt
- Increase water warmth (safely) and add a drop of liquid soap.
- Use a textured surface (bamboo mat or washboard-style texture).
- Make sure you’re using 100% non-superwash wool roving/top.
The Felt Is Too Thick and Lathers Poorly
- Use less wool next timeaim for coverage without bulk.
- Choose a soap known for good lather to begin with.
How to Use and Care for Felted Soap
- Use it like normal soapthe wool acts like a built-in washcloth.
- Let it dry between uses on a draining dish or rack.
- If it pills, lightly rub the surface under warm water to smooth it.
- When the soap is almost gone, the felt pouch can be composted if it’s untreated wool (or repurposed as a scrubby, depending on condition).
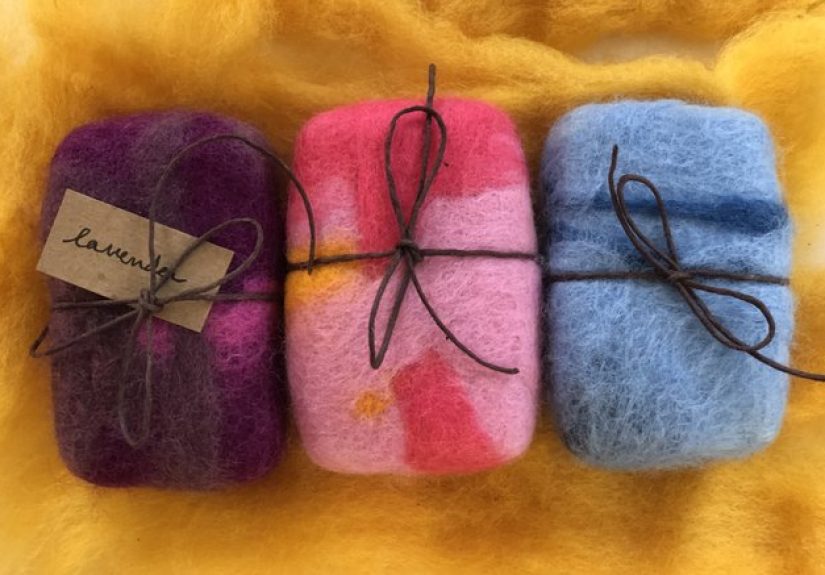
Gift Packaging Ideas (Because Cute Counts)
Felted soap is already pretty, but presentation takes it from “nice” to “someone on Etsy would charge $18 for this.”
Let the bar dry fully, then wrap it in paper or a simple belly band label. A small muslin bag or kraft box also works well.
If gifting, include a tiny care note: “Let it dry between uses.”
FAQ: Felted Soap Questions People Actually Ask
Do I have to use wool roving?
Roving/top is easiest because it’s already prepared for felting. You can sometimes use 100% wool yarn or a piece of old wool sweater,
but roving gives the smoothest, most predictable results.
Can I use acrylic or “wool blend” fiber?
For best results, use 100% wool. Acrylic won’t felt the same way, and many blends are inconsistent. If it doesn’t felt, it won’t hug the soap.
What wool type is best?
Merino felts nicely and feels soft. Corriedale is often more robust and beginner-friendly. The key is avoiding superwash-treated wool when possible.
Is felted soap safe for sensitive skin?
Many people find it gently exfoliating, but sensitivity varies. If you’re prone to irritation, test on a small area or choose very soft wool and a mild soap.
Avoid scratchy fibers if you know wool bothers you.
How long does felted soap last?
It depends on the soap formula and how well it dries between uses, but many users find it lasts longer than an un-felted bar because it stays drier and gets less mushy.
Can kids make this?
Yeswith warm (not hot) water and adult supervision. The process is hands-on and fun, but be mindful of water temperature and slippery surfaces.
Experience Notes: What Making Felted Soap Feels Like (and What You’ll Learn Fast)
Here’s the part most tutorials don’t say out loud: making felted soap is a tiny emotional journey. It starts with confidence (“I can wrap wool around soap.
I am basically a textile wizard.”), then takes a quick detour into doubt when the wool gets wet and puffs up like it’s trying to become a small sheep again.
That early phase is where beginners tend to panic-ruband panic-rubbing is how you get sliding fibers, wrinkles, and a lopsided “felt jacket” that looks like it
was applied during mild turbulence. The trick is starting gently. Patting and light rubbing feels slow, but it sets the outer layer so the rest behaves.
Another common experience: realizing you used too much wool about three minutes into felting. The bar starts to feel plush, which is nice, until you try to
lather and it’s like washing with a tiny pillow. Most people find that thinner layers work better, even if it feels like you’re not using “enough.”
If you can still faintly see the soap through the fibers before wetting, that’s not automatically a failurewispy coverage often felts down into a smooth,
even surface. Big chunky clumps, on the other hand, tend to felt unevenly and can create ridges.
You’ll also notice that the nylon/mesh step can change your whole mood. Without it, the first minute can feel like herding cats, except the cats are damp
fibers clinging to your fingers. With nylon, the wool stays put long enough for you to build that initial felt “skin.” Once the bar tightens up, you can
remove the nylon and refine the surface. Many makers end up doing a hybrid method: nylon for control early, bare-hands finishing for a cleaner look.
Design-wise, beginners often discover that “less decoration” looks more professional. A couple of thin stripes or a small color-block can look intentional.
If you add too many colors at once, the surface can get busy, and heavy layers may reduce lather. A great first “fancy” approach is a single base color
with two accent strandssimple, modern, and hard to mess up. If you’re doing initials, you learn quickly that needle-felting doesn’t need to be deep or aggressive;
you’re just tacking fibers in place so wet-felting can lock them down.
Then there’s the “is it done?” moment. Felted soap doesn’t always announce completion with fireworks. Instead, it quietly becomes firmer, smoother, and smaller.
A helpful way to judge progress is to pinch the surface: if the fibers lift easily, keep felting; if it feels like one cohesive fabric and seams don’t separate,
you’re basically there. Finally, drying teaches the most underrated lesson of all: felted soap rewards patience. A fully dried bar feels tighter and sturdier,
and it behaves better in the shower. The first use after drying is usually when people say, “Ohhh, now I get it.” That’s the moment your soap graduates from
“craft project” to “daily favorite.”
Conclusion
If you can wrap a present and rub your hands together like you’re plotting something, you can make felted soap. Start with 100% wool roving,
use gentle pressure first, and let warm water + soap + friction do the heavy lifting. Once you’ve made one bar, you’ll start eyeing every soap in your house
like it’s about to get a tiny wool makeover. And honestly? That’s a healthy hobby. Probably.