Table of Contents >> Show >> Hide
- Why Pressed Flower Lanterns Are So Magical
- Supplies You’ll Need for Pressed Flower Lanterns
- How to Press Flowers for Lanterns
- Step-by-Step: How to Make Pressed Flower Lanterns
- Design Ideas and Creative Variations
- Troubleshooting & Pro Tips
- Real-Life Experiences with Pressed Flower Lanterns
- Bringing a Little Garden Glow Indoors
Imagine your patio or bedroom lit by tiny gardens in jars soft candlelight glowing through pansies, ferns, and wildflower petals. Pressed flower lanterns look like something you’d buy at a boutique, but they’re actually a simple, budget-friendly DIY project you can absolutely pull off at home. With a few glass jars, some Mod Podge, and dried blooms, you can turn recycling-bin glass into magical, floral lanterns perfect for everyday décor, parties, and gifts.
This guide walks you through everything: how to press flowers (or buy them), how to choose the right jars, the best glue tricks so your petals don’t wrinkle, and creative design ideas for every season. We’ll finish with real-world tips and experiences to help you avoid common mistakes and feel confident lighting up your home with handmade pressed flower lanterns.
Why Pressed Flower Lanterns Are So Magical
Pressed flower lanterns are one of those crafts that look way more complicated than they are. When the candle or LED tealight shines through the glass, the dried petals almost glow, showing off details you’d never notice in a regular bouquet. It’s like framing your favorite flowers in light.
These DIY lanterns are also:
- Budget-friendly: You can re-use yogurt jars, mason jars, or any smooth glass containers you already have around the house.
- Sentimental: Turn flowers from weddings, birthdays, or your garden into long-lasting keepsakes.
- Customizable: Match your color palette for weddings, baby showers, holiday tablescapes, or cozy fall décor.
- Beginner-friendly: If you can paint glue on a jar and press a sticker, you’re basically qualified.
Plus, this is a fun activity for kids (with some adult supervision for the glass and candles) and a relaxing, screen-free craft night idea with friends.
Supplies You’ll Need for Pressed Flower Lanterns
You don’t need a craft room full of tools. Most projects use simple supplies you can find at any craft store, online, or even at the dollar store.
Basic Materials
- Glass jars or lantern bases: Mason jars, yogurt jars, food jars, or small glass vases. Smooth-sided glass works best so flowers lay flat.
- Pressed or dried flowers: Store-bought pressed flowers or blooms you’ve pressed yourself.
- Decoupage glue or sealer: Mod Podge (matte or gloss) is the go-to choice for most crafters.
- Small paintbrush or foam brush: For applying glue and smoothing petals.
- Tweezers (optional but helpful): Great for placing tiny petals without tearing them.
- Candles or LED tealights: Use battery-powered tealights if kids or paper elements are involved.
Optional Extras
- Ribbon, twine, or lace for the jar rim
- Wire and pliers if you want to add a handle for hanging
- Vellum or tissue paper if you’re making paper-mâché-style lanterns instead of decorating glass
How to Press Flowers for Lanterns
You can absolutely buy pre-pressed flowers, but pressing your own blooms lets you preserve special memories and match your favorite colors. The key is choosing the right flowers and letting them dry completely so they don’t mold or turn brown.
Choosing the Best Flowers to Press
For lanterns, thin, flat flowers and leaves work best. Thick blooms can wrinkle, bubble, or lift off the glass. Craft and gardening experts recommend:
- Small daisies, pansies, cosmos, and violas
- Forget-me-nots and other small wildflowers
- Fern fronds and delicate greenery
- Individual rose petals instead of full rose heads
Look for fresh flowers that are fully open but not wilted. Avoid anything damp with morning dew; moisture can cause browning or mold in the press.
Simple Book-Press Method
The classic method is low-tech but reliable:
- Place a sheet of parchment paper or coffee filter on a page of a heavy book.
- Arrange your flowers in a single layer, not overlapping.
- Cover with another sheet of parchment or paper.
- Close the book and add extra heavy books on top.
- Leave them for 1–2 weeks until completely dry and papery.
Once they’re dry, handle them gently. Pressed flowers are beautiful but fragile think “potato chip energy.” Tweezers are your best friend here.
Quick Alternatives
- Microwave flower press: Special microwave presses can dry flowers in minutes instead of weeks.
- Store-bought pressed flowers: Many crafters simply buy pre-pressed blooms online, especially for last-minute projects or events.
Step-by-Step: How to Make Pressed Flower Lanterns
Once your flowers are pressed, the actual lantern-making part is quick. Many tutorials estimate about 10–20 minutes of active crafting time per jar, plus drying time.
Step 1: Prep Your Jar or Lantern Base
- Wash and dry the jar. Remove labels, glue, and oils so the decoupage medium sticks well. A bit of rubbing alcohol helps remove residue.
- Plan your design. Lay a few flowers against the jar to visualize placement. You can go minimal with just a few blooms or dense and garden-like.
Step 2: Attach the Pressed Flowers
- Dip your brush in Mod Podge or another decoupage medium.
- Paint a thin layer of glue on a small area of the jar.
- Use tweezers to gently place a pressed flower onto the glue.
- Lightly press the petals down from the center outward to remove air bubbles.
- Repeat, working in small sections so the glue doesn’t dry before you place the flowers.
Don’t worry if the glue looks streaky or milky at first it will dry clear. The key is a thin layer; too much glue can crinkle delicate petals.
Step 3: Seal the Design
- Once the flowers are in place, gently brush another thin coat of Mod Podge over the top of each flower and the surrounding glass.
- Feather the strokes outward to blend with the clear parts of the jar.
- Let the lantern dry fully, usually about an hour or as directed on the product label.
- For extra durability, add a second sealing coat after the first is completely dry.
Some crafters like to coat the entire jar for a soft, frosted effect. Others only seal where the flowers are, leaving the rest of the glass completely clear.
Step 4: Add Light Safely
When it’s time for the big reveal:
- Place a tealight, votive, or LED candle at the bottom of the jar.
- For kids’ rooms, outdoor parties, or paper-based lanterns, stick with flameless LED tealights.
- If you use real candles, keep the flame centered and never leave the lantern unattended.
Turn off the room lights and enjoy the way each petal glows. This is the part where you say, “I made that!” at least three times.
Design Ideas and Creative Variations
Once you’ve mastered the basic pressed flower lantern, it’s incredibly easy to customize for different seasons, themes, and spaces.
Seasonal Themes
- Spring: Use pastel pansies, daisies, and fresh green leaves for bright, Easter-ready lanterns.
- Summer: Go bold with wildflowers, bright cosmos, and tiny fern fronds for garden parties and weddings.
- Fall: Press colorful leaves, golden petals, and seed heads for cozy autumn tablescapes.
- Winter: Try neutral petals, silver ribbon, and white tissue-paper backgrounds for a soft, snowy glow.
Hanging Lanterns
If you want to hang your lanterns in trees or along a porch, you can:
- Wrap wire around the jar rim and twist to form a secure loop.
- Add a longer piece of wire or sturdy twine as a handle.
- Use LED tealights so you’re not juggling real flames over your head.
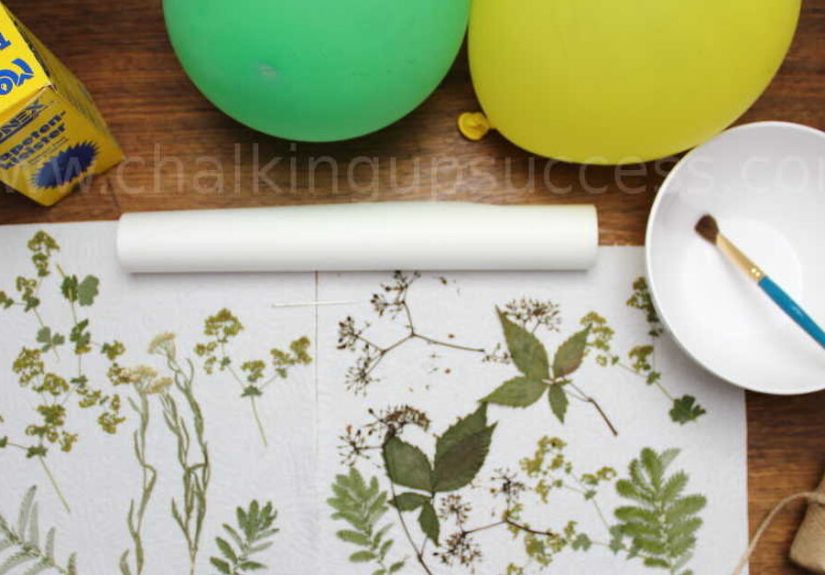
Paper-Mâché & Vellum Lanterns
For a softer, diffused look, you can create paper lanterns instead of decorating glass:
- Layer thin white tissue paper or handmade paper over a balloon or mold.
- Press flowers into the wet paper with decoupage medium.
- Once dry, pop the balloon and cut a flat opening for the candle.
These lanterns glow beautifully, but always use LED tealights with any paper-based design.
Troubleshooting & Pro Tips
Why Are My Flowers Turning Brown?
If your petals are browning or spotting inside the glue, it usually means they weren’t fully dry before you started. Make sure flowers are completely pressed and papery before using them, and avoid very thick or juicy blooms.
How Do I Avoid Wrinkles and Bubbles?
- Work in small sections so the glue doesn’t start to dry mid-placement.
- Use your fingers or a clean brush to gently smooth from the center of the flower outward.
- Keep the glue layer thin puddles of glue almost guarantee wrinkling.
What If I Make a Mistake?
If a flower tears or folds on itself, gently lift it away while the glue is still wet and swap it for another. You can also cover small mishaps by layering a second petal or leaf on top. Lanterns are forgiving; once the candle is lit, most tiny “imperfections” just look like extra texture.
Real-Life Experiences with Pressed Flower Lanterns
People who’ve made pressed flower lanterns often talk about how surprisingly meaningful this simple craft becomes once you start pairing it with personal memories and events. Many crafters use flowers from important days: a wedding bouquet, a graduation arrangement, or even the first bouquet a child picked from the backyard.
One common experience crafters describe is the “aha” moment when they turn off the lights and see the lanterns glowing for the first time. During the day the jars look pretty and delicate, but in the dark, the light reveals tiny veins in petals, subtle shades of color, and little details that weren’t obvious before. It feels like each lantern has its own personality a mix of which flowers were chosen, how they were arranged, and the shape of the glass.
Families often turn pressed flower lantern making into a seasonal ritual. In spring and summer, kids help gather blossoms from the yard, learning which flowers press well and which ones are better enjoyed fresh. Parents or caregivers handle the pressing and glass work, while little hands choose color combinations (“all purple,” “rainbow,” or “only leaves”) and decide who gets each lantern. Later, those same lanterns come out for backyard dinners, movie nights on the couch, or cozy reading corners.
People also report that these lanterns make unexpectedly popular gifts. A simple mason jar decorated with pressed flowers and paired with a small candle feels handmade but not “craft-fail homemade.” It’s a thoughtful hostess gift, teacher thank-you, or birthday surprise for anyone who loves plants, gardening, or cottage-style décor. Many crafters like to tie a handwritten tag around the jar, explaining where the flowers came from “zinnias from our 2025 garden” or “wildflowers from our first camping trip together.”
Another shared experience is how relaxing the process becomes once you get past the first jar. Arranging flowers on glass has a similar vibe to working on a puzzle or coloring book. There’s no single “correct” layout, and every design looks a little different. Some people like to line flowers in neat rows for a more modern, graphic look. Others create loose, meadow-inspired patterns with petals dancing up the sides of the jar. Because the stakes are low and the supplies are inexpensive, it’s easy to experiment.
For people who are new to DIY, pressed flower lanterns offer the confidence boost that comes from completing a project quickly. You don’t need power tools, sewing skills, or expensive materials. With just one evening, a few supplies, and some dried blooms, you can transform a plain jar into something you’re proud to display. When guests ask where you bought those pretty lanterns and you get to say, “Oh, I made them,” that’s a tiny but satisfying victory.
Finally, there’s the experience of watching these lanterns age gracefully. Over time, the colors may soften a little, but many people find that gentle fading just adds vintage charm. You can keep older lanterns as nostalgic keepsakes and create fresh ones each year with new flowers, gradually building a little glowing archive of seasons, gardens, and moments you wanted to remember.
Bringing a Little Garden Glow Indoors
Making beautiful pressed flower lanterns is less about perfection and more about capturing a little piece of nature in a form you can enjoy every evening. With a handful of pressed blooms, a jar from your recycling bin, and a bit of glue, you can create glowing mini-gardens that feel custom, personal, and surprisingly high-end.
Whether you’re decorating for a Hometalk-worthy makeover, planning a garden wedding, or just trying to make your living room feel a bit cozier, pressed flower lanterns are a simple DIY project that delivers a big payoff. Start with one jar, experiment with colors and layouts, and before you know it, you’ll have a whole collection of handmade lanterns lighting up your home.