Table of Contents >> Show >> Hide
- Before You Start: Is Your Hat Dishwasher-Safe?
- Why Use a Dishwasher to Clean a Baseball Cap?
- What You’ll Need
- The 9-Step Dishwasher Method
- Step 1: Check the care label and materials
- Step 2: Do a quick colorfastness check
- Step 3: Dry-brush and de-lint first
- Step 4: Pre-treat sweat stains (the secret weapon step)
- Step 5: Secure the hat in a cage (or stabilize it smartly)
- Step 6: Load the top rack onlyno dishes allowed
- Step 7: Choose the safest cycle settings
- Step 8: Use the right detergent (and less than you think)
- Step 9: Reshape immediately and air-dry the right way
- Common Mistakes That Ruin Hats (So You Don’t Join the Sad Hat Club)
- Dishwasher vs. Hand-Washing: Which Is Better?
- Quick FAQs
- Extra: Real-World Experiences and Lessons People Learn the Hard Way (About )
- Conclusion
Baseball caps are basically wearable sweat sponges. They soak up sunscreen, scalp oil, stadium nacho fumes (no judgment),
and whatever mystery dust lives in your car’s cupholder area. Eventually, even your “lucky hat” starts looking less lucky
and more like it survived a minor natural disaster.
You’ve probably heard the debate: “Can I wash a baseball cap in the dishwasher?” The answer is:
sometimesbut only if you do it the careful way. Some brands and cleaning pros say it can work for modern caps,
while other experts warn the dishwasher can be too harsh and risky. This guide splits the difference: it shows the
safest dishwasher method (for hats that qualify), plus the “don’t even think about it” rules so you don’t
accidentally turn your favorite cap into a tiny doll accessory.
Before You Start: Is Your Hat Dishwasher-Safe?
The dishwasher method is best for newer, structured baseball caps made from sturdy materials like
cotton blends or polyesterespecially hats with a plastic brim insert. It’s not a great
idea for every hat in your collection.
Green Light Hats
- Modern cotton or cotton-blend baseball caps
- Polyester/trucker hats (foam fronts can be trickyproceed gently)
- Athletic performance caps designed to handle sweat
- Caps with a plastic brim insert that holds its shape
Red Flag Hats (Skip the Dishwasher)
- Vintage hatsespecially anything you’d cry over if it warped
- Cardboard brims (common in older hats)
- Wool, felt, suede, leather, straw, or hats with delicate trims
- Heavily embroidered hats where you’re worried about snagging or fraying
- Hats with glued-on patches that already look like they’re considering retirement
Quick brim test: If you’re unsure whether the brim is cardboard, try a simple check: lightly flick/tap
the bill. Warning signs can include a more “hollow” feel/sound or visible warping from water exposure. If you suspect
cardboard, use spot-cleaning only. (When in doubt, play it safeyour hat will thank you by continuing to be a hat.)
Why Use a Dishwasher to Clean a Baseball Cap?
The dishwasher approach is popular because it’s hands-off and can rinse away sweat and grime evenlyespecially if you’re
cleaning multiple caps at once. But it also comes with risks: high heat, strong detergents, and rough water pressure can
fade color, weaken stitching, or warp the crown.
Pros
- Convenient for cleaning multiple hats
- Consistent rinse action that can lift sweat and oil
- Less scrubbing (your toothbrush gets a break)
Cons
- Heat can shrink, fade, or warp the hat
- Harsh detergents can strip color and damage fibers
- Shape can collapse without support
What You’ll Need
- Hat cage/hat frame (highly recommended to protect shape)
- Mild detergent (more on this below)
- Soft brush/toothbrush (for pre-treating sweat stains)
- Clean towel
- A bowl, small colander, or hat form for drying (optional but helpful)
- Optional deodorizing helpers: baking soda (dry use) or a fabric-safe spray
The 9-Step Dishwasher Method
These steps are designed to reduce the biggest hat-killers: heat, harsh detergent,
and shape loss.
Step 1: Check the care label and materials
If the tag says “Do not wash,” believe it. If it’s vague, use the material checklist above. This method is mainly
for durable, modern caps with plastic brims. If your cap is vintage, wool, suede/leather, or has a cardboard bill,
don’t dishwasher it.Step 2: Do a quick colorfastness check
Dampen a white cloth and rub a hidden spot (inside the brim or sweatband). If dye transfers, dishwasher washing is
more likely to fade it. Consider spot-cleaning instead.Step 3: Dry-brush and de-lint first
Rinse cycles don’t magically remove hair and fuzz bunnies. Brush off dust, pet hair, and loose dirt. If your sweatband
looks like it ran a marathon, scrape away the crusty salt lines gently before they get “baked” into the fibers.Step 4: Pre-treat sweat stains (the secret weapon step)
Dishwashers are good at rinsingbut sweat stains are stubborn. Mix a few drops of mild soap with cool water and use a
soft brush/toothbrush to gently work the solution into the sweatband and any grime spots. Let it sit for about
10–15 minutes, then lightly rinse.Example: If the hat has a yellowed sweatband, focus on the inside rim. A little patience here can
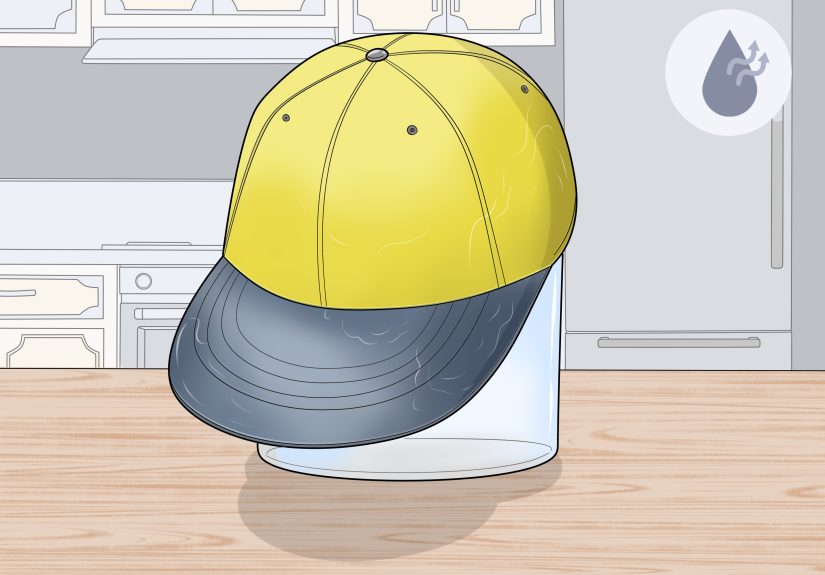
save you from running a second cycle (and increasing wear).Step 5: Secure the hat in a cage (or stabilize it smartly)
A hat cage/frame helps the cap keep its shape and prevents the brim from bending into a modern art sculpture.
If you don’t have a cage, you can improvise by placing the hat over an upside-down small colander on the top rack
so the crown stays rounded and stable.Step 6: Load the top rack onlyno dishes allowed
Put the hat (in its cage) on the top rack, away from heating elements and intense spray zones.
Don’t wash it with dirty plates. Food residue + fabric = “Why does my hat smell like lasagna?”If you’re cleaning multiple hats, give them breathing room so water can circulate without crushing the crowns.
Step 7: Choose the safest cycle settings
Select the most gentle option your dishwasher offers. You’re aiming for: cooler water,
lighter wash, and no extra heat.- Cycle: Light/Gentle/Delicate (avoid “pots & pans” like it’s a villain)
- Water temp: Cool or warmnot hot
- Heated dry: OFF (air-dry only)
- Sanitize: OFF (too hot for many caps)
Step 8: Use the right detergent (and less than you think)
Standard dishwasher detergent can be harshoften formulated for food soils and sometimes includes bleaching agents.
Choose a mild, non-bleach option. And go easy: you’re cleaning fabric, not a week-old casserole dish.- Avoid bleach-based or “ultra-degreasing” detergents
- Avoid citrus-heavy additives if you’ve seen them discolor fabrics
- Skip rinse aid if you’re worried about residue on fabric
Pro tip: If you’re nervous about detergent strength, you can rely more on your pre-treatment and run
a lighter cycle, using minimal detergent (or in some cases, a rinse-only approach after a careful hand pre-clean).Step 9: Reshape immediately and air-dry the right way
When the cycle finishes, remove the hat right away. While it’s still damp:
- Pat gently with a towel (don’t wring it like you’re starting a strongman contest)
- Reshape the crown with your hands
- Let it dry over a bowl, upside-down colander, hat form, or rolled towel
- Air-dry at room temperatureno dryer, no direct heat blast
If your hat is a snapback or fitted cap, check the sweatband area while drying to prevent stiff “crunch lines.”
Common Mistakes That Ruin Hats (So You Don’t Join the Sad Hat Club)
- Using heated dry: Heat is the #1 shape wrecker and shrink-maker.
- Using strong detergent pods: Harsh chemicals can fade dyes and rough up fibers.
- Placing the hat on the bottom rack: Too close to heat and intense water action.
- Washing with dishes: Food particles and grease can redeposit onto the hat.
- Skipping pre-treatment: Sweat stains often need targeted attention first.
Dishwasher vs. Hand-Washing: Which Is Better?
If you want the safest, least risky route, hand-washing is usually the winnerespecially for hats you
truly care about. But if your hat is modern, durable, and you follow the “no heat + mild detergent + hat cage” rule,
the dishwasher can be a reasonable shortcut.
Think of it like this: hand-washing is the gentle spa day. Dishwasher washing is the express car washfine for sturdy
daily drivers, not ideal for antiques.
Quick FAQs
Will the dishwasher shrink my baseball cap?
It canespecially with hot water or heated drying. That’s why the safest approach is a gentle cycle with cooler temps
and air-drying only.
Can I wash a hat in the dishwasher without a hat cage?
You can, but shape loss becomes much more likely. If you don’t have a cage, stabilize the crown by placing the hat over
an upside-down colander on the top rack and keep the cycle gentle.
How do I get rid of hat odor?
Odor is usually trapped sweat/oil in the sweatband. Pre-treat the band, make sure the hat dries fully (damp hats smell
like regret), and consider sprinkling a little baking soda inside once drythen brush it out later.
How often should I clean a baseball cap?
If you wear it frequently (workouts, yardwork, hot weather), a light clean every few weeks can prevent deep staining.
For occasional wear, clean it when you notice sweat lines, odor, or visible grime.
Extra: Real-World Experiences and Lessons People Learn the Hard Way (About )
Ask a group of hat-wearers about dishwasher cleaning, and you’ll hear stories that range from “my hat came out brand new”
to “my hat now fits a garden gnome.” The difference is almost always the same handful of details: heat, detergent, and
how well the hat kept its shape during washing.
One common experience is the “I used the normal cycle” mistake. People toss a cap in, hit start, and
assume the dishwasher will treat fabric like a plate. The wash might look fine at first, but the heated dry stage is
where heartbreak happens. The brim can curl, the crown can soften, and fitted hats may tighten just enough to feel
annoyingly snug. The lesson most people share afterward is simple: air-dry only, even if you’re tempted
by the siren song of “Heat Dry: 60 minutes.”
Another frequent learning moment is about detergent strength. Dish detergents are designed to attack
grease and baked-on food, which is great for casserole dishes and not always great for dyed fabric. Some people notice
their hats come out slightly faded, especially darker colors or hats with bold contrast stitching. That’s why experienced
cleaners tend to use minimal detergent and avoid anything bleach-forward. Many also rely on pre-treating
the sweatband firstbecause that’s where the real grime livesand treat the dishwasher more like a gentle rinse-and-refresh.
Then there’s the shape saga. Hats don’t just “dry”they set. If a cap dries with a dented crown,
it may keep that dent like a permanent memory. People who get the best results usually reshape the crown immediately
after washing and let it dry over something rounded: a bowl, an upside-down colander, a hat form, or even a tightly
rolled towel. The goal is to support the inside so the fabric dries in the correct curve instead of collapsing inward.
If you’ve ever seen a cap with a weird “pinched” front panel, that’s often a drying problem, not a washing problem.
There’s also the hygiene angle people talk about: don’t wash hats with dishes. Even if the dishwasher
seems clean, food residue and grease can redeposit onto fabric. Lots of folks learn this after pulling out a cap that
smells faintly like dinner. Running hats alone (or with only other non-food household items) tends to produce the “fresh
laundry” result people want, without the “hint of marinara.”
Finally, the most experienced hat-cleaners usually end up with a simple personal rule:
dishwasher for everyday hats, hand-wash for favorites. The everyday hat that gets worn to mow the lawn,
coach practice, or walk the dog? Dishwasher method can be a practical tool. The signed cap, the vintage collectible,
the one you wore on a memorable trip, or the perfectly broken-in fitted hat? Most people decide it deserves the gentle
sink treatment instead. In other words: the dishwasher can workbut your hat collection shouldn’t be the place you learn
that heat is a powerful force.
Conclusion
Cleaning baseball hats with a dishwasher can be a surprisingly effective shortcutif you choose the right
hats and follow the rules that protect color, stitching, and shape. Remember the big three: use a hat cage (or stabilize
the crown), keep the cycle gentle and cool, and skip heated dry like it personally offended you. When done carefully,
your cap can come out fresher, less funky, and ready for the next inning (or errand run).