Table of Contents >> Show >> Hide
- Why a Pallet Planter Box Is Such a Good DIY Project
- Step Zero: Pick a Safe Pallet (This Matters More Than Fancy Trim)
- Tools and Materials
- The Build: A Classic Pallet Planter Box You Can Finish in a Weekend
- Step-by-Step: How to Build the Planter Box
- Step 1: Break Down the Pallet Without Destroying the Boards
- Step 2: Sort, Inspect, and Prep the Wood
- Step 3: Build a Strong Frame First (It’s the Skeleton)
- Step 4: Attach Pallet Slats to the Sides
- Step 5: Build a Bottom That Drains (Because Roots Hate Swimming Pools)
- Step 6: Line the Planter (Optional, But Often Worth It)
- Step 7: Add Feet or Spacers (A Small Upgrade That Helps a Lot)
- Step 8: Finish the Outside (Keep It Cute, Keep It Practical)
- Planting Tips: Set Your Planter Up for Success
- Easy Customizations (Pick One, Don’t Try Them All at 10 PM)
- Common Mistakes (and How to Avoid Them)
- FAQ: Quick Answers That Save You a Second Trip to the Hardware Store
- Conclusion
- Bonus: Real-World Experiences Building a Pallet Planter Box (Lessons, Mistakes, and Small Victories)
If you’ve ever looked at a wooden pallet and thought, “I could totally turn that into something cute,” congratulations: you have the exact brain chemistry required for DIY gardening. A pallet planter box is one of the best starter builds because it’s cheap, practical, and forgiving. (Unlike basil, which will die if you look at it with the wrong attitude.)
In this guide, you’ll learn how to choose safe pallet wood, break it down without starting a personal nail museum, and build a sturdy planter box that drains properly and lasts more than one dramatic rainstorm. I’ll also include a few build variations, finishing options, and real-world lessons learned the hard wayso you don’t have to.
Why a Pallet Planter Box Is Such a Good DIY Project
Pallet planter boxes hit the sweet spot of DIY: low-cost materials, simple joinery, and a finished project you’ll use immediately. They’re ideal for patios, balconies, porches, and small yardsanywhere you want contained soil, fewer weeds, and plants that feel like they’ve been given their own tiny apartment.
- Budget-friendly: Many pallets are free (or close to it).
- Beginner-friendly: Mostly straight cuts and basic screws.
- Custom sizing: Make it shallow for herbs or deeper for veggies.
- Upcycling win: You’re keeping wood out of the waste stream.
Step Zero: Pick a Safe Pallet (This Matters More Than Fancy Trim)
Not every pallet should become a planterespecially if you’re growing anything edible. Your goal is wood that’s clean, dry, structurally sound, and treated in a way that’s appropriate for garden use.
Look for a Stamp (Yes, Pallets Have Paperwork)
Many pallets used in shipping have an IPPC/ISPM 15-style mark. The important part for DIY gardeners is the treatment code:
- HT = heat-treated. This is generally the preferred choice for garden projects.
- MB = methyl bromide fumigation. Skip these for planter boxes, especially for edible gardens.
- DB = debarked. Helpful info, but it’s not a “safe/unsafe” stamp by itself.
Use Your Eyes (and Your Nose)
Even a heat-treated pallet can be a bad pick if it has mystery stains, strong odors, or signs it carried chemicals. Avoid pallets that look oily, have powdery residue, smell like solvents, or have spill marks that make you say, “Huh.” Your plants do not need to be raised in a suspense novel.
If You’re Unsure, Choose a Different Pallet
Pallets are common. Your peace of mind should be, too. If the origin is sketchy, don’t use it for a planterespecially for herbs and vegetables. Save it for a non-garden project like a storage shelf or something that never touches soil.
Tools and Materials
You can build a pallet planter box with basic tools. If you have power tools, it’s faster. If you don’t, it’s still doable you’ll just earn more “character development.”
Tools
- Work gloves and safety glasses (splinters love fingers; nails love surprises)
- Pry bar and hammer or a pallet buster tool
- Drill/driver with bits
- Measuring tape and pencil
- Speed square (optional, but it keeps your corners honest)
- Saw: circular saw, miter saw, jigsaw, or handsaw (use what you’ve got)
- Nail puller or end-cutting nippers for stubborn nails/staples
- Sander or sandpaper (80 grit then 120 grit is plenty for “planter box pretty”)
Materials
- 1–2 clean pallets (depends on planter size)
- Exterior-grade screws (1 1/4″ and 2″)
- Optional: wood glue rated for exterior use
- Landscape fabric (recommended) or food-safe plastic liner (optional)
- Staple gun and staples (for liner)
- Optional: non-toxic exterior finish (tung oil/linseed oil) for the outside
- Potting mix + compost for planting
The Build: A Classic Pallet Planter Box You Can Finish in a Weekend
Let’s build a straightforward rectangular planter box: sturdy frame, pallet slat sides, and a bottom that drains. This design works for flowers, herbs, leafy greens, and shallow-root veggies.
Suggested Finished Size (Easy, Useful, Not Ridiculous)
- Length: 36″
- Width: 16″
- Height: 12″
You can scale this up or down. The only “rule” is: the bigger you go, the more you need strong corner posts and a rigid frame to prevent bowing once the soil is wet (wet soil is heavy and has zero sympathy).
Step-by-Step: How to Build the Planter Box
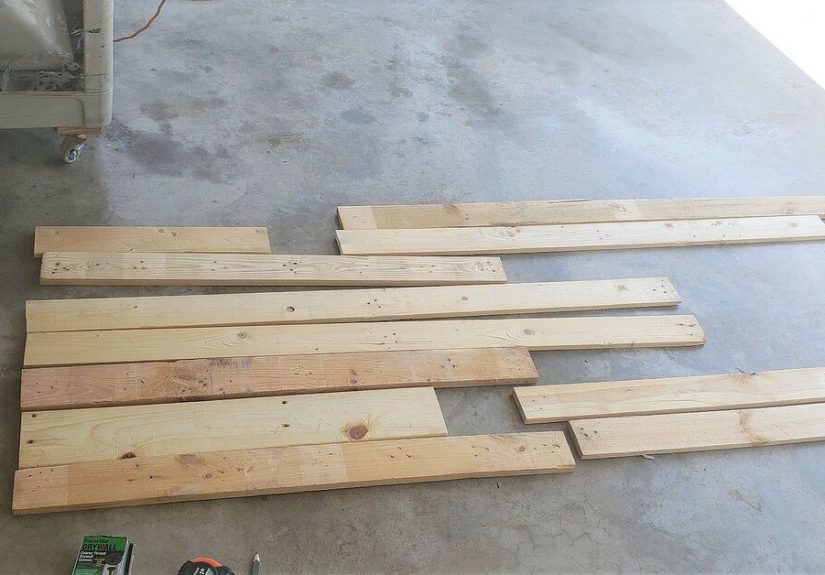
Step 1: Break Down the Pallet Without Destroying the Boards
Pallets are held together with nails that were clearly installed by someone who got paid per nail and had a personal grudge against future DIYers. You’ve got a few options:
- Pry bar method: Work slowly, pry near nail points, and lift a little at a time along the board to reduce cracking.
- Reciprocating saw method: Slide a long metal-cutting blade between boards and cut the nails. This is fast and saves wood.
- Pallet buster tool: Designed to pull boards more evenly and reduce splits. Very satisfying.
Once boards are off, remove nails completely. Don’t “leave them for later.” Later is when a tire finds them. Or your hand does.
Step 2: Sort, Inspect, and Prep the Wood
Separate boards into “great,” “usable,” and “why are you like this?” piles.
- Sand rough faces and knock down sharp corners (you’re building a planter, not a medieval punishment device).
- Cut away cracked ends; short boards are still useful for bottoms or spacers.
- Wipe dust off before finishing or lining.
Step 3: Build a Strong Frame First (It’s the Skeleton)
The mistake many pallet builds make is relying on pallet slats alone for structure. Slats are great as “cladding,” but a planter full of wet soil needs a frame that acts like a tiny piece of furniture.
Make four corner posts. You can rip thicker pallet stringers into posts if they’re clean and not crumbly, but many DIYers prefer using 2x2s or similarly sturdy scraps for the corners.
For a 36″ x 16″ planter, cut:
- 4 corner posts @ 12″ (planter height)
- 2 long frame rails @ 36″ (top and bottom, one per side)
- 2 short frame rails @ 16″ (top and bottom, one per end)
Assemble a rectangle at the top: attach the long and short rails to the corner posts with 2″ exterior screws. Repeat for the bottom rails (or build one rectangular “ring” and then add bottom support pieces). Check corners with a square as you goyour plants don’t care, but you will.
Step 4: Attach Pallet Slats to the Sides
Measure your side panels and cut slats to fit. You can run boards horizontally for a classic look or vertically for a modern fence-style vibe.
- Pre-drill if boards are dry or prone to splitting.
- Use 1 1/4″ exterior screws for slats.
- Leave tiny gaps (1/8″–1/4″) between boards if you want more airflow and easier drainage.
Pro tip: start with your prettiest boards on the “front” side. This is woodworking’s version of taking photos from your good angle.
Step 5: Build a Bottom That Drains (Because Roots Hate Swimming Pools)
You have two reliable bottom options:
Option A: Slatted Bottom (Recommended)
Cut slats to span the bottom frame and screw them in with small gaps between each board for drainage. Add a center support strip under longer spans if your planter is wide or long.
Option B: Solid Bottom with Drainage Holes
If you use plywood (exterior-grade) or a solid panel, drill multiple drainage holes across the bottom. This can be useful for very fine potting mixes, but it’s less breathable than slats.
Either way, drainage is non-negotiable. A beautiful planter box with poor drainage is just a decorative root rot container.
Step 6: Line the Planter (Optional, But Often Worth It)
Lining helps keep soil from washing out and reduces constant moisture contact on the wood interiorboth good things for longevity.
Landscape Fabric Liner
This is the go-to for many gardeners because it lets water drain while keeping soil in place. Staple it along the inside, making sure the bottom still drains freely. Trim excess at the top.
Plastic Liner (If You Use It, Do It Correctly)
Use only a thick, food-safe plastic and add drainage holes so water can escape. Plastic can trap moisture against the wood if installed poorly, so consider using it only on side walls with a breathable bottom.
Step 7: Add Feet or Spacers (A Small Upgrade That Helps a Lot)
Wood lasts longer when it can dry. If your planter sits directly on concrete, the bottom stays damp longer after watering. Add simple feet, set it on bricks, or attach thin runners underneath. This improves airflow and reduces rot risk.
Step 8: Finish the Outside (Keep It Cute, Keep It Practical)
You can leave pallet wood unfinished for a rustic look. If you want more longevity, finish the outside with a plant-friendly wood treatment like pure tung oil or raw linseed oil. Many gardeners skip finishing the interior so the soil and drainage can behave naturally.
If you paint, use an exterior paint on the outside only, and let it cure fully before planting. Think of paint like perfume: it’s great once it settles, but you don’t want it trapped in a small enclosed space.
Planting Tips: Set Your Planter Up for Success
Choose the Right Soil Mix
Avoid digging random yard soil into a planter boxcontainers need lighter, well-draining media. A simple, effective blend:
- 60% high-quality potting mix
- 30% compost
- 10% perlite or coco coir (optional, for better drainage and moisture balance)
What to Grow in a Pallet Planter Box
For a 12″ deep box, you’re in great shape for:
- Herbs: basil, parsley, cilantro, thyme, chives
- Leafy greens: lettuce, spinach, arugula
- Strawberries (bonus: they look adorable spilling over the edge)
- Flowers: marigolds, petunias, nasturtiums
- Compact veggies: radishes, green onions, bush beans (with support)
If you want to grow deeper-rooted plants (like carrots or tomatoes), increase depth to 16–18″ and reinforce the frame.
Easy Customizations (Pick One, Don’t Try Them All at 10 PM)
- Add a trellis: Screw lattice or welded wire to the back for peas, beans, or climbing flowers.
- Make it mobile: Heavy-duty locking casters turn it into a rolling garden cart.
- Cap the top edge: A wider “rim” board gives a finished look and a spot to rest tools.
- Label strip: A thin board across the front for plant labels (or jokes, depending on your priorities).
- Tiered look: Build two boxes in different heights for a stepped patio display.
Common Mistakes (and How to Avoid Them)
Mistake: Using Any Random Pallet
Fix: Choose clean pallets, preferably heat-treated, and avoid pallets with questionable stains, odors, or treatment markings you don’t trust.
Mistake: No Drainage
Fix: Use a slatted bottom or drill plenty of holes. Test by pouring water in and watching it exit freely.
Mistake: A “Slats-Only” Build That Wobbles
Fix: Build a frame with corner posts and rails. Soil is heavy; your planter should behave like furniture.
Mistake: Trapping Water Against the Wood
Fix: If lining, don’t create a sealed bathtub. Keep drainage clear and promote airflow under the box with feet/spacers.
FAQ: Quick Answers That Save You a Second Trip to the Hardware Store
How long will a pallet planter box last?
It depends on your climate, drainage, and whether you protect the wood. Many pallet builds last a few seasons, and longer if the planter can dry out between waterings and the exterior is treated.
Can I use pressure-treated wood in a garden planter?
Some modern pressure-treated lumber uses treatments different from older formulations, but many gardeners still prefer untreated wood for edible planters. If you’re building from pallets and can’t verify the wood’s history, it’s smart to be cautious.
Do I need a liner?
Not alwaysbut a breathable landscape fabric liner is a nice upgrade that helps retain soil while still draining.
Conclusion
A pallet planter box is one of those rare DIY projects that’s both practical and charming: you get a functional growing space, you upcycle wood, and you can customize it endlessly (or keep it simple and still feel like a genius). Pick a safe pallet, build a sturdy frame, prioritize drainage, and you’ll have a planter that looks great and supports healthy plantsno elaborate woodworking degree required.
Bonus: Real-World Experiences Building a Pallet Planter Box (Lessons, Mistakes, and Small Victories)
The first pallet planter box I ever built looked fantastic from exactly one angle: the angle I took photos from. In real life, it leaned slightly to the left like it was listening to gossip. The reason was simplemy “frame” was basically optimism and screws. I had attached slats together and called it a day, forgetting that wet soil weighs a lot and will politely but firmly test every corner of your design. The next time I built one, I used corner posts and rails first, and the wobble disappeared. Lesson learned: structure first, pretty boards second.
Another unforgettable moment was discovering how many nails can live inside a single pallet. You’ll find nails where nails should not logically exist. Some will be bent. Some will be doubled. Some will appear to be installed by a person who took the phrase “secure fastening” as a personal challenge. I started out removing boards with a pry bar only, which worked but caused occasional splitsespecially near knotty spots. Switching to a reciprocating saw to cut nails between boards was a game changer. The boards stayed intact, and my patience stayed mostly intact, too.
Then there’s the “pallet wood personality” factor. Pallet boards are rarely perfect. Some are slightly warped, some are oddly thick, and some are so dry they crack if you sneeze near them. Instead of fighting that, I learned to sort boards: best boards for the visible front, slightly rough boards for the back, and the weird boards for the bottom slats where nobody will judge them. Pre-drilling also became my best friendespecially when using older, brittle pallet slats. It adds a few minutes, but it prevents that heartbreaking moment when a screw splits a board right at the end and you stare at it like it betrayed you.
My biggest “garden reality check” came from drainage. On one build, I lined the entire interior with plastic because I thought, “More protection for the wood!” What I actually created was a moisture trap. Water pooled, the soil stayed soggy, and the planter developed that unmistakable swampy smell. Plants struggled, and the interior wood stayed damp longer than it should have. The fix was simple: breathable landscape fabric, a slatted bottom, and feet to lift the planter off the ground. Suddenly the planter dried out between waterings, and the plants acted like they wanted to live again. It was a humbling reminder that plants don’t care how cute the planter isroots want air as much as they want water.
The fun part, though, is how satisfying these planters are once they’re planted. There’s something about walking past a box you built with your own hands and seeing basil, lettuce, or flowers thriving in it that feels like a small superpower. I’ve also learned that pallet planters invite experimentation. One season I dedicated a box entirely to “kitchen herbs I swear I’ll use,” and it actually workedmostly because the planter was close to the door, so harvesting felt easy instead of like a chore. Another season I mixed marigolds with leafy greens, which looked great and made the box feel like a living centerpiece.
If you’re building your first pallet planter box, here’s the honest truth: it probably won’t be perfectand that’s fine. The goal isn’t museum-quality joinery; it’s a sturdy container that drains well and gives plants a happy home. Each build teaches you something: how to read wood grain, where to place screws so boards don’t split, how much soil compacts after watering, and why “I’ll add drainage later” is a lie we tell ourselves. With every planter, your skills improve. And even if your first one turns out a little quirky, you’ll still get a garden out of it. That’s a win.