Table of Contents >> Show >> Hide
- Before You Build: Railing Rules That Matter (and Why)
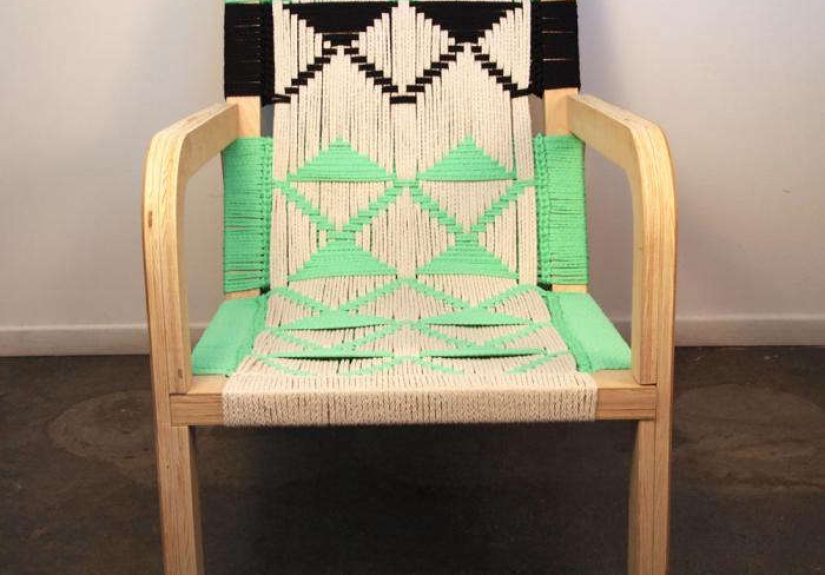
- Pick Your Deck Railing Style and Materials
- Tools and Materials Checklist
- Step-by-Step: Build a Wood Deck Railing That Doesn’t Wiggle
- Step 1: Plan post locations and railing “sections”
- Step 2: Install guard posts the right way (the make-or-break moment)
- Step 3: Set the bottom rail height and “sweep” clearance
- Step 4: Build the railing section between posts
- Step 5: Nail the spacing details so it passes inspection
- Step 6: Add a cap rail and make it comfortable
- How to Build a Deck Stair Railing and Handrail
- Composite and Metal Railing Systems: The Smart Way to DIY
- Finishing, Maintenance, and the Final “Shake Test”
- Conclusion: Build It Once, Enjoy It for Years
- Real-World Deck Railing Lessons (The Stuff People Learn the Hard Way)
A deck railing has one job: keep people on the deck. (Okay, two jobs: look good while doing it.) If your railing wobbles when someone leans on it, it’s not “rustic charm”it’s a future story your friends will tell at your expense.
This guide walks you through planning, building, and finishing a sturdy, code-friendly deck railingfrom rock-solid posts to baluster spacing that won’t fail the “tiny kid = 4-inch sphere” test. We’ll focus on common U.S. residential practices and the kind of details inspectors and future-you care about.
Before You Build: Railing Rules That Matter (and Why)
In building-code language, what most homeowners call a “deck railing” is usually a guard (the protective barrier along an open edge) plus, on stairs, often a handrail (the thing you grip). They’re related, but they’re not the sameand mixing them up is how DIY projects end up “almost done” for three summers in a row.
When is a deck railing required?
In many U.S. jurisdictions that follow the International Residential Code (IRC) model, decks that are more than about 30 inches above grade typically require a guard. Even if your deck is lower, you may still want a railing for safety, pets, or that one uncle who treats every gathering like a competitive sport.
Typical height requirements
Many residential guards are commonly built to 36 inches minimum above the deck surface, while some locations or building types call for 42 inches. Always confirm your local rules, especially if you’re in a multi-family setup or your city has amendments.
The “4-inch sphere” spacing rule (aka: the toddler test)
Openings in guards generally can’t be large enough for a 4-inch sphere to pass through. Stairs often have slightly different allowances (commonly 4-3/8 inches on the open side of stairs), and that triangular gap near the tread/riser/bottom rail area is often limited (commonly 6 inches). This is the part that trips up otherwise gorgeous railings.
Stairs usually need a real handrail
Many codes require a handrail when a stair run has 4 or more risers. Handrails typically must be in a grip-friendly height range and shaped so your hand can actually wrap around it. (A 2×4 can work in some designs, but it’s not always ideal or compliant everywhere.)
Pick Your Deck Railing Style and Materials
Your railing system is basically three decisions: posts (the structure), infill (balusters/pickets/cables/panels), and top rail (the touchable edge). Here are common options:
Wood railing (classic, customizable, more maintenance)
- Pros: Affordable, easy to modify, matches wood decks nicely, straightforward tools.
- Cons: Needs sealing/painting, can warp or check, fasteners can loosen over time.
Composite/PVC railing (low maintenance, kit-friendly)
- Pros: Cleaner look, less staining and sealing, lots of prefab systems.
- Cons: Must follow manufacturer spacing/support rules; can feel “bouncier” if under-supported.
Metal/aluminum railing (sleek, durable)
- Pros: Stable, consistent, often powder-coated, great with metal balusters.
- Cons: Can cost more; requires careful measuring and specialty brackets.
Cable railing (modern view, needs precision)
- Pros: Maximizes view, contemporary style.
- Cons: Requires solid framing and tensioning; spacing must account for cable deflection.
If this is your first build, a wood railing or a reputable kit system can be the sweet spot: forgiving enough to DIY, predictable enough to pass inspection.
Tools and Materials Checklist
Exact quantities depend on your deck layout, but most builds include:
Common tools
- Tape measure, pencil, speed square, level (and/or laser level)
- Circular saw or miter saw, drill/driver, bits, countersink
- Clamps (more than you think), impact driver (nice-to-have)
- Wrench/socket set for bolts, safety glasses, hearing protection
Common materials
- Posts: Typically 4×4 minimum for guards in many systems (some guides prefer larger posts depending on design)
- Rails: Often 2×4 top and bottom rails, plus a 5/4 or 2x cap rail
- Balusters: 2×2 wood, metal balusters, composite pickets, or kit infill
- Hardware: Structural screws or through-bolts with washers/nuts, approved connectors, railing brackets (if using a kit)
- Fasteners: Exterior-rated screws; for treated lumber, use hardware rated for treated wood (often stainless or hot-dipped galvanized)
- Finish: Exterior stain/paint or sealant (if using wood)
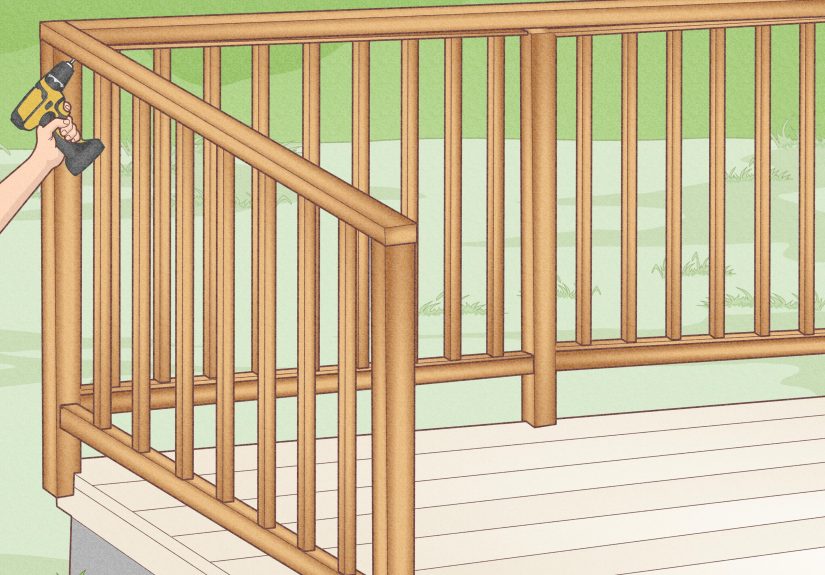
Step-by-Step: Build a Wood Deck Railing That Doesn’t Wiggle
The most common DIY railing is a wood guard: sturdy posts, top and bottom rails, and vertical balusters. The sequence below also helps if you’re using metal balusters or adding a decorative cap.
Step 1: Plan post locations and railing “sections”
Start by marking where each railing section begins and ends. In many traditional designs, posts are spaced no more than about 6 feet on-center (and sometimes closer for kit systems). Corners, stair transitions, and gates also need posts.
Pro tip: Stand where you’ll actually sit and look out. That “perfectly centered” post might land exactly in the middle of your best viewlike a photobomb that never leaves.
Step 2: Install guard posts the right way (the make-or-break moment)
A railing is only as strong as its posts. The safest approach is to tie the post into the deck framing with proper blocking and either through-bolts or structural-rated screwsso loads transfer into joists and rim boards, not into a few angry screws biting end grain.
- Open the framing if needed. If decking is already installed, you may need to remove a few boards to add blocking and access fasteners cleanly.
- Add blocking. Install solid blocking between joists near each post location to prevent rim-joist twist and to share loads with adjacent joists.
- Fasten posts with code-appropriate methods. Many prescriptive details show posts secured with multiple bolts and washers, plus hold-down anchors or equivalent reinforcement. Follow tested details or a reputable guidethis isn’t the place to freestyle.
- Keep posts plumb. Clamp them, level them, then fasten. A post that starts out leaning will only get sassier with time.
One big warning you’ll see repeatedly: don’t notch guard posts for deck guards unless you’re using an approved, engineered detail. Notching removes material right where bending forces are highest, which is a fancy way of saying “you just built a wobble lever.”
Step 3: Set the bottom rail height and “sweep” clearance
The bottom rail is usually raised a couple inches above the deck boards. This gives you a clean look, helps with drainage and debris, and keeps you aligned with common sweep/clearance guidance. Many builders clamp the bottom rail at a consistent offset (often in the 3-ish inch range) and use scrap wood as temporary supports to keep things uniform.
If you’re using a manufactured railing kit, follow its required sweep clearance and mid-span support rules. Some systems want additional supports every few feet to prevent sagging.
Step 4: Build the railing section between posts
You can assemble the section on the deck surface and then lift it into place, or build it in place. For many DIYers, pre-assembly is easier:
- Cut rails to length so they fit between posts (allowing space for brackets if used).
- Lay out balusters on the bottom rail. Use a spacer block to keep gaps consistent.
- Fasten balusters to bottom rail (pilot holes help prevent splitting).
- Attach the top rail to the balusters to create a rigid panel.
- Lift into place, check level and plumb, then fasten the assembly to the posts.
Use exterior-rated screws (stainless is a popular choice for longevity). Pilot holes are your friendespecially near ends and mitersbecause wood loves to split the moment you stop paying attention.
Step 5: Nail the spacing details so it passes inspection
This is where you slow down, measure twice, and pretend the inspector is watching from a nearby shrub.
- Baluster spacing: Keep openings small enough to satisfy the 4-inch rule (including the gap between a baluster and a post).
- Bottom gap: The space beneath the bottom rail must also respect opening limits.
- Stairs: Follow stair-specific opening limits and address the triangular gap by the tread/riser/bottom rail zone.
Step 6: Add a cap rail and make it comfortable
A cap rail (often a 2×6 or 5/4 board) makes the top feel sturdy and gives you a comfortable place to rest a drink, a forearm, or your hopes and dreams. Miter corners for a clean look, pre-drill, and consider slightly rounding edges so it’s pleasant to touch.
How to Build a Deck Stair Railing and Handrail
Stairs add angles, which is carpentry’s way of saying “now your measurements have opinions.” The basic approach is similarposts, rails, balustersbut you’ll cut rails to match the stair slope and pay attention to the handrail requirements.
Practical stair steps
- Clamp rails along the stairs and mark cut angles where they meet posts.
- Install bottom rails first, then use a baluster as a gauge to locate the top rail.
- Add balusters with consistent spacing, verifying openings meet stair limits.
- Install a graspable handrail if required (commonly when there are 4+ risers).
A “graspable” handrail is shaped so a hand can wrap around it, and it typically needs to run continuously and return at ends to reduce snag hazards. If your design uses a 2×4 as a handrail, confirm it meets your local requirements (many areas want a more grip-friendly profile).
Composite and Metal Railing Systems: The Smart Way to DIY
If you’re installing a composite, PVC, or aluminum railing kit, your job is less about inventing geometry and more about following instructions like they’re a recipe for cake you don’t want to flop.
- Measure between installed posts and cut rails to fitaccounting for bracket thickness.
- Support long spans with any required mid-span braces or crush blocks to prevent sag.
- Don’t rely on decking alone for post base supportuse proper structural blocking under the surface where required.
- Use approved fasteners compatible with treated lumber and the railing material.
Kits can look ultra-clean, but only if you keep your posts straight and your measurements consistent. A tiny post misalignment can turn a “simple install” into a “why is this rail 3/8 inch short?” situation.
Finishing, Maintenance, and the Final “Shake Test”
Before you call it done, do the tests that matter:
- Push test: Apply firm pressure at posts and mid-span. Movement should be minimal. If it flexes, reinforce the post-to-frame connection.
- Plumb/level check: Posts should be plumb, top rails level (or aligned with stairs), and sections consistent.
- Fastener check: Confirm bolts are tight, screws are seated, and nothing is splitting.
- Finish check: Seal or paint wood railings. If you used treated lumber, allow drying time as recommended before finishing.
Maintenance is simple: once or twice a year, tighten anything that loosened, check for rot (especially near post bases), and recoat wood finishes as needed. A railing that’s maintained is a railing that doesn’t surprise you.
Conclusion: Build It Once, Enjoy It for Years
Building a deck railing isn’t hardbuilding a sturdy deck railing is the part that rewards careful planning. Start with code basics (height and spacing), install posts with real structural reinforcement, keep baluster gaps compliant, and treat stairs like their own special project (because they are).
If you do it right, your deck railing becomes invisible in the best way: it quietly keeps everyone safe while your deck does what it’s supposed to dohost food, laughs, and the occasional dramatic sunset photo.
Real-World Deck Railing Lessons (The Stuff People Learn the Hard Way)
Here’s what tends to happen in the wildbased on patterns contractors and inspectors see constantly. If you learn these lessons now, you can skip the “redo weekend” later.
1) The post is the project
Most DIY deck railing frustration traces back to posts. People will spend hours picking the perfect baluster style, then fasten posts in a way that treats a guard like a decorative fence. A guard post has to resist real lateral forcepeople lean, kids climb, guests stumble, and someone will absolutely use the top rail to steady a tray of burgers. If the post connection is weak, the entire railing feels weak no matter how pretty the infill is.
2) Blocking feels boring… until you skip it
Solid blocking between joists isn’t glamorous, but it’s what turns “rim board and hope” into “rim board and structure.” Blocking spreads loads, prevents twisting, and gives your fasteners something meaningful to bite into. The bonus: it also makes your deck frame feel more solid overall.
3) Spacing mistakes hide in plain sight
The 4-inch rule isn’t just between balusters. The sneaky failures happen at: (a) the gap between the last baluster and the post, (b) the space under the bottom rail, and (c) stair triangles. People eyeball those gaps because “it looks close enough,” and inspectors (correctly) do not share that optimism. Measure the weird gaps first, then design your baluster layout to make the “ends” work.
4) Pre-drilling saves your sanity
Wood splits at the worst possible moment: after you’ve already installed the section and you’re one screw away from victory. Pilot holes, especially near ends and in dry lumber, are the cheapest insurance policy you’ll ever buy. They also help screws pull parts together more cleanly, which improves stiffness.
5) Treated lumber shrinksplan for it
Pressure-treated boards are often wet when you buy them. They can shrink as they dry, which can loosen fasteners and open tiny gaps. Use fasteners and hardware rated for treated lumber, keep boards tight where appropriate, and recheck connections after a season. If you’re painting or staining, follow best practices for drying time so your finish doesn’t peel like a sunburn.
6) Stairs demand patience (and sometimes a second set of hands)
Stair rails are all angles and repetition. Clamp your rails, mark angles carefully, and expect to dry-fit more than once. This is also where handrail comfort mattersnobody wants to white-knuckle a sharp-edged board when it’s icy or wet. A grip-friendly handrail profile can be a small upgrade that makes the whole deck feel more polished.
7) The best “pro move” is calling for an inspection early
If your local building department offers guidance, use it. A quick conversation (or an early framing check) can prevent rework. It’s much easier to add blocking before everything is closed up. In the end, passing inspection isn’t about bureaucracyit’s your confirmation that the railing will behave when real life happens.
Bottom line: build the posts like they matter, measure the gaps like they’ll be tested (because they will), and treat stairs like their own mini-project. Do that, and your deck railing won’t just look goodit’ll feel solid for years.