Table of Contents >> Show >> Hide
- Why This DIY Christmas Tree Works So Well
- Supplies You Need for a Tumbling Tower Blocks Christmas Tree
- Choose Your Tree Style Before You Build
- How to Build the Tree Step by Step
- Creative Variations to Try
- Common Mistakes to Avoid
- How to Display Your Finished Christmas Tree
- Final Thoughts
- Extra Holiday Experience: What Making One of These Trees Actually Feels Like
Some holiday crafts whisper “cozy farmhouse charm”. This one cheerfully shouts it while wearing a tiny bow and pretending it absolutely meant to be that cute. A tumbling tower blocks Christmas tree is one of those rare DIY projects that checks every box: inexpensive, beginner-friendly, customizable, and genuinely adorable when it is finished. It looks handmade in the best possible way, not in the “well, that certainly happened” way.
If you have ever spotted a box of tumbling tower blocks and thought, “These cannot possibly be destined for anything this festive,” allow this article to prove otherwise. With a little glue, a simple layout, and a finish that matches your holiday style, those humble wooden blocks can become a charming tabletop Christmas tree that looks right at home on a mantel, shelf, entryway table, or office desk. Better yet, you do not need a workshop, a power saw, or the patience of a saint.
In this guide, you will learn how to build a tumbling tower blocks Christmas tree from start to finish, how to decorate it without making it look overworked, and how to avoid the most common mistakes that turn “rustic” into “slightly alarming.” Whether your style is farmhouse, vintage, snowy cottage, or merry-and-bright, this DIY Christmas decor idea can be tailored to fit your holiday setup beautifully.
Why This DIY Christmas Tree Works So Well
A tumbling tower blocks Christmas tree works because the material does half the design work for you. The blocks are already cut to a uniform size, which means your tree gets a clean, stacked look without complicated measuring. The wood also brings natural warmth to holiday decor, so even an undecorated version feels festive. In other words, the blocks arrive ready to be useful little overachievers.
This project is especially great for people who want DIY Christmas decorations that feel handcrafted but not chaotic. It is small enough for apartment living, quick enough for weekend crafting, and affordable enough that you can make more than one. A single tree can be elegant. A group of three in varying heights looks like you definitely have your holiday life together.
Supplies You Need for a Tumbling Tower Blocks Christmas Tree
Core Materials
- One box of tumbling tower blocks or jumbling tower blocks
- Hot glue gun and glue sticks, or a strong craft adhesive suitable for wood
- Acrylic craft paint, wood stain, or both
- Paintbrush or foam brush
- Sandpaper or sanding block
- Protective mat or scrap cardboard for your work surface
Optional Decorative Extras
- Mini bells, beads, buttons, or pearl accents
- Twine, ribbon, burlap, or plaid bows
- Faux greenery, berries, or tiny pine sprigs
- Wood star, metal star, or a small topper
- White paint for a snow-dusted effect
- Clear matte or satin sealer
- Glitter if you enjoy vacuuming and making dramatic life choices
If you are brand new to wood crafts, do not overcomplicate your shopping list. The best version of this project starts with a small pile of supplies and a clear idea. Blocks, glue, paint, and one or two embellishments are enough to make something beautiful.
Choose Your Tree Style Before You Build
Before you start gluing, decide what kind of Christmas tree you want. That single choice will guide your finish, color palette, and decorations.
Rustic Farmhouse Tree
Use stain or a light brown wash, add twine, maybe tuck in a tiny sprig of faux cedar, and stop before it becomes too busy. Rustic decor looks best when it has room to breathe.
Snowy Cottage Tree
Paint the tree green or white, dry-brush on white for a frosted look, and add little pearl dots or white beads like tiny ornaments. This style feels soft, cozy, and wonderfully wintry.
Vintage Christmas Tree
Think muted greens, reds, creams, miniature bells, and a slightly distressed finish. If your tree looks like it belongs beside a mug of cocoa and a Bing Crosby record, you are doing great.
Bright and Playful Tree
Paint the blocks in bold colors, add candy-inspired accents, and go all in with cheerful details. This option is perfect for kids’ rooms, craft fairs, or anyone who believes Christmas should not whisper when it could sing.
How to Build the Tree Step by Step
Step 1: Sort and Prep the Blocks
Spread out the blocks and check for rough edges, splinters, or uneven pieces. Lightly sand anything that feels scratchy. This step seems skippable until you brush on paint and realize one block looks like it has been through a tiny lumberyard argument. Smooth surfaces make the final tree look cleaner and more polished.
Step 2: Plan the Shape First
Lay the blocks on your table before gluing. The simplest design is a stacked triangle. For example, make the bottom row with seven blocks, then six above it, then five, and continue until you reach the top. Another option is to create a narrower silhouette with five, four, three, two, and one. Both work well; the right choice depends on how tall and wide you want your tabletop Christmas tree to look.
Do not eyeball the whole thing from across the room like a holiday architect in a rush. Actually lay it out. A dry fit helps you catch crooked spacing, odd proportions, and that one rogue block that apparently wants to become modern art.
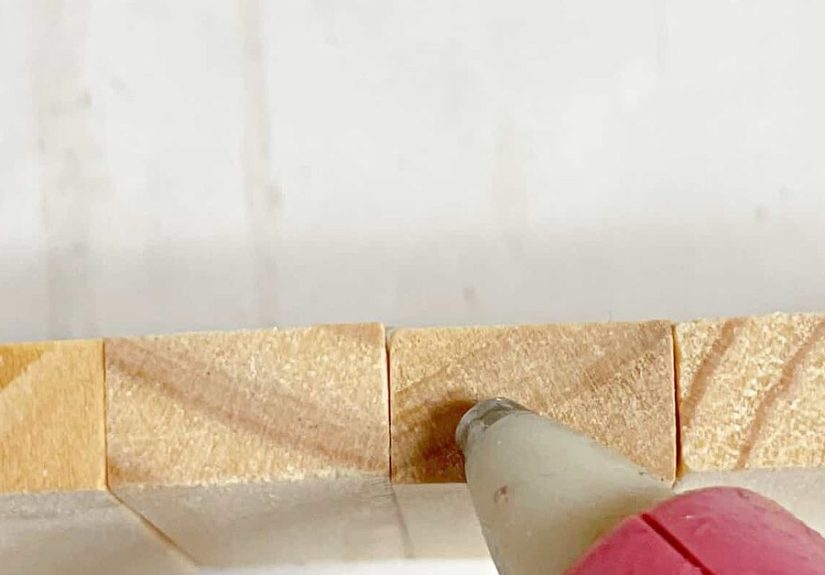
Step 3: Glue from the Bottom Up
Once you like the layout, start gluing row by row from the bottom upward. Apply a modest amount of glue between touching surfaces. Too little glue creates a shaky tree. Too much glue creates shiny strings that follow you around the room like clingy tinsel. Hold each row in place for a few seconds, then continue.
Many crafters also like to reinforce the back with one or two extra blocks placed horizontally across the rows. This is especially helpful if your tree is taller, heavier, or destined for a spot where it may get bumped by excited children, pets, or adults reaching for cookies with no spatial awareness.
Step 4: Add a Trunk or Base
To make the design read clearly as a Christmas tree, glue one block vertically or horizontally at the bottom center as a trunk. You can also mount the tree onto a small wood round or block base if you want it to stand with extra stability. A base is a smart choice for mantel displays or entry tables where the decor gets moved around during the season.
Step 5: Paint, Stain, or Leave It Natural
Now for the transformation. You have three good directions here:
- Natural wood: Clean, Scandinavian, understated, and very easy to style.
- Painted finish: Great for traditional green trees, white snowy trees, or colorful modern versions.
- Stained finish: Perfect for rustic, vintage, and farmhouse Christmas decor.
If you are using acrylic paint, do thin coats instead of one heavy coat. That keeps the texture of the wood visible and prevents gloppy edges. If you want a distressed look, let the paint dry and then lightly sand the corners so some wood shows through. It gives the tree that lived-in holiday charm, like it has been part of family Christmas decor for years instead of since Tuesday evening.
Step 6: Decorate with Restraint
This is the part where people often go from “charming” to “the craft store exploded.” Choose two or three embellishments, not nine. A tiny bow at the top, a sprig of greenery, and a few miniature beads are often enough. If your paint or stain finish is already interesting, let it be the star.
Try wrapping twine loosely around the tree like garland. Add a small bell or star at the top. Dot the front with tiny buttons or flat-back pearls. If you want a snowy finish, dry-brush a little white paint onto the edges and corners. Think whisper of snow, not blizzard inside the living room.
Creative Variations to Try
Make a Trio of Trees
One of the best decorating tricks is to make three trees in different heights and display them together. This creates depth and gives your holiday vignette a styled, intentional feel. It also makes people assume you are naturally good at decorating, which is a wonderful seasonal bonus.
Turn It into an Ornament
Build a mini version with fewer blocks, glue a loop of ribbon or twine to the back, and hang it on your tree. These also make sweet gift toppers or handmade package tags.
Add Words or Seasonal Phrases
If you have a steady hand or vinyl lettering, add a tiny holiday message on the trunk or base. Think “Joy,” “Merry,” “Noel,” or “Let It Snow.” Keep it small so the project does not drift into craft-sign territory unless that is absolutely your thing.
Common Mistakes to Avoid
Using Too Much Glue
Excess glue can leave shiny ridges and stringy webs. Use enough to bond, then stop. Your glue gun does not need to express its entire personality.
Skipping the Layout Stage
When you glue first and plan later, the result often leans, gaps, or looks oddly lopsided. Always dry fit the design before committing.
Overdecorating
The wood block structure already has visual texture. Too many extras can bury the charm that made you want to build the tree in the first place.
Ignoring Stability
If the tree feels wobbly, reinforce the back or add a base. A Christmas craft should spread joy, not suspense.
How to Display Your Finished Christmas Tree
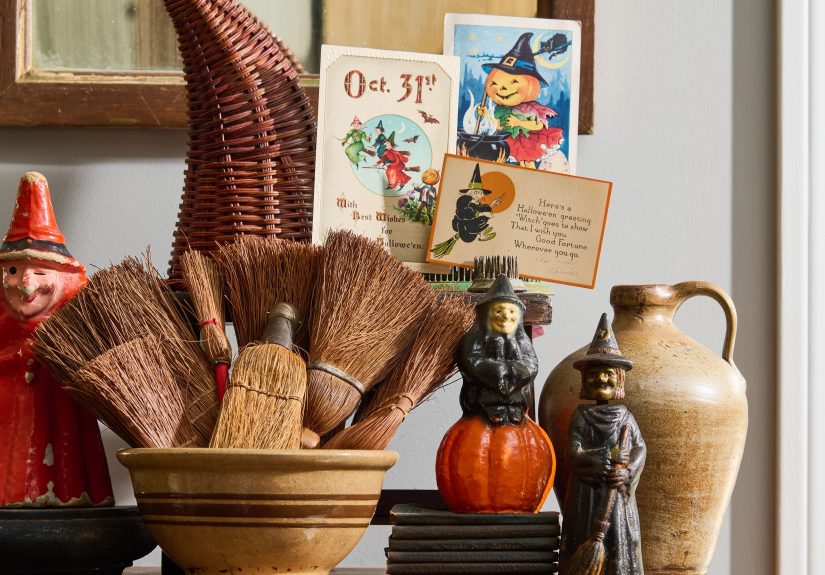
This DIY tumbling tower blocks Christmas tree works beautifully on a mantel, bookshelf, coffee bar, entry console, tiered tray, or holiday centerpiece. It pairs especially well with candles, vintage books, ceramic houses, knit stockings, and other natural textures like burlap or greenery. If your decor leans minimalist, leave the tree simple. If your decor is cozy and layered, cluster several together with beads and pine sprigs.
You can also use these as handmade gifts. Wrap one in tissue paper, tuck in a small ornament or gift tag, and suddenly you look like the person who always has tasteful holiday presents ready ahead of time. Nobody needs to know you were still brushing on the final coat while reheating coffee.
Final Thoughts
A charming tumbling tower blocks Christmas tree is proof that holiday magic does not require expensive supplies or advanced woodworking skills. It just takes a clever material, a simple plan, and enough restraint to stop decorating before the tree begins requesting its own zip code. The finished piece feels warm, personal, and delightfully festive, which is exactly what great Christmas decor should be.
If you want a craft that is easy to personalize, simple to display, and fun enough to make more than once, this project deserves a spot on your holiday DIY list. Build one in natural wood for a rustic look, paint one green for a classic Christmas vibe, or create a whole little forest for your mantel. However you style it, the result is a handmade decoration with real charm and just the right amount of holiday cheer.
Extra Holiday Experience: What Making One of These Trees Actually Feels Like
The first time I made a tumbling tower blocks Christmas tree, I expected a quick little craft and a modestly cute result. What I got instead was one of those surprisingly satisfying holiday projects that makes an entire afternoon feel more festive. There is something deeply enjoyable about taking an object designed for a game and giving it a second life as decor. It feels resourceful, creative, and just mischievous enough to be fun. Like the blocks are thinking, “We were built for suspense, but honestly, we look fantastic as a Christmas tree.”
What stands out most is how calming the process is. You spread the blocks out, test a few layouts, change your mind twice, and slowly see a tree shape emerge. It is not a loud craft. It is not one of those projects where you need ten tools, twelve tutorials, and emotional support. It is simple enough that you can chat with family, listen to Christmas music, or watch a holiday movie in the background while you work. That easy rhythm is part of the charm.
I also learned that this craft has a sneaky way of becoming social. You make one, someone sees it, and suddenly they want one too. Then you are discussing whether the next tree should be stained dark walnut, painted snowy white, or dressed up with a tiny plaid bow. Kids want to add “ornaments.” Adults suddenly have very strong opinions about twine. Someone suggests glitter, and the room divides immediately into two political parties: Team Festive Sparkle and Team Absolutely Not.
Another fun part is how forgiving the project is. If you do not love the first finish, you can repaint it. If the bow looks silly, remove it. If one tree turns out especially cute, make two more and call it a styled collection. You are not trapped by perfection. In fact, the slight imperfections are often what make the piece feel warm and handmade. A tiny bit of uneven distressing or a not-quite-identical trio can actually make the display look more authentic and inviting.
The finished tree also has a wonderful way of sneaking into different spaces around the house. One ends up on the mantel. Another lands on a bookshelf. A smaller version appears near the coffee station because apparently even the mugs deserve Christmas decor. And every time you walk past one, it gives off that small burst of satisfaction that only handmade holiday pieces seem to deliver. You made that. Out of blocks. During an ordinary afternoon. And now it looks like something from a cozy holiday display.
More than anything, this project feels memorable. Not because it is complicated, but because it is easy enough to repeat. It becomes the kind of craft you pull out every holiday season, maybe with a slightly different color palette or style each year. One year it is rustic. The next year it is snowy and elegant. Maybe later you make ornament versions or gift a few to friends. Over time, the project stops being just a craft and starts becoming part of your Christmas routine. And that, more than any ribbon or bell, is what makes it truly charming.