Table of Contents >> Show >> Hide
- What “GodMode” Actually Is (and What It Isn’t)
- Before You Start: A Quick Safety Checklist
- How to Activate GodMode (Windows 11, 10, 8/8.1, and 7)
- How to Use GodMode Without Getting Lost
- What to Do Inside GodMode: Quick Wins That Actually Matter
- Troubleshooting: When GodMode Doesn’t Work
- How to Remove GodMode
- Bonus: Other “GodMode” Style Shortcuts (Optional Nerd Candy)
- Real-World Experiences: What Using GodMode Feels Like (and Why You’ll Keep It)
- Wrap-Up
- SEO Tags
Windows has a secret superpowerand no, it’s not “making printers work on the first try.” It’s a hidden Control Panel view that drops hundreds of system settings into one searchable list. Microsoft didn’t officially call it “GodMode” (the internet did, because the internet can’t resist dramatic branding), but the shortcut is real, it’s safe, and it works across Windows 11, Windows 10, Windows 8/8.1, and Windows 7.
If you’ve ever bounced between Settings, Control Panel, and random legacy dialogs like you’re on a scavenger hunt, GodMode is the “put everything in one drawer” fix. It won’t magically grant you admin powers, but it will save you clicks, time, and a little sanity.
What “GodMode” Actually Is (and What It Isn’t)
GodMode is essentially a special folder/shortcut that opens a master list of Control Panel tasksoften called All Tasks or the Master Control Panel. Think of it as a neatly organized menu of shortcuts to tools you already have: Device Manager, Backup options, Power settings, Network & Sharing, Troubleshooters, credential tools, and more.
- It is: a fast, searchable hub for existing Windows settings.
- It isn’t: a hack, a cheat code, or a backdoor that unlocks forbidden features.
- It doesn’t: bypass security. If a setting requires administrator approval, you’ll still get a UAC prompt or need admin credentials.
Before You Start: A Quick Safety Checklist
This is low-risk, but do yourself a favor and follow these two rules so you don’t accidentally “hide” your own stuff:
- Create a brand-new empty folder for GodMode. Don’t rename an existing folder that already contains files.
- Copy the code exactlyone missing character and Windows will treat it like a normal folder with a very suspicious name.
Ready? Let’s flip the switch.
How to Activate GodMode (Windows 11, 10, 8/8.1, and 7)
The steps are basically identical across these versions. Choose the method that fits your vibe: classic folder trick, cleaner shortcut, or “open it only when needed.”
Method 1: The Classic “Magic Folder Name” Trick
- Go to your Desktop (or any location you like in File Explorer).
- Right-click an empty space and choose New > Folder.
- Rename the folder to this exact text (yes, include the period):
GodMode.{ED7BA470-8E54-465E-825C-99712043E01C} - Press Enter.
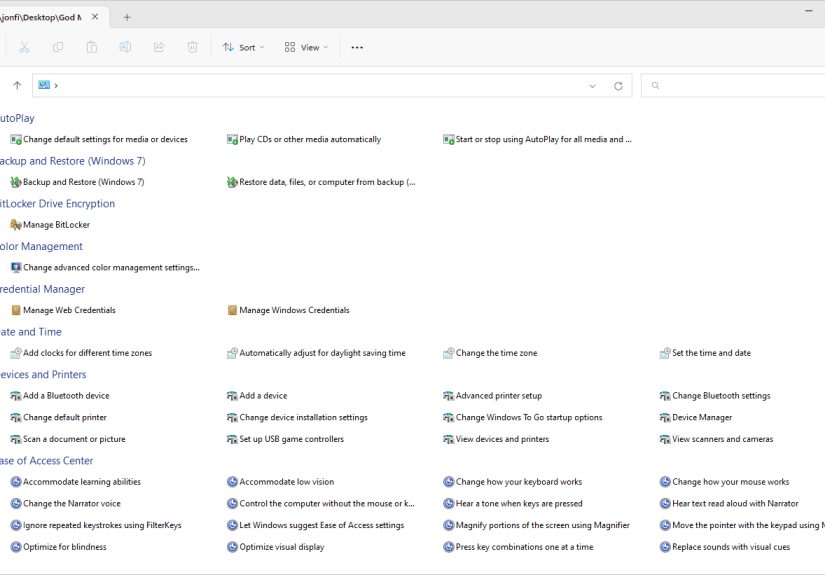
If everything is correct, the folder icon will instantly change into a Control Panel–style icon, and the visible name may change (or even disappear, depending on your Windows version). Double-click it, and you’ll see a categorized list of settings with a search box ready to go.
Pro tip: You don’t have to name it “GodMode.” You can use “JediMode,” “NinjaCat,” or “PleaseLetMeFixThisPrinter,” as long as the GUID part stays the same.
Method 2: Create a Clean Desktop Shortcut (No Weird Folder Name)
If you don’t want a special folder sitting around, make a shortcut that opens the All Tasks view directly:
- Right-click the Desktop and choose New > Shortcut.
- In the location box, paste:
%windir%explorer.exe shell:::{ED7BA470-8E54-465E-825C-99712043E01C} - Click Next, name it something obvious like All Tasks or GodMode, then click Finish.
This method is especially nice if you want to pin it somewhere, share it with less-technical family members, or keep your Desktop from becoming “icon soup.”
Method 3: Open GodMode On Demand (No Desktop Icon)
If you prefer a minimalist setup, you can open the All Tasks view only when you need it:
- Open File Explorer.
- Click the address bar.
- Type (or paste):
shell:::{ED7BA470-8E54-465E-825C-99712043E01C} - Press Enter.
It’s the same destinationjust without leaving a shortcut behind like digital breadcrumbs.
How to Use GodMode Without Getting Lost
Open GodMode and you’ll see a long list of settings grouped by category. The first-time experience is basically: “Wow, that’s a lot,” followed by: “Wait… this is actually organized.” Here’s how to make it genuinely useful.
1) Search First, Click Second
GodMode shines because it’s searchable. Instead of guessing where Windows hid a setting, just search for what you want:
- “environment” to find environment variables
- “firewall” for security-related settings
- “power” for sleep and performance controls
- “backup” for recovery and file history tools
2) Build Tiny “Toolkits” for Common Jobs
One of the smartest tricks is creating mini collections. For example, if you’re troubleshooting Wi-Fi, you can copy shortcuts related to networking into a separate folder, then work from that focused list instead of scrolling through everything.
3) Drag-and-Drop Shortcuts for One-Click Access
You can drag many items out of GodMode and drop them onto your Desktop as shortcuts. If you repeatedly open Device Manager, Programs and Features, or Sound settings, this becomes a “why didn’t I do this years ago?” moment.
What to Do Inside GodMode: Quick Wins That Actually Matter
GodMode contains a lot, but you don’t need to use all of it. Here are a few high-value moves that normal humans (not just IT wizards in hoodies) tend to appreciate:
Speed up the “Where is that setting?” moments
- Uninstall a stubborn app: Jump straight to Programs and Features instead of digging through Settings menus.
- Fix sound issues fast: Get to classic Sound control panels, manage devices, and set defaults.
- Manage startup behavior: Find power and sleep settings, plus legacy performance options.
Network and sharing tools in one place
- Open Network & Sharing Center and related adapters/options without the usual “Settings maze.”
- Access troubleshooters and legacy dialogs that still solve real problems.
Admin-friendly essentials
- Credential Manager for stored logins
- Administrative Tools for deeper system management
- Backup/Restore and recovery options (varies by Windows version)
- Power Options for performance tuning, sleep, and battery behavior
Reality check: Clicking a tool doesn’t automatically make it safe to change. GodMode makes access easiernot consequences smaller. If you’re not sure what a setting does, pause before you turn your PC into a science experiment.
Troubleshooting: When GodMode Doesn’t Work
Problem: “It’s just a normal folder”
Almost always, the name wasn’t entered exactly right. Check for:
- The period before the braces: GodMode.{GUID}
- Curly braces included: { }
- No missing characters in the GUID
Problem: “The name disappeared / it looks blank / it’s a weird folder icon”
This can be normal behavior on some versions/builds. If it opens and shows the All Tasks list, you’re fine. If Windows 11 shows a plain-looking folder, try opening it anyway. Some guides also note you can right-click > Properties and adjust how it displays, but functionality is the key test: does it open the settings list?
Problem: “I used an existing folder and now my files are gone”
They’re not goneWindows is just showing the special view instead of the folder’s contents. Rename it back. If File Explorer won’t let you rename it easily, you can use Command Prompt to rename the folder to something normal again. After that, your files should reappear.
Problem: “Some settings are missing”
In managed environments (work/school PCs), administrators can hide or disable certain Control Panel items via policy. In that case, GodMode can’t show what the system won’t allow. Updating Windows may change the list slightly, but policy restrictions will still winbecause IT always wins.
How to Remove GodMode
Deleting GodMode is delightfully low drama: just delete the folder or shortcut you created. Nothing “installs,” so nothing needs an uninstaller. If you used the shortcut method, delete the shortcut. If you used the folder method, delete the folder.
Bonus: Other “GodMode” Style Shortcuts (Optional Nerd Candy)
The reason this works is that Windows Explorer can treat certain specially named folders as shell namespace shortcuts. That means there are other CLSIDs that open specific system areas. For example, some guides note you can create a folder that opens Administrative Tools directly using a different CLSID. This is optional, advanced, and mostly for people who enjoy customizing Windows the way others customize mechanical keyboards.
If you try this, keep a simple rule: only use CLSIDs from trustworthy references, and don’t go past what you understand. Windows already has enough “surprises.”
Real-World Experiences: What Using GodMode Feels Like (and Why You’ll Keep It)
The first time most people open GodMode, it’s equal parts delight and disbelief. Delight, because suddenly the settings you normally hunt forlike you’re tracking a rare Pokémonare sitting in one list. Disbelief, because you start wondering why Windows doesn’t ship with this view pinned somewhere obvious. After about five minutes, the pattern becomes clear: GodMode doesn’t give you superpowers. It gives you momentum.
A common “aha” moment happens during troubleshooting. Say your Bluetooth won’t cooperate or your Wi-Fi keeps dropping. Normally, you’d bounce between Settings pages, Control Panel dialogs, and maybe an old-school wizard window that looks like it time-traveled from 2009. With GodMode, you search “network,” and suddenly you’re staring at a buffet of relevant tools: adapters, sharing options, troubleshooting links, and supporting settings that usually take multiple hops to reach. Even if you don’t fix the problem instantly, you stop losing time just getting to the right place.
Another experience people love: building a personal “mini control panel.” After you’ve used GodMode for a bit, you begin to notice repeatsthose same five to ten settings you open all the time. Maybe it’s Sound settings for switching output devices, Device Manager for driver checks, Power Options for performance, or backup tools for peace of mind. Dragging those shortcuts out to the Desktop (or copying them into a dedicated folder) turns Windows into something that feels more tailored. It’s not about flexing “power user” statusit’s about cutting friction from your daily routine.
GodMode also shines when you’re helping someone else. If you’ve ever played remote tech support for a friend or family member, you know the pain of directions like: “Click Start… no, the other Start… okay, open Settings… now scroll… wait, which section are you in?” With GodMode, you can say: “Open the All Tasks folder and type ‘firewall’ in the search.” It’s simpler, repeatable, and less dependent on whether Windows decided to rename a menu in the latest update.
And yes, there’s a funny side: GodMode exposes just how much Windows is still juggling modern Settings and classic Control Panel pieces at the same time. You’ll see legacy items right next to newer ones, like Windows is politely saying, “We’re still working on it.” But that’s exactly why GodMode remains useful. When Settings doesn’t include a deeper option, GodMode often leads you straight to it without the usual detours.
After a week, most people keep GodMode for one reason: it becomes the fastest “escape hatch” when Windows hides something again. It’s like having a master keynot to bypass locks, but to stop wandering the hallway looking for the right door.
Wrap-Up
GodMode is one of those rare Windows tricks that’s both simple and genuinely useful. You’re not installing anything, you’re not hacking anything, and you’re not summoning ancient spirits from the Registry. You’re just creating a shortcut to the All Tasks view so you can reach settings quicklyespecially the ones Windows likes to bury three menus deep.
Create it once, use it when you need it, delete it when you don’t. And if you name it “PrinterFixMode,” I won’t judge you. I’ll understand.