Table of Contents >> Show >> Hide
- Why sprinkler valves matter (even if you never wanted to learn this)
- Meet the parts inside a typical sprinkler valve
- How sprinkler valves work step-by-step
- Step 1: The valve is OFF (closed and pressurized)
- Step 2: The controller sends power to the solenoid
- Step 3: The pilot port opens (pressure escapes from the upper chamber)
- Step 4: The diaphragm lifts (the valve opens)
- Step 5: The controller shuts off power (the valve closes)
- Step 6: The upper chamber refills and the diaphragm reseats
- Why a tiny solenoid can control a big flow (pilot operation explained)
- Common types of sprinkler valves (and what’s different about them)
- How to manually open a sprinkler valve (for testing)
- Why sprinkler valves fail (and what it usually looks like)
- A simple troubleshooting checklist (no special tools required)
- Maintenance basics: how to keep valves from becoming drama queens
- Repair or replace: which is smarter?
- Bottom line: so… how do sprinkler valves work?
- Real-World Experiences With Sprinkler Valves (About )
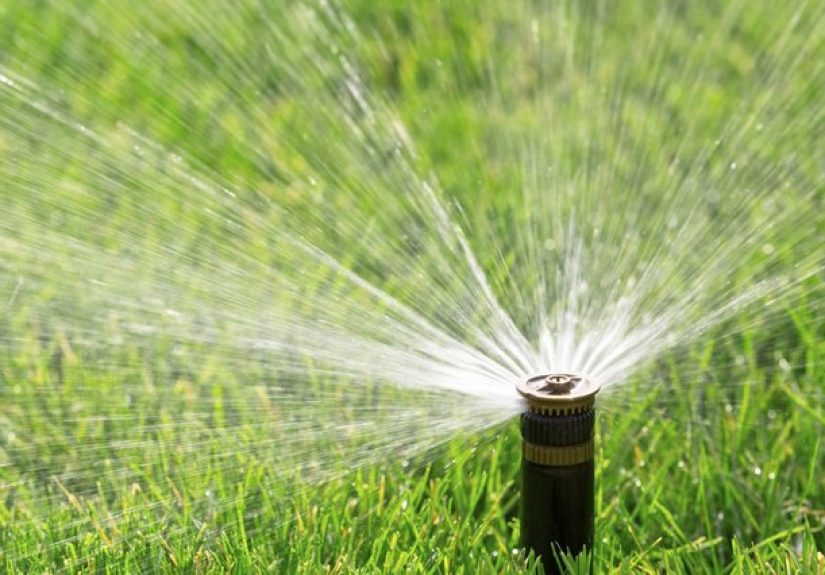
If your lawn has “zones,” your sprinkler valves are the backstage crew making the show happen. They’re the reason the front yard can water for 12 minutes while the flower beds get a gentle drip session and your side yard doesn’t flood like it’s practicing for a swimming meet.
In plain English: a sprinkler valve is a remote-controlled gate that opens and closes to send water to a specific zone. In slightly nerdier (but still friendly) English: most residential irrigation valves are pilot-operated diaphragm valves controlled by a 24-volt solenoid. That’s a fancy way of saying a tiny electric part uses water pressure to do the heavy liftingkind of like a bouncer who doesn’t pick anyone up, but still controls the entire line with a clipboard.
Why sprinkler valves matter (even if you never wanted to learn this)
Sprinkler valves control:
- Where water goes (which zone is watering)
- When it waters (based on the controller schedule)
- How well it waters (flow consistency, leaks, and pressure issues often trace back to valves)
When a zone won’t turn on, won’t shut off, or “mysteriously” trickles water when it’s supposed to be off, the valve is often the main suspect.
Meet the parts inside a typical sprinkler valve
Most residential sprinkler valves (Rain Bird, Hunter, Orbit, Irritrol, and similar brands) share the same core anatomy. Here are the main characters.
1) Valve body (the “plumbing tunnel”)
The valve body is the hard shell (usually plastic in residential systems, sometimes brass in commercial or specialty setups). It has an inlet (water coming from the main line) and an outlet (water heading toward your zone’s sprinkler heads or drip line).
2) Diaphragm (the flexible gate)
The diaphragm is a thick rubber disc that seals against the valve seat. When it’s pressed down, water is blocked. When it lifts up, water flows. The diaphragm is also part of a two-chamber system that uses pressure differences to open and close smoothly.
3) Upper chamber (the “pressure hat”)
Above the diaphragm is a small chamber. When that upper chamber is pressurized, it pushes the diaphragm down and keeps the valve closed. When pressure in the upper chamber is released, pressure from below can lift the diaphragm and open the valve.
4) Solenoid (the electric on/off switch)
The solenoid is the cylinder on top of the valve with two wires coming out. When your controller sends power (commonly 24 VAC in standard irrigation systems), the solenoid energizes and moves a small plunger inside. That movement opens (or closes) a tiny pathwaycalled a pilot portthat controls pressure in the upper chamber.
5) Tiny ports and passages (the “secret hallways”)
Inside the valve are very small holes and channels. One important feature is a small orifice that allows water to slowly fill the upper chamber when the valve is off. Another is the pilot exhaust path that lets water leave the upper chamber when the solenoid is activated.
These little passages are why valves sometimes fail due to debris. It doesn’t take muchone grain of grit in the wrong placeand suddenly your “precision irrigation system” becomes “surprise water feature.”
6) Manual bleed screw / manual operation
Many valves include a bleed screw or manual knob. Loosening it slightly releases pressure from the upper chamber, manually opening the valve without the controller. Some valves also allow manual operation by turning the solenoid a fraction of a turn (often 1/4 to 1/2 turn, depending on design). It’s useful for testing zones during troubleshooting or adjustments.
7) Flow control (on some valves)
Some valves have a flow control knob on top. This doesn’t “turn a zone on and off” like a light switch. Instead, it throttles how much the valve can openhelpful for reducing misting, water hammer, or matching a zone’s flow needs.
How sprinkler valves work step-by-step
Let’s walk through what’s happening when your controller turns on a zone. This is the heart of the question: how do sprinkler valves work?
Step 1: The valve is OFF (closed and pressurized)
When the valve is closed, water pressure exists on both sides of the diaphragmbut the design creates a stronger “closing force” on top. Water enters the valve and, through a tiny orifice, fills the upper chamber above the diaphragm. With the upper chamber pressurized, the diaphragm is pushed down tightly against the valve seat, stopping flow to the zone.
Think of it like holding a lid down with your palm. The water wants to push up from below, but the pressure above (and sometimes a spring) keeps it sealed.
Step 2: The controller sends power to the solenoid
Your irrigation controller activates a zone by sending low-voltage power through the valve wires to the solenoid (commonly 24 VAC for many systems). The solenoid energizes and lifts a small plunger.
Step 3: The pilot port opens (pressure escapes from the upper chamber)
When the plunger lifts, it opens a tiny pilot pathway. That pathway allows pressurized water in the upper chamber to escape downstream (or out through an exhaust passage). The upper chamber pressure drops.
Step 4: The diaphragm lifts (the valve opens)
Once the pressure above the diaphragm is lower than the pressure below it, the stronger force from below pushes the diaphragm upward. Now water can pass through the valve body and flow into the zone’s pipes, feeding sprinkler heads or drip emitters.
This is the “pilot-operated” magic: the solenoid doesn’t have to shove a big gate open against full water pressure. It just releases pressure from the top chamber so the system’s own pressure does the heavy lifting.
Step 5: The controller shuts off power (the valve closes)
When the controller ends that zone’s runtime, the solenoid de-energizes and the plunger returns to its resting position, closing the pilot port. Water can no longer escape from the upper chamber.
Step 6: The upper chamber refills and the diaphragm reseats
That tiny orifice now slowly refills the upper chamber with water. As the upper chamber pressure rebuilds, it pushes the diaphragm back down onto the valve seat. Flow stops. Zone off. Lawn no longer drinking from a firehose. Everyone’s happy.
Why a tiny solenoid can control a big flow (pilot operation explained)
If you’ve ever wondered how that little cylinder with two wires can control gallons per minute, here’s the key: the solenoid isn’t opening the main water path. It’s opening a small pressure-relief path.
That’s why sprinkler valves are efficient and reliable when clean. The solenoid needs only enough power to move a small plungerwhile water pressure handles the rest. It’s also why:
- Debris matters (tiny ports clog easily)
- Diaphragm condition matters (tears or warping prevent proper sealing)
- Electrical issues matter (no power = plunger doesn’t lift = upper chamber pressure stays = valve never opens)
Common types of sprinkler valves (and what’s different about them)
Electric in-line diaphragm valves (most common)
This is the typical buried valve in a valve box. It’s controlled by a 24-volt solenoid and uses the diaphragm/upper-chamber system described above. These come in globe and angle configurations and in common sizes like 3/4-inch or 1-inch for residential systems.
Anti-siphon valves (often above ground)
Anti-siphon valves are designed to help prevent contaminated water from siphoning back into the home’s potable supply. They’re commonly installed above ground and must be placed higher than the highest sprinkler head in the zone. They still use a diaphragm/solenoid setup, but the anti-siphon feature adds installation rules and extra internal parts.
Jar-top valves (maintenance-friendly)
Some valves have a “jar-top” lid that unscrews instead of using multiple screws. The goal is easier access for diaphragm cleaning or replacement. Same basic operationjust less time hunting for that one screw you dropped into the valve box mud (a universal homeowner experience).
Drip-specific control valves and filter/regulator combos
Drip zones often need lower pressure and filtration. Some systems use valves designed for low-flow performance, or pair standard valves with a filter and pressure regulator. If you’re running drip, keeping debris out becomes even more important because small emitters and pilot ports clog easily.
How to manually open a sprinkler valve (for testing)
Manual operation is helpful when you’re troubleshooting: “Is the problem electrical (controller/wiring/solenoid) or hydraulic (water supply/diaphragm/debris)?”
Method A: Turn the solenoid slightly
Many valves allow you to twist the solenoid counterclockwise a small amount (often about 1/4 to 1/2 turn) to open the valve manually. You’re essentially opening that pilot path without electricity. To stop, tighten it back clockwise until snug (hand-tight, not “gorilla-tight”).
Method B: Use the bleed screw/bleed knob
Loosen the bleed screw slightly to release pressure from the upper chamber. You may see a little water tricklethis is normal. Retighten to close.
Pro tip: If a zone is stuck running, one of the first simple checks is whether the solenoid or bleed screw is slightly open from a prior manual test or seasonal service.
Why sprinkler valves fail (and what it usually looks like)
Problem 1: The valve won’t open
Common causes include:
- Water supply is off (yes, this happens more than people admit)
- Electrical issue: broken wire, bad splice, corrosion, blown fuse, or controller problem
- Bad solenoid: coil failure or stuck plunger
- Clogged pilot ports: debris blocks the tiny passages
- Diaphragm stuck: debris or warping prevents movement
A quick test is manual operation. If the valve opens manually but not electrically, the problem is often solenoid/wiring/controller. If it won’t open manually either, think water supply, severe clog, or a mechanical issue.
Problem 2: The valve won’t close (zone runs forever)
This is the classic “my controller is off but my sprinklers are still partying” scenario. Usual suspects:
- Debris under the diaphragm keeping it from sealing
- Torn or damaged diaphragm
- Solenoid/bleed screw left partially open from manual operation
- Pilot port not sealing because the plunger is stuck or debris is lodged
Problem 3: Weeping, leaking, or puddling around the valve
Leaks can be internal (water sneaking through to the zone) or external (water escaping into the valve box). External leaks are often caused by:
- Loose bonnet screws (the top cover isn’t evenly tightened)
- Damaged o-ring or diaphragm seal
- Cracked valve body (often from freezing or physical stress)
- Bleed screw not fully closed or damaged
Problem 4: Weak sprinklers or low flow in one zone
If heads barely pop up, or coverage is sad and uneven, the valve might be only partially opening. Causes include:
- Clogged pilot ports or diaphragm filter/screen (if present)
- Debris restricting the diaphragm movement
- Flow control partially closed
- System pressure issues (not always the valve, but it’s in the lineup)
A simple troubleshooting checklist (no special tools required)
- Confirm water supply: main irrigation shutoff fully open.
- Find the valve box: look for a green rectangular lidusually near the house or in a grouping.
- Check manual settings: ensure bleed screw and solenoid are snug (not overtight).
- Try manual open: if it runs manually, the plumbing side is likely okay.
- Listen/feel: when the controller runs a zone, you may hear or feel the solenoid click. No click can suggest electrical issues.
- Inspect for debris: if stuck on/off, cleaning the diaphragm area and pilot ports often solves it.
Maintenance basics: how to keep valves from becoming drama queens
Sprinkler valves don’t need constant attention, but they do appreciate a little respect:
- Use waterproof wire connectors in valve boxes. Moisture plus electricity plus time equals corrosion.
- Keep valve boxes clean so dirt and debris don’t get pulled into parts during repairs.
- Flush the system after installation or major pipe work. New PVC cuts and dirt love clogging tiny passages.
- Service diaphragms as needed: many brands sell diaphragm repair kits, which can be cheaper than replacing the entire valve.
- Protect against freezing: winterize properly in cold climates to avoid cracked bodies and fittings.
Repair or replace: which is smarter?
Repair is often smart when:
- The valve body is intact (no cracks)
- The issue is debris, a worn diaphragm, or a failing solenoid
- Parts are readily available for your valve model
Replace is often smart when:
- The valve body is cracked or warped
- Threads are stripped, fittings are damaged, or leaks persist after reseating
- The valve is very old and parts are hard to match
If you’re unsure, start with the least invasive fix: confirm manual settings, then clean/inspect the diaphragm and pilot area. Many “dead” valves are just dirty, not doomed.
Bottom line: so… how do sprinkler valves work?
Sprinkler valves work by using water pressure and a flexible diaphragm to control flow, while a low-voltage solenoid opens a tiny pilot path that changes pressure in the upper chamber. When pressure above the diaphragm drops, the valve opens. When the pilot closes and the upper chamber repressurizes, the valve shuts.
It’s a clever design: small electrical signal, big hydraulic resultand it’s why most sprinkler systems can run for years with minimal fuss (until someone drops gravel into the line, and then the valve starts writing its own soap opera).
Real-World Experiences With Sprinkler Valves (About )
If you’ve never interacted with your sprinkler valves, your first “experience” usually starts the same way: you notice something weirdone zone won’t run, or one zone won’t stop runningand suddenly you’re outside, lifting a valve box lid like you’re opening a treasure chest. Except instead of gold, you find damp soil, a suspicious amount of ants, and a tangle of wires that look like they were installed during a stressful week.
One common moment: you try to test a zone manually and learn that “loosen the solenoid a quarter turn” is a real instruction that actually works. You twist it, water starts flowing, and you feel like a wizard. Then you forget to tighten it back. Later, the controller is off, but the sprinklers are still runningand you spend 30 minutes blaming the timer, the weather, and possibly your entire life plan before realizing the solenoid is still slightly open. The valve wasn’t broken; it was just doing exactly what you accidentally told it to do.
Another classic experience is the “tiny pebble, huge problem” lesson. Because sprinkler valves rely on a diaphragm sealing against a seat, a small bit of debris can keep the valve from closing completely. Homeowners often find that after new installation work (or after a line break repair), a zone sticks on. When they open the valve, there it is: a little grit particle sitting under the diaphragm like it pays rent. Cleaning it out and reseating the diaphragm can turn a panic situation into a five-minute fixafter you spend 20 minutes washing mud off your forearms.
Electrical gremlins are also frequent. People discover that non-waterproof wire connections inside a valve box are basically an invitation for corrosion. Everything might work fine for months, then one day a zone stops turning on. The controller sends power, but the valve never opens because the solenoid isn’t actually receiving clean voltage through the corroded splice. Replacing the solenoid won’t help if the wire connection is the real culpritso learning to use proper waterproof connectors becomes a rite of passage.
Seasonal changes create their own stories. In colder areas, valves can crack if water freezes inside them, leading to leaks in spring. In warmer climates, the more common seasonal problem is simple: people adjust schedules, run longer cycles, and stir up sediment that ends up in filters or pilot ports. Drip zones add another layerpressure regulators and filters are your friends, and when they clog, your plants slowly start looking like they’re giving you a disappointed stare.
The big takeaway from these real-life moments is that sprinkler valves are usually logical. When something goes wrong, it’s often one of three things: a manual setting left open, debris in a tiny port or under the diaphragm, or an electrical connection/solenoid problem. Once you understand the pressure-chamber “trick” that opens and closes the diaphragm, troubleshooting stops feeling like magic and starts feeling like a checklist. And that’s when sprinkler valves go from mysterious plastic lumps to something you can actually managewithout needing to bribe a neighbor who “knows irrigation.”