Table of Contents >> Show >> Hide
- Why Pantry Organization Matters (Beyond Looking Pretty)
- The 60-Minute Pantry Reset (Yes, Really)
- Create Pantry Zones That Make Sense
- Use the Right Containers (Without Buying a Whole Store)
- Label Like You Mean It (So the System Survives Other Humans)
- Pantry Layout Tricks for Small Spaces
- Keep Food Fresher (And Reduce Waste) with Simple Rotation
- Maintenance: The 5-Minute Pantry Routine
- Pantry Organization Experiences (The Real-Life, Slightly Chaotic Version)
- Conclusion
If your pantry has ever launched a surprise avalanche of pasta boxes the moment you opened the door, welcome. You don’t need a full “re-do the whole kitchen” weekend (or a reality TV budget) to fix it. You need a simple, repeatable system: sort, zone, contain, label, and maintaindone in a way that matches how you actually cook. These easy pantry organization tips are designed for real life: rushed grocery unloads, snack-hunting kids, and that mysterious bag of lentils you swear you’ll use “someday.”
Why Pantry Organization Matters (Beyond Looking Pretty)
A well-organized pantry saves money, time, and sanity. When you can see what you have, you buy less duplicate stuff (no more “Wait… we already had three jars of marinara?”). When items are grouped logically, meals come together faster. And when your storage is clean and sealed, you reduce the odds of pests treating your flour like an all-inclusive resort.
The 60-Minute Pantry Reset (Yes, Really)
You can absolutely do a deep, color-coded pantry makeover. But most people need a fast reset that sticks. Set a timer, put on a playlist, and follow this order.
1) Empty the “Hot Spots,” Not the Entire Universe
If you have a small pantry, pull everything out. If you have a walk-in pantry, don’t punish yourselfstart with the shelves you use daily: snacks, breakfast, canned goods, and baking staples. Wipe shelves as you go. A slightly damp cloth + mild cleaner is usually enough; you’re aiming for “clean enough to store food,” not “surgery-ready.”
2) Toss the Obvious (and Be Smarter About Dates)
Throw out anything with bugs, mold, rancid smell, or weird texture. Then check packaging. Dented, rusted, or bulging cans? Into the trashno debate.
Now the part that surprises people: many date labels are about quality, not safety. A “Best if Used By/Before” date typically signals peak flavor or texturefoods may still be fine afterward if stored properly and show no signs of spoilage.
Use common sense: if a product smells off, looks strange, or the container is compromised, skip it. When in doubt, choose safety over thrift. (No one wants “nostalgia” to be the main note in their cereal.)
3) Sort into Simple Categories (Your Pantry’s “Playlists”)
Don’t overthink the taxonomy. You want categories that match how your household eats. A practical starting point:
- Breakfast: cereal, oats, pancake mix, nut butters
- Snacks: bars, crackers, chips, dried fruit
- Baking: flour, sugar, baking powder/soda, chocolate chips
- Cooking basics: rice, pasta, beans, grains, broth
- Canned & jarred: tomatoes, sauces, tuna, nut milks
- Spices & seasonings: salts, pepper, spice blends
- Backstock: extras you don’t need daily
The goal is fewer “miscellaneous” piles. If you keep a lot of a certain type (tea, ramen, school snacks), give it its own category. Your pantry should reflect you, not an influencer’s quinoa collection.
Create Pantry Zones That Make Sense
Zoning is the secret sauce of pantry storage. Instead of “wherever it fits,” you assign homes based on how often you use things and how heavy they are.
Zone A: Prime Real Estate (Eye-Level)
Put everyday items where you can reach them without a step stool or a risky chair-balancing routine: weekday breakfast, go-to snacks, and your top 10 cooking staples.
Zone B: Kid Zone (If You Have Kidsor Kid Snacks)
Use one or two bins at kid height for lunch snacks and grab-and-go items. This reduces rummaging, spills, and the dramatic “There’s nothing to eat!” monologue delivered while staring directly at food.
Zone C: Heavy Zone (Low Shelves)
Keep canned goods, bulk rice, and heavy appliances low. It’s safer, and you won’t accidentally pull a shoulder trying to lift a family-size can of tomatoes from the top shelf like it’s a kettlebell.
Zone D: Backstock & Party Supplies (High Shelves)
Store extras, paper goods, and “only sometimes” items up top. If you can’t see it, label it (more on that soon). This is also where seasonal items can liveholiday sprinkles, birthday candles, or the fancy crackers you hide from yourself until guests arrive.
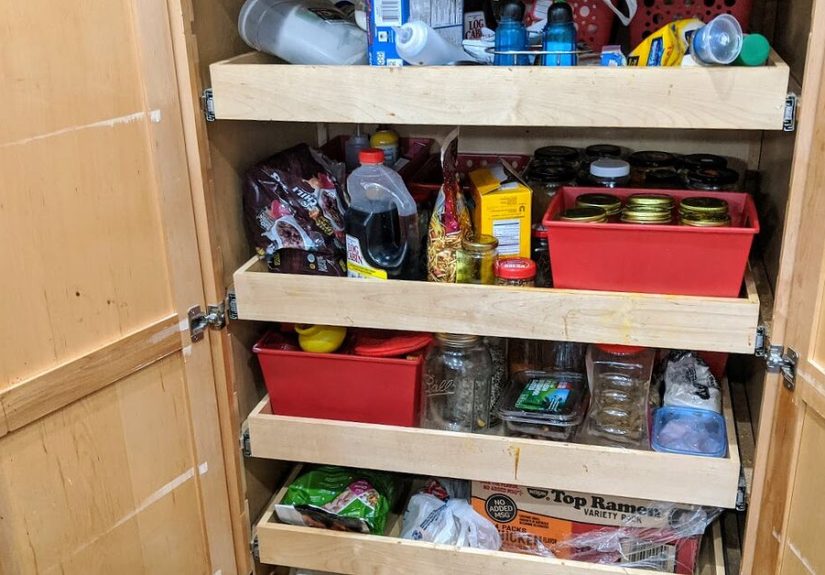
Use the Right Containers (Without Buying a Whole Store)
You don’t need to decant every item into matching jars. The best pantry containers are the ones that solve your specific problems: stale food, messy bags, and hard-to-see clutter.
Start with “Problem Solvers”
- Airtight containers for flour, sugar, rice, cereal, and anything that goes stale quickly
- Clear bins for snack bags, baking packets, and “little stuff” that disappears
- Turntables (Lazy Susans) for sauces, nut butters, oils, and small jars
- Tiered risers so canned goods don’t hide behind each other
- Over-the-door organizers for spices, packets, wraps, or small bottles
These tools show up again and again in pro organizer advice for a reason: they prevent the classic pantry fail of “I forgot this existed until it expired.”
Decanting: Do It Selectively
Decanting (pouring items from original packaging into containers) looks tidy and improves visibility, but it’s only worth it for foods you use often or that benefit from airtight storage. If decanting feels like a chore, limit it to 5–10 staples: flour, sugar, oats, cereal, rice, pasta, and maybe snacks that rip open messy. That’s the sweet spot between “organized” and “I now have a second job: Container Manager.”
Label Like You Mean It (So the System Survives Other Humans)
Labels aren’t just for aestheticsthey’re for maintenance. If people know where something belongs, they’re more likely to put it back correctly (and less likely to invent a new category called “random shelf chaos”).
What to Label
- Bins (Snacks, Baking, Pasta, Breakfast, Backstock)
- Containers (especially if items look similar: flour vs. powdered sugardangerous mix-up)
- Shelves (optional, but great for shared households)
What to Write on Labels
Keep it simple: item name + (optional) expiration/“best by” month. If you decant, consider writing the purchase date for things like nuts or whole grains that can go rancid sooner than you expect.
Pantry Layout Tricks for Small Spaces
Small pantry? Great. Constraints force smart decisions.
Go Vertical
Use shelf risers and stackable bins. If your shelves are tall, add an extra shelf insert so you’re not wasting vertical space with one lonely box of tea living in a penthouse.
Use the Door
Over-the-door racks can hold spices, wraps, foil, snacks, or small condiments. It’s one of the most underused storage surfaces in a kitchen, and it’s basically free square footage.
Square Containers Beat Round Ones
Square and rectangular containers pack more efficiently and waste less shelf space than round canisters. If you’re buying new, think “stackable” and “fits like Tetris.”
Keep Food Fresher (And Reduce Waste) with Simple Rotation
The easiest maintenance habit: FIFOFirst In, First Out. When you unload groceries, move older items forward and put new items behind them. It takes 20 seconds and prevents the “ancient soup can” discovery.
For shelf-stable foods, remember: many date labels focus on quality, and properly stored items may be usable beyond that date. Still, inspect packaging and the food itself, and don’t keep items you won’t realistically use.
Maintenance: The 5-Minute Pantry Routine
The best pantry organization system is the one that survives a normal week. Try these tiny habits:
- After grocery day: put backstock in one labeled spot (not “wherever it fits”).
- Once a week: do a quick front-facing straighten (pull items forward).
- Once a month: wipe crumbs and check for open bags.
- Every season: purge the “fantasy foods” you never eat.
If you want bonus points, keep a tiny “use this next” basket for items close to their best quality date or half-used bags. It’s basically a gentle pantry reminder without the guilt trip.
Pantry Organization Experiences (The Real-Life, Slightly Chaotic Version)
Let’s talk about what happens after you’ve done the “perfect” pantry resetbecause that’s when the true plot twist arrives: you start living again. Groceries come in. Someone shoves a bag of chips onto the nearest shelf like they’re defusing a bomb. And suddenly your carefully crafted “Baking Zone” becomes a witness-protection program for rogue snack cakes.
The first lesson I learned (the hard way) is that systems fail when they rely on people making perfect decisions every time. If your organization requires you to decant 17 items, label them in matching fonts, and align them by height while chanting affirmationscongrats, you’ve built an art project, not a pantry. The moment you’re tired, hungry, or unloading groceries while your freezer ice cream is melting, the system collapses. What actually works is “good enough on a busy day.” For me, that meant decanting only the messiest staples (flour, sugar, cereal) and using bins for everything else. If it can be tossed into a labeled bin in two seconds, it will stay organized.
Second lesson: the “snack category” is a lawless land unless you give it strong borders. I once tried to organize snacks by type (salty, sweet, protein, “healthy-ish”). It looked great for three days. Then real life hit, and everything became “whatever fits.” The fix was simpler: two bins. One labeled “Lunch & Grab” and one labeled “Treats.” That’s it. Fewer decisions = fewer mistakes. And if you have kids, making snack bins reachable at their height is basically the pantry equivalent of childproofing your sanity.
Third lesson: backstock needs a dedicated home or it becomes pantry folklore. The extra pasta, spare peanut butter, and “two more cans just in case” items should live in one clearly labeled zone. Otherwise, you’ll buy duplicates and discover them later like an archaeological dig: “Ah yes, the ancient civilization of Chickpeas, circa last spring.” I also found it helps to keep backstock in opaque bins. If you see backstock constantly, your brain starts treating it as daily inventory and you’ll overbuy again. Hide it, label it, and visit it intentionally.
Fourth lesson: a Lazy Susan is not just a cute spinning tray; it’s a peace treaty with corner shelves. I used to shove oils, vinegars, and sauces into the back and then forget them until I needed one specific bottle right now. A turntable fixed that overnight. The best part is that you don’t have to be neatjust put things on it. The spinning does the “organizing” for you like a tiny circular assistant that never complains.
Final lesson: the pantry doesn’t need to be perfect to be useful. The win isn’t matching containersit’s knowing what you have, finding it quickly, and keeping food from going to waste. If your pantry makes cooking easier on a Tuesday night, you nailed it. If it also looks nice? Consider that a delightful side effect.
Conclusion
The easiest way to organize your pantry is to stop chasing perfection and start building habits: create zones, use a few high-impact organizers (bins, risers, turntables), label the obvious, and keep maintenance ridiculously simple. You’ll spend less, waste less, and finally open the pantry door without bracing for impact. Your future self (and your pasta boxes) will thank you.