Table of Contents >> Show >> Hide
- Why a Strawberry Tower Is a Tiny-Space Superpower
- How the Built-In Reservoir Works (Without Fancy Plumbing)
- Plan It Before You Cut Plastic (Your Future Self Will Thank You)
- Materials & Tools
- 8-Step Build: DIY Strawberry Tower With Built-In Reservoir
- Step 1: Mark your planting pockets
- Step 2: Cut the pockets (and smooth the edges)
- Step 3: Add drainage holes in the bottom
- Step 4: Drill an overflow hole (your anti-swamp insurance)
- Step 5: Build the inner reservoir bottle
- Step 6: Install the reservoir in the center
- Step 7: Fill and plant in layers (the neat way)
- Step 8: Water in, mulch, and start your refill routine
- Soil Mix That Won’t Turn Into a Brick in July
- Watering, Feeding, and Maintenance in a Tower
- Troubleshooting: Fix Problems Before They Become a Saga
- Conclusion: A Tower That Waters Itself (Mostly) and Feeds You (Definitely)
- Extra (500+ Words): Real-World “Been There” Lessons DIYers Learn With Strawberry Towers
Strawberries are adorable, delicious, and somehow always one hot afternoon away from turning into sad, crunchy confetti. A DIY strawberry tower with a built-in reservoir is the “work smarter, not harder” upgrade: it saves space, keeps berries cleaner, and gives your plants a steady sip of water instead of the classic pattern of drought… flood… drama…
Why a Strawberry Tower Is a Tiny-Space Superpower
A vertical strawberry planter turns one small footprint into a whole snack factory. Instead of strawberries sprawling across a bed, your plants grow in stacked “pockets” around a tower. That gives you:
- Cleaner fruit: berries hang away from soil splash and mud.
- Fewer weeds: containers cut down on the weed Olympics.
- Better picking: no crawling around like you dropped a contact lens in the garden.
- Easy control: you decide the soil, drainage, and nutrientsespecially helpful for container strawberries.
Bonus: towers are also a sneaky way to keep berries closer to your house than to the neighborhood birds. (Not a guarantee, but it helps.)
How the Built-In Reservoir Works (Without Fancy Plumbing)
Self-watering containers generally rely on a water reservoir and either a wicking pathway or slow-release watering so the potting mix stays evenly moist. A key detail is an overflow level so roots don’t sit in swamp water after heavy refills or rain. Your strawberry tower uses the same logicjust shaped like a vertical buffet line.
Two reservoir styles you can DIY
- Slow-release inner reservoir (simple): a perforated bottle or tube inside the tower lets water seep out gradually. Think “mini olla energy,” but made from what’s already in your recycling bin.
- Bottom reservoir + overflow (more self-watering): you create a small water-holding zone at the base and add an overflow hole. The soil draws moisture upward, evening out dry pockets.
In this guide, you’ll build a tower that uses a center reservoir bottle for slow, even hydration and includes an overflow hole near the bottom so the tower can’t accidentally become a rice paddy.
Plan It Before You Cut Plastic (Your Future Self Will Thank You)
Pick the right strawberries
For towers and containers, day-neutral and everbearing strawberries are often easier to live with because they can produce over a longer season in tight spaces (and you’re not relying on one big June event). If you only grow June-bearing, you still can just expect a more concentrated harvest window.
Choose the right location
Strawberries want lots of sunaim for a spot that gets at least 6–8 hours of direct light. Morning sun is especially helpful because it dries leaves faster after watering or dew, which can reduce disease headaches.
Mind the weight and stability
Wet potting mix is heavy. A fully planted tower can weigh enough to win an argument with gravity. Put your tower on a flat surface, and if you live in a windy area, consider strapping it to a railing or adding a wide base.
Materials & Tools
This build uses easy-to-find supplies. Most are at any home center, garden shop, or already in your garage “collection” (also known as a pile).
Materials
- One tall container: a food-safe 5–7 gallon bucket, tall nursery pot, or sturdy plastic trash can (16–24 inches tall is ideal)
- One 2-liter bottle (or similar) for the inner reservoir
- Potting mix (not garden soil) + compost (optional) + perlite (optional)
- Strawberry plants (starts or bare-root)
- Mulch: straw or pine needles (optional but helpful)
- Zip ties or wire (optional, to stabilize the bottle or anchor the tower)
- Fertilizer suitable for containers (water-soluble is easiest)
Tools
- Drill
- 2″ hole saw attachment (or a sharp utility knife + patience)
- 1/4″ drill bit (for bottle holes and ventilation holes)
- 1/2″ drill bit (for overflow hole)
- Marker + measuring tape
- Sandpaper (optional, to smooth cut edges)
- Gloves + eye protection (always a good look)
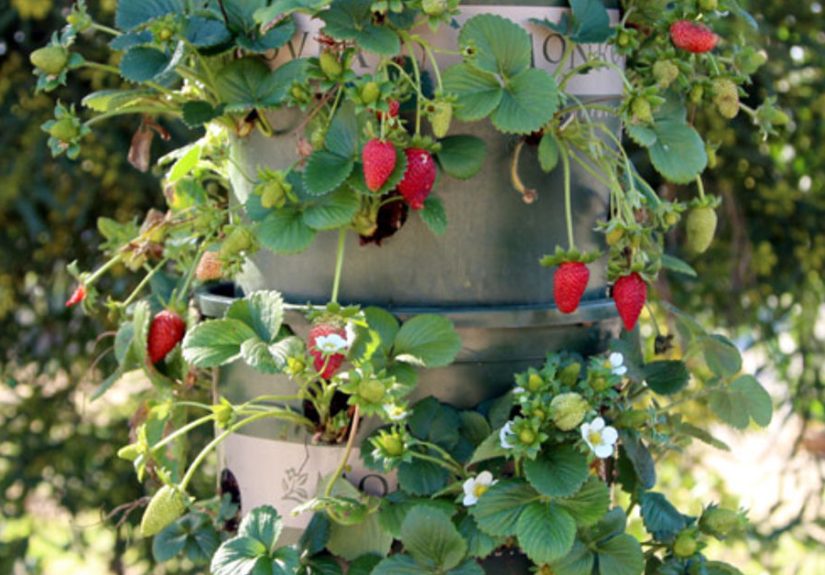
8-Step Build: DIY Strawberry Tower With Built-In Reservoir
This version is designed to be simple, sturdy, and forgiving. You’ll cut planting pockets around the tower and install a center bottle reservoir that slowly leaks water into the surrounding soil. The overflow hole protects roots from accidental overwatering.
Step 1: Mark your planting pockets
Use a marker to lay out staggered rows of planting holes around the container. A common pattern is holes spaced about 4–6 inches apart vertically, staggered so plants aren’t stacked directly on top of each other. Keep the bottom 4–5 inches mostly hole-free so you have structure (and room for the reservoir to sit).
Step 2: Cut the pockets (and smooth the edges)
Drill/cut your holes using a 2″ hole saw. If you want “pockets” that cradle plants better, you can slightly angle the holes upward. Smooth rough edges with sandpaper so the container doesn’t saw through your plant crowns or your hands.
Step 3: Add drainage holes in the bottom
Flip the container over and drill multiple drainage holes in the bottom (think: “pepper shaker,” not “one sad hole”). Good drainage matters because strawberries hate sitting in soggy soil.
Step 4: Drill an overflow hole (your anti-swamp insurance)
Measure about 2 inches up from the bottom on the side of the container and drill a 1/2-inch overflow hole. When you refill the reservoir or it rains, excess water can escape at this level instead of drowning roots.
Step 5: Build the inner reservoir bottle
Take a 2-liter bottle and:
- Cut off the bottom (so it becomes a wide fill opening).
- Leave the cap on tightly.
- Drill small holes (1/8–1/4″) around the bottlemore holes near the upper half, fewer near the bottom.
This creates a slow-seep reservoir: you pour water into the open “top” (the cut end), and it leaks gradually through the holes.
Step 6: Install the reservoir in the center
Place the bottle upright in the center of the container (cap-side down). Stabilize it by pressing it into a thin layer of potting mix or tying it loosely to a couple of small holes you drill near the rim (zip ties work great).
Step 7: Fill and plant in layers (the neat way)
Add potting mix around the bottle in layers. After each layer, tuck strawberry plants into the side holes. Important: keep the crown (where leaves meet roots) at soil level, not buried and not exposed.
Lightly firm the mix as you go so plants don’t slide out later. Keep filling until you reach the top, then plant a few strawberries in the top surface too.
Step 8: Water in, mulch, and start your refill routine
First watering: pour water into the reservoir bottle until you see a little water coming out of the bottom drainage holes (and the overflow hole stays mostly quiet). Then water lightly around the top surface.
Add straw or pine needles around the top openings if you likeit helps reduce evaporation and keeps splashing down. From here on out, you’ll mostly refill the bottle reservoir and only top-water occasionally.
Soil Mix That Won’t Turn Into a Brick in July
For container strawberries, use a light, well-draining potting mixnot straight garden soil (garden soil compacts and holds too much water). A reliable blend is:
- 70% quality potting mix
- 20% compost (optional, for slow nutrients)
- 10% perlite (optional, for extra drainage and air)
You’re aiming for a mix that holds moisture but still drains faststrawberries have shallow roots and can swing from thirsty to root-rot fast.
Watering, Feeding, and Maintenance in a Tower
Watering: the “steady sip” strategy
In a vertical strawberry planter, the top dries faster and the bottom stays wetter. The reservoir helps even that out, but you still want to check moisture with your finger a couple inches into the top mix.
- Newly planted: keep evenly moist while roots establish (you may need to top-water lightly at first).
- Hot weather: refill the reservoir more oftensometimes daily if the tower is in full sun.
- Rainy periods: the overflow hole should prevent waterlogging, but check anyway.
Tip: Water in the morning when possible. Wet leaves overnight are basically a VIP invitation for fungal problems.
Feeding: towers are hungry (but don’t overdo it)
Container plants leach nutrients faster than in-ground beds. A gentle, consistent feeding schedule works better than “fertilizer heroics.”
- Day-neutral/everbearing: light feeding every few weeks during active growth can keep production steady.
- June-bearing: feeding after harvest (or as directed for your region) often makes the most sense.
- Container-friendly option: use a water-soluble fertilizer at label rates to avoid salt buildup.
Runners, flowers, and the art of not letting your tower become a jungle
- Runners: if you want fruit, snip most runners so energy goes into berries, not endless baby plants.
- Airflow: don’t overcrowd pockets; airflow helps prevent mildew and gray mold.
- Rotate: turn the tower every week or two so all sides get sun and fruit ripens more evenly.
Winter care (especially for container towers)
Strawberries in containers are more exposed to cold than in-ground plants. In many climates, the easiest move is to put the tower in an unheated garage or sheltered spot once it’s consistently cold, or treat it as a seasonal project and replant next year.
Troubleshooting: Fix Problems Before They Become a Saga
Problem: Top pockets dry out fast
- Add a little mulch near the top openings.
- Refill the reservoir more often during heat.
- Top-water lightly every few days until plants are established.
Problem: Bottom pockets stay soggy
- Make sure bottom drainage holes are plentiful and not blocked.
- Confirm the overflow hole is open and at the right height.
- Use a lighter potting mix (avoid dense soil).
Problem: Plants look “meh” (yellow leaves, low fruit)
- Check sun exposurestrawberries need a bright site.
- Feed lightly and consistently (containers run out of nutrients faster).
- Remove diseased leaves and any moldy fruit quickly.
Problem: Crowns rot or plants collapse
This is often a planting-depth issue. Strawberry crowns should sit at soil levelburied crowns can rot, and exposed roots struggle. Replant at the correct depth and improve drainage.
Conclusion: A Tower That Waters Itself (Mostly) and Feeds You (Definitely)
A DIY strawberry tower with a built-in reservoir is one of those projects that feels almost unfair: it takes up very little space, looks impressive, and gives you a steady stream of berries if you keep up with sunlight, moisture, and light feeding. Build it once, tweak it for your climate, and you’ll wonder why you ever tried to manage strawberries in a sprawling tangle.
Start simple: good potting mix, correct crown depth, a reliable reservoir refill routine, and enough sun. Then let the tower do what it does bestturn vertical space into dessert.
Extra (500+ Words): Real-World “Been There” Lessons DIYers Learn With Strawberry Towers
People don’t usually fail at strawberry towers because they can’t cut holes in a bucket. They “fail” because strawberries are tiny, demanding roommates who notice every change in moisture, light, and airflow. The good news: most tower problems repeat the same patterns, and once you recognize them, you can fix the system instead of blaming your life choices.
First lesson: stability is not optional. A tower that’s perfectly upright when dry can turn into a wobbly thriller when the mix is saturated. DIYers often report that their best upgrade wasn’t a fancy reservoirit was a wider base, a heavier bottom, or a strap to a railing. If your tower lives on a balcony or patio, wind can act like a prankster. A little anchoring now beats replanting strawberries later like you’re doing tiny plant triage.
Second: the top dries out faster than you think, even with a center reservoir. Vertical planters create microclimates: top pockets get more sun and more wind; bottom pockets stay cooler and wetter. Many builders end up developing a simple rhythm: refill the reservoir daily during hot spells, and do a quick “top check” every couple of daysjust a light splash if the surface is bone-dry. After plants establish, the roots knit into the mix and moisture becomes more even, but early weeks are when towers need the most babysitting.
Third: hole angle matters. DIYers who cut holes straight through sometimes notice plants slowly sliding outward over time, especially when watering loosens the mix. A slight upward angleor shaping the edge so it cradles the planthelps pockets hold their shape. It’s not about perfection; it’s about giving the plant a comfy seat instead of a waterslide.
Fourth: crown depth is a make-or-break detail. Many tower builds look great on day one and then mysteriously decline. Often the crowns were buried while packing soil into pockets. In a tower, it’s easy to accidentally mound mix over the crown. The fix is simple: re-seat plants so the crown is at soil level, then firm the soil around roots. It’s a small adjustment with a big payoff.
Fifth: feeding lightly beats feeding heroically. Container towers flush nutrients quickly. DIYers often learn the hard way that over-fertilizing can cause lush leaves with fewer berriesor salt buildup that stresses roots. A steady, label-rate water-soluble feed every few weeks during active growth usually outperforms a “big dose” approach. If you want sweeter berries, many gardeners also notice that consistent watering (not boom-and-bust) improves flavor and reduces misshapen fruit.
Finally: variety choice changes the whole experience. In a tower, day-neutral or everbearing strawberries tend to feel more rewarding because you get fruit over a longer stretch rather than a single burst. That longer season also makes your reservoir system more valuablebecause you’re managing watering for months, not weeks. If you’ve built a tower before and felt underwhelmed, switching varieties and tightening your watering rhythm is often the “aha” moment.
Bottom line: the best strawberry towers aren’t complicatedthey’re consistent. Stable base, light potting mix, correct crown height, a reservoir you actually refill, and enough sun. Do those, and your tower stops being a project and starts being a habitone that happens to taste like summer.