Table of Contents >> Show >> Hide
- Why These Bars Work (And Why You’ll Make Them Again)
- Key Ingredients
- Equipment You’ll Want
- Step-by-Step: Creme Brulee Cheesecake Bars
- How to Get That Crackly Brûlée Top
- Pro Tips (So You Nail It on the First Try)
- Troubleshooting (Because Dessert Has Opinions)
- Fun Variations (Same Drama, Different Outfit)
- Make-Ahead, Storage, and Freezing
- Serving Ideas
- Kitchen Experiences & Real-Life Lessons (The Extra )
- SEO Tags
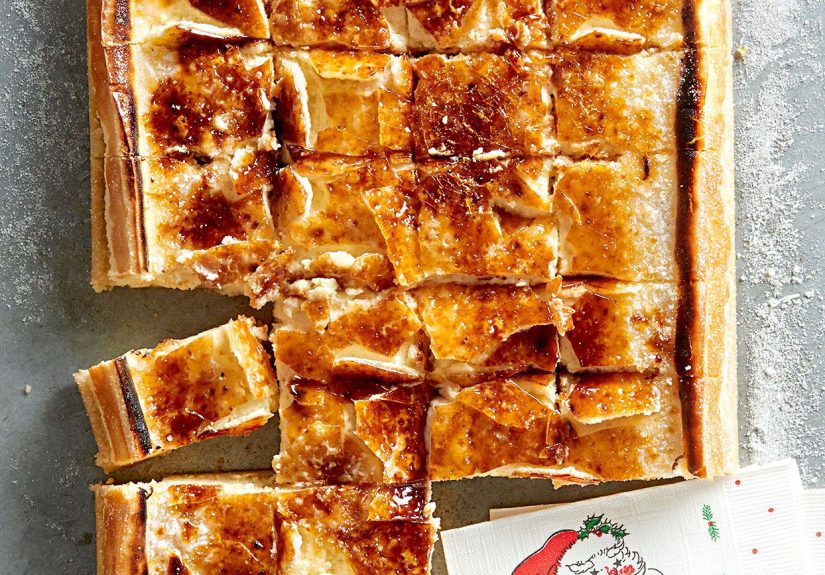
If crème brûlée and cheesecake ever got married, these bars would be the wedding cakeexcept you can eat them with your hands and nobody asks you to make a speech.
You get the best of both worlds: a buttery graham cracker crust, a silky vanilla cheesecake layer, and that signature crackly caramelized sugar top that makes people go,
“Wait… did you just bring a torch to dessert?” Yes. Yes, you did.
This recipe is built for real life: clean slices, straightforward steps, and a topping that’s dramatic in the good way (like a season finale, not a group text).
Whether you torch the sugar like a pastry chef or broil it like a resourceful home cook, these crème brûlée cheesecake bars deliver big “fancy restaurant” energyno reservation required.
Why These Bars Work (And Why You’ll Make Them Again)
- Bar format = less stress: No springform pan gymnastics. A lined baking pan makes slicing and serving painless.
- Custardy cheesecake texture: Lower-temp baking helps keep the filling creamy instead of chalky.
- Brûléed topping you can control: Torch each piece right before serving for maximum crunch (and maximum applause).
- Make-ahead friendly: Bake and chill the day before, brûlée the sugar when you’re ready to show off.
Key Ingredients
You don’t need anything weirdjust a few “don’t swap this” essentials and a couple of smart options if you want extra flavor.
For the Graham Cracker Crust
- 1 1/2 cups graham cracker crumbs (about 10–12 full sheets, crushed)
- 3 tablespoons granulated sugar
- 6 tablespoons unsalted butter, melted
- Pinch of salt
For the Cheesecake Filling
- 24 ounces full-fat cream cheese, softened (3 blocks)
- 3/4 cup granulated sugar
- 2 tablespoons all-purpose flour (optional, for a slightly sturdier bar)
- 3/4 cup sour cream, room temperature
- 1/4 cup heavy cream (or half-and-half)
- 2 teaspoons vanilla extract or 1 1/2 teaspoons vanilla bean paste
- 1/4 teaspoon fine salt
- 3 large eggs, room temperature
For the Brûlée Topping
- 1/3 to 1/2 cup granulated sugar (for a thin, shattery top)
- Optional: turbinado sugar for a thicker, crunchier crust
Equipment You’ll Want
- 9×9-inch metal baking pan (for thicker bars) or 9×13-inch pan (for thinner bars)
- Parchment paper (make a “sling” with overhang for easy lifting)
- Hand mixer or stand mixer (low speed is your friend)
- Kitchen torch or broiler (torch is easier, broiler works with vigilance)
- Instant-read thermometer (optional, but a confidence booster)
Step-by-Step: Creme Brulee Cheesecake Bars
1) Prep the Pan
Heat oven to 350°F for the crust step. Line your pan with parchment, leaving overhang on two sides so you can lift the bars out later.
Lightly grease the parchment corners if they’re trying to behave like a rebellious sticker.
2) Make and Bake the Crust
- Mix graham crumbs, sugar, melted butter, and salt until it looks like damp sand that would make a great tiny beach.
- Press firmly into the lined pan (use the bottom of a measuring cup to really pack it in).
- Bake for 8–10 minutes until lightly golden and fragrant.
- Reduce oven to 325°F for the cheesecake and let crust cool slightly while you make the filling.
3) Mix the Filling (Smooth, Not Fluffy)
Cheesecake cracks are usually caused by too much air + too much heat + too much impatience. We’re doing none of that today.
- Beat softened cream cheese on low until completely smoothno lumps. (Lumps now become heartbreak later.)
- Add sugar (and flour if using) and mix on low until combined. Scrape down the bowl.
- Mix in sour cream, heavy cream, vanilla, and salt just until smooth.
- Add eggs one at a time, mixing on low and stopping as soon as each disappears into the batter. Do not whip.
- Tap the bowl on the counter a couple times to pop hidden air bubbles.
4) Bake Low and Slow
- Pour filling over the crust and smooth the top.
- Bake at 325°F for about 35–45 minutes (9×9) or 28–35 minutes (9×13), until the edges are set and the center has a gentle jiggle.
- Optional doneness check: center temp around 150–155°F means creamy and set.
- Turn off oven, crack the door, and let the pan rest inside for 30–60 minutes to cool gradually.
5) Chill Like You Mean It
Cool at room temperature until no longer warm, then cover and refrigerate for at least 6 hoursovernight is even better.
This is when the texture turns from “nice” into “whoa.”
How to Get That Crackly Brûlée Top
The #1 secret: the cheesecake surface must be cold and dry. Condensation is the villain that turns your sugar crust into sticky syrup.
Option A: Kitchen Torch (Best Crunch, Best Control)
- Lift cheesecake out using parchment sling and place on a cutting board.
- Slice into bars with a long knife warmed in hot water; wipe between cuts for clean edges.
- Pat the tops dry with paper towel.
- Sprinkle a thin, even layer of sugar over each bar (about 1–2 teaspoons per piece).
- Torch until the sugar melts, bubbles, and turns amber. Let it harden for 1–2 minutes.
Option B: Broiler (Works, But Don’t Blink)
- Chill bars in the freezer for 10 minutes so they’re extra cold.
- Sprinkle sugar evenly on top.
- Broil on a high rack position for 30–90 seconds (timing varies), watching constantly.
- Remove when caramelized and let crust harden.
Pro Tips (So You Nail It on the First Try)
- Room-temp ingredients = smooth batter: Cold cream cheese fights back and leaves lumps.
- Mix on low: Overmixing adds air, air expands, cheesecake puffs, then sinks… and sometimes cracks.
- Humidity helps: If your oven runs hot or dry, place a pan of hot water on the lower rack while baking (a gentler “water bath” vibe).
- Don’t overbake: A slight center jiggle is correct. If it’s completely firm in the oven, it’ll likely be dry once chilled.
- Brûlée right before serving: The sugar crust is crispiest within the first hour.
Troubleshooting (Because Dessert Has Opinions)
“My cheesecake cracked!”
Totally edible. Most cracks come from overbaking or rapid cooling. Next time: bake at 325°F, pull it while the center jiggles, and cool gradually in the oven.
For today: the brûlée topping is basically edible spackle.
“My sugar topping turned wet.”
Condensation. Make sure bars are cold, pat tops dry, and brûlée right before serving. Also, store un-brûléed bars covered, and torch individual pieces as needed.
“My crust is crumbly.”
Press harder and consider baking the crust those full 8–10 minutes. A firmly packed crust slices cleaner and stays put.
Fun Variations (Same Drama, Different Outfit)
- Citrus vanilla: Add 1–2 teaspoons lemon zest to the filling for a brighter finish.
- Espresso brûlée: Mix 1–2 teaspoons instant espresso powder into the sugar topping for a coffee-caramel vibe.
- Berry swirl: Dollop thick berry jam on top before baking and gently swirl with a knife (don’t overdo it).
- Salted caramel energy: Add a pinch of flaky salt to the brûléed tops right after torching.
- Vanilla bean flex: Use vanilla bean paste for that classic speckled look and deeper aroma.
Make-Ahead, Storage, and Freezing
- Make-ahead: Bake and chill up to 2 days ahead. Brûlée topping right before serving.
- Refrigerator: Store (un-brûléed) bars covered for up to 4–5 days.
- Freezer: Freeze sliced bars between parchment layers for up to 2–3 months. Thaw overnight in the fridge, then brûlée.
Serving Ideas
These bars are richdeliciously soso simple sides shine: fresh berries, lightly sweetened whipped cream, or strong coffee.
If you want maximum “wow,” torch the sugar in front of guests. It’s basically dinner theater, but edible.
Kitchen Experiences & Real-Life Lessons (The Extra )
The first time you brûlée sugar at home, it feels a little illegalin the best way. You’re standing in your kitchen holding a flame,
watching plain white sugar transform into glossy amber glass. It’s oddly calming, like watching a campfire, except the campfire becomes dessert.
The first lesson most people learn is also the most important: dry surface, cold cheesecake. If you torch sugar on a warm or damp top,
the sugar doesn’t shatterit sulks. It turns sticky. It melts into syrup. Suddenly you’re not cracking a brûlée crust; you’re peeling caramel off your teeth
like you lost a fight with a candy apple.
Another real-life truth: slicing matters more than you think. Cheesecake is a diva about being cut too early, and it will punish impatience with messy edges.
Once you’ve waited overnight (or at least a solid six hours), the bars behave like they took finishing school. Warm your knife, wipe it between slices,
and you’ll get those bakery-clean squares that make people assume you own matching ramekins and say things like “finishing salt” in conversation.
Also, parchment slings deserve more credit than they getwithout one, you’re basically trying to excavate cheesecake with a spatula,
and nobody needs that kind of emotional stress on a weekday.
The brûlée topping itself is a choose-your-own-adventure moment. Some people swear by plain granulated sugar for an even, thin, glassy crackclassic and elegant.
Others love turbinado sugar because the crystals are bigger and the crunch is louder (yes, louder). Both are valid. The best part is experimenting:
a thinner layer gives you a delicate, quick-shattering top; a thicker layer feels more like a caramel “shield.”
If you’re making these for a party, torch each piece right before serving and watch the sugar go from white to golden to amber.
Guests tend to gather around like moths to a porch lightexcept the light is dessert and the moths are your friends saying,
“Wait, can you do mine next?”
I’ve also learned that brûléed desserts bring out everyone’s inner food critic in the funniest way.
Someone will tap the top with a spoon (very official), nod solemnly, and announce, “Great crack.”
Another person will insist the torching needs “just two seconds more,” as if they’re judging an Olympic event called Caramelization.
And the best compliment you’ll hear is the simplest: silence. When people bite in and stop talking for a second, that’s the moment.
Creamy cheesecake, vanilla perfume, buttery crust, and that crisp sugar snapyour kitchen just pulled off a restaurant trick.
Finally, the biggest confidence boost: even if something goes slightly offtiny crack, uneven caramel, a corner that isn’t perfectly straightthese bars still win.
The flavors are forgiving and the texture is luxurious. Plus, you’re literally putting a caramelized sugar crown on top.
Nobody remembers the minor imperfections when dessert arrives wearing a crunchy, golden hat.