Table of Contents >> Show >> Hide
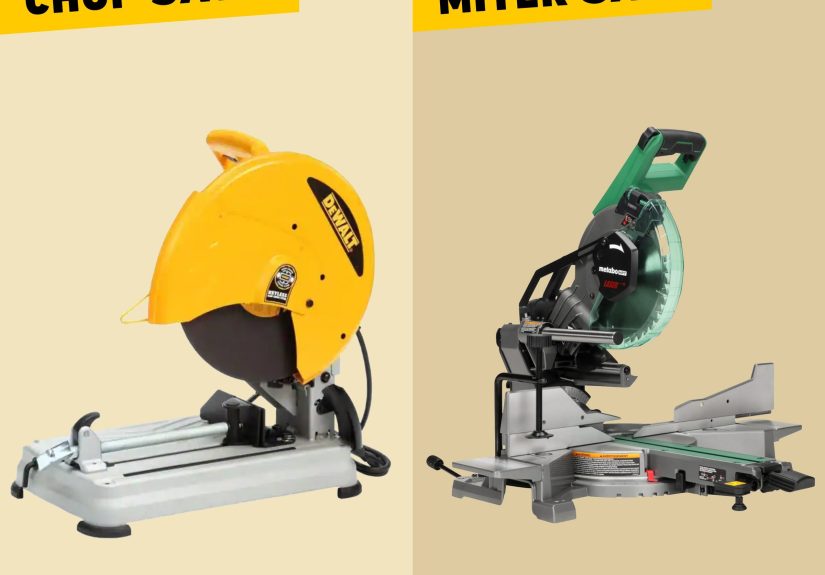
- First, a quick translation: what people mean by “chop saw”
- What a chop saw really is (the metal cut-off kind)
- What a miter saw is (and why trim carpenters love it)
- Chop saw vs miter saw: side-by-side comparison
- Choose the right saw based on what you’re building
- Buying checklist: what actually matters (and what’s just shiny marketing)
- Accuracy: why miter saws usually win (and how to keep them honest)
- Safety basics (because fingers are surprisingly useful)
- Do you ever need both?
- Quick decision guide
- FAQ
- Real-world experiences: what it feels like living with each saw (about )
- Conclusion
If you’ve ever stood in the tool aisle staring at two similar-looking saws while silently negotiating with your wallet,
you’re not alone. “Chop saw” and “miter saw” get tossed around like they’re the same thingsometimes they are, often they’re not,
and your project results will absolutely tattle on you if you pick the wrong one.
This guide breaks down the real-world differences (materials, cut types, accuracy, speed, mess, and cost), then helps you choose
based on what you actually buildtrim, framing, decks, DIY furniture, metal projects, or a little of everything.
First, a quick translation: what people mean by “chop saw”
In everyday conversation, “chop saw” can mean two different tools:
- Metal chop saw (cut-off saw): A tough, usually non-sliding saw designed mainly for straight (90°) cuts in metal.
It uses an abrasive wheel or a specialized cold-cut blade and typically includes a heavy vise to clamp stock. - Wood “chop saw” (common nickname): Many folks call a miter saw a chop saw because the action is “down and chop.”
But a true miter saw is built for accurate angle cuts in wood trim and carpentry.
So when someone says “Just grab a chop saw,” your best follow-up question is: Are we cutting wood trim… or steel?
What a chop saw really is (the metal cut-off kind)
A metal chop saw is the “no-nonsense bouncer” of the saw world: it clamps the workpiece, drops the blade, and makes fast straight cuts.
It’s a favorite for steel studs, angle iron, rebar, tubing, conduit, and other metal stockespecially on job sites where speed matters.
Abrasive chop saw vs cold-cut chop saw
Not all chop saws cut metal the same way:
- Abrasive chop saw: Uses a grinding-style abrasive wheel. Cuts quickly but throws sparks, can heat the workpiece,
and often leaves a rough edge that needs deburring. - Cold-cut chop saw (carbide / TCT): Uses a toothed blade designed for metal. Tends to produce cleaner cuts with less heat
and fewer sparks, but blades cost more and selection matters.
When a chop saw is the best choice
- You’re cutting metal all the time: steel tube, angle iron, threaded rod, fence components, EMT, etc.
- You want clamp-and-cut simplicity: secure the stock in the built-in vise and repeat cuts with confidence.
- You care more about rugged speed than fine finish: perfect for fabrication and rougher construction tasks.
Bottom line: a true chop saw shines when the material is metal and the cuts are mostly straight.
What a miter saw is (and why trim carpenters love it)
A miter saw is built for accuracy and angles. It’s the go-to for baseboards, casing, crown molding, picture frames,
flooring cuts, and clean crosscuts in lumber. It can cut 90° just finebut its superpower is dialing in angles precisely and repeating them.
The main miter saw types (in plain English)
- Standard miter saw: Rotates left/right to cut miters (like 45° for corners). No bevel tilt.
- Compound miter saw: Adds bevel tilt (leans the blade) for compound cutsuseful for crown molding and angled trim.
- Sliding compound miter saw: The head slides on rails (or a glide mechanism) so you can cut wider boards
(think “this is why it eats 2x12s for breakfast”). - Dual-bevel: Tilts both left and right, so you can make opposing bevel cuts without flipping the board
a huge time saver for trim work.
When a miter saw is the best choice
- Trim and finish: tight miters, clean corners, repeatable results.
- Woodworking and DIY builds: cabinets, shelves, small furniture, molding, flooring.
- Accuracy matters: when a 1° mistake becomes a 1/4″ gap you’ll stare at forever.
Chop saw vs miter saw: side-by-side comparison
| Feature | Chop Saw (Metal Cut-Off) | Miter Saw (Wood/Trim Focus) |
|---|---|---|
| Best for | Metal stock: tubing, angle iron, steel studs, conduit | Wood trim and carpentry: baseboard, crown, framing crosscuts |
| Typical cuts | Mostly straight 90° (some models miter a bit) | Miter + bevel + compound (especially compound/sliding models) |
| Accuracy expectation | Good for fabrication tolerances; edge may need cleanup | High accuracy and repeatability for tight joints |
| Finish quality | Often rougher (especially abrasive); may burr | Cleaner cut faces with the right blade |
| Mess factor | Sparks/dust (abrasive), metal chips (cold-cut) | Sawdust (and it gets everywhere like it pays rent) |
| Cut capacity | Great for metal profiles; not designed for wide boards | Excellent for wide boards if sliding; great for trim lengths |
| Blades | Abrasive wheel or metal-cutting carbide/TCT blade | Tooth-count wood blades (crosscut/finish), specialty blades |
| Best “buy once” scenario | You regularly work with metal | You regularly do trim/wood projects |
Choose the right saw based on what you’re building
If you’re doing trim, molding, or finish carpentry
Pick a miter saw, almost every time. Baseboards and crown molding demand consistent angles.
A compound (and ideally dual-bevel) saw makes life easier. If you’re cutting wide boards or tall crown nested against the fence,
a sliding compound miter saw earns its keep fast.
Example: Installing baseboard in a slightly-out-of-square room? A miter saw’s detents and fine angle adjustments help you sneak up on the “close enough to caulk” sweet spot.
If you’re framing, decking, or building outdoor structures
A miter saw still wins for fast, repeatable crosscuts in 2x materialespecially when you’re batching a lot of the same length.
But you don’t necessarily need the fanciest model unless you’re also doing finish work.
If your cuts are mostly 90° and you’re on a budget, a solid 10″ compound miter saw can be a workhorse.
If you’re frequently cutting wide boards (like 2x10s and 2x12s), a sliding model is worth considering.
If you’re cutting steel, conduit, or metal stock for projects
This is where a chop saw makes senseespecially if the material is ferrous metal and you want a clamp-tight setup.
A dedicated metal chop saw is built for the abuse and usually includes a vise that holds tubing securely.
Example: Building a simple steel workbench frame from square tubing? A chop saw makes consistent 90° cuts quickly so your frame doesn’t end up shaped like a confused parallelogram.
If you’re the “weekend warrior who does everything”
If your projects swing between wood and occasional metal, you have three realistic paths:
- Buy a miter saw first if most projects are wood/trim, and handle occasional metal with alternative tools (or a specialty blade only when appropriate).
- Buy a metal chop saw first if you fabricate metal often, and use a circular saw or handsaw setup for wood until you upgrade.
- Go hybrid cautiously (multi-material solutions exist), but understand you’re trading peak performance for versatility.
For many homeowners, a good miter saw covers the widest variety of common projects: flooring, trim, shelving, framing, and general carpentry.
Buying checklist: what actually matters (and what’s just shiny marketing)
Miter saw checklist
- Blade size (10″ vs 12″): 12″ often offers more capacity, but can cost more (and blades cost more too).
- Sliding or non-sliding: sliding helps with wide boards; non-sliding is lighter and simpler.
- Single bevel vs dual bevel: dual bevel saves time on trim by reducing flips and re-clamps.
- Fence quality and adjustability: a sturdy, square fence is your accuracy foundation.
- Cut line indicator: shadow line or laser can help speed up layout (but don’t let it replace test cuts).
- Dust collection: none are perfect; some are just “less messy.” Plan for a vacuum hookup if you can.
- Calibration and repeatability: you want a saw that can be tuned and stay tuned.
Chop saw checklist
- Blade type: abrasive is cheaper up front; cold-cut can be cleaner and cooler with higher blade cost.
- Vise and clamping stability: the vise is half the toolsolid clamping improves accuracy and safety.
- Cut capacity: check the maximum size tubing/angle iron it can handle.
- Spark and debris management: abrasive saws throw sparksthink about where you’ll use it and what’s nearby.
- Ergonomics and guards: comfortable handle, solid guard action, and a predictable trigger help reduce “oops” moments.
Accuracy: why miter saws usually win (and how to keep them honest)
Miter saws are designed for precision joinery and trim alignment. But even the best saw can drift if it’s out of calibration.
If you’re chasing tight corners, treat tuning like brushing your teeth: not glamorous, but the alternative gets ugly fast.
- Check for square: verify the blade is truly 90° to the fence and table before blaming your measuring tape.
- Use test cuts: a quick test cut on scrap can reveal tiny angle errors before they ruin expensive trim.
- Choose the right blade: higher tooth count generally improves finish in wood crosscuts; dull blades tear wood and invite wandering.
Chop saws, by contrast, often prioritize ruggedness and speed. That’s not “worse”it’s just a different job description.
If you need machined-level precision in metal, you may end up looking beyond abrasive chop saws.
Safety basics (because fingers are surprisingly useful)
Both tools deserve respect. A few universal principles help reduce risk:
- Eye and face protection: always. Material chips don’t care how tough you are.
- Keep guards functional: guards are not “optional accessories.” Make sure they move freely and return properly.
- Secure the workpiece: clamps and vises exist for a reasonmovement mid-cut is a recipe for trouble and bad cuts.
- Hands at a safe distance: keep your hands well away from the blade path and use supports for longer stock.
- Let the blade stop: wait for the blade to fully stop before lifting the head or moving offcuts.
- Be mindful of noise and dust: hearing protection and dust control matter more the longer you work.
If you’re cutting metal with an abrasive saw, plan for sparks and hot material. If you’re cutting wood, plan for dust and offcut movement.
In both cases, slow down just enough to keep controlspeed is only helpful when it’s safe and repeatable.
Do you ever need both?
If you do serious woodworking/trim and regular metal fabrication, yesowning both makes sense.
They’re specialized tools, and specialization usually wins on performance.
But if you’re a typical homeowner, buying both right away can be overkill. A practical approach:
- Start with a miter saw if your projects are mostly wood: trim, shelving, framing, decks, flooring.
- Start with a chop saw if your projects are mostly metal: welding, fencing, steel framing, fabrication.
- Add the second saw later when you repeatedly hit the limits of the first one.
Think of it like footwear: you can hike in dress shoes… but you’ll hate your life and your shoes will write a complaint letter.
Quick decision guide
- Mostly trim and finish cuts? Get a miter saw (compound/dual bevel if you do a lot of molding).
- Mostly framing and crosscutting lumber? Get a miter saw (sliding if you cut wide stock often).
- Mostly metal stock and straight cuts? Get a chop saw (consider cold-cut for cleaner results).
- Mixed materials, light use? Get a miter saw first for versatility, then expand if needed.
FAQ
Is a miter saw the same as a chop saw?
Sometimes people use the terms interchangeably, but technically a miter saw is for accurate angled cuts (mostly in wood),
while a chop saw usually refers to a metal cut-off saw designed for straight cuts in metal.
Can a miter saw cut metal?
Some miter saw setups can cut certain non-ferrous metals with the right blade, but a dedicated metal chop saw is usually better for frequent metal cutting.
Always follow your saw manufacturer’s guidance on allowable materials and blades.
Do I need a sliding miter saw?
You need sliding if you routinely cut wide boards (like big shelving, wide trim, or larger dimensional lumber crosscuts).
If you mostly cut smaller boards and trim, a non-sliding compound saw may be enough.
What’s the most versatile option for wood projects?
A dual-bevel sliding compound miter saw is often considered the most versatile for wood because it handles straight, miter, bevel,
and compound cuts with excellent capacity.
Real-world experiences: what it feels like living with each saw (about )
Talk to a handful of DIYers and pros, and a funny pattern shows up: people don’t regret buying a sawthey regret buying the wrong saw
for the projects they actually do. On paper, it’s easy to say “I’ll do both wood and metal.” In real life, your weekends will pick a favorite.
One common story starts with a homeowner who buys a metal chop saw because it looks tough and the price seems reasonable. It’s great for the first
metal taskmaybe cutting steel posts for a fence or trimming conduit for a garage project. Then the next month comes crown molding or baseboards,
and suddenly the chop saw’s world feels… narrow. You can still make a wood cut, sure, but it’s not built to be your best friend for tight miters.
The result is usually a second purchase: a miter saw for trim work. The chop saw doesn’t become uselessit just becomes a specialist that comes out
when metal shows up.
The opposite happens too: someone buys a miter saw for “a few simple wood projects,” and it becomes the default tool for everything. You start with
floating shelves, then a closet organizer, then a deck repair, then “just one little bench,” and suddenly your garage is producing sawdust like it’s
in a competition. The miter saw feels rewarding because it makes clean cuts quickly, and small improvements (a better blade, a basic stand, a shop vac)
noticeably improve results. Many people describe the miter saw as the tool that makes them feel more capable because it turns measuring and cutting into
a repeatable routine.
Metal, however, has a way of humbling wood-first folks. Try cutting a stack of steel tubing with a tool not designed for it and you’ll learn fast:
stability and clamping matter. People who fabricate even occasionally tend to appreciate the “clamp it and forget it” vise on a chop saw. That vise
reduces the fussy balancing act you sometimes get when improvising supports for awkward stock. With a chop saw, the workpiece is held firmly, and you
can focus on making consistent lengths for a frame, rack, or bracket system.
Another real-world lesson: your shop space will vote. Sliding miter saws are loved for capacity, but they can dominate a small garage. Some users
report that a compact setup (or a space-saving slide/glide mechanism) matters just as much as raw cutting width. Meanwhile, abrasive chop saws bring
a different kind of “space issue”: sparks and metal grit encourage you to set up in a safer, more controlled area. People often end up creating two
zonesone for wood (dust control) and one for metal (sparks and chips).
The best experience-based advice is simple: pick the saw that matches the next three projects you’re truly going to do, not the ten projects
you might do in a fantasy montage with perfect lighting and zero interruptions. When the tool fits the work, you cut faster, waste less material,
and enjoy the process morebecause the saw stops being “another thing to learn” and starts being the shortcut to results.