Table of Contents >> Show >> Hide
- What Makes This Chocolate Swirl Cheesecake Work
- Ingredients
- Equipment You’ll Want (and Why)
- Step-by-Step: How to Make Chocolate Swirl Cheesecake
- Common Cheesecake Problems (and How to Fix Them)
- Flavor Variations That Still Count as “Chocolate Swirl”
- Make-Ahead, Storage, and Freezing
- Serving Tips (Because Presentation Is Half the Fun)
- Experience Notes: The Chocolate Swirl Cheesecake Journey (The Real One)
- Final Thoughts
A cheesecake is basically a cozy sweater for your taste budssoft, comforting, and somehow always the right choice.
Add a chocolate swirl and it becomes a tuxedo sweater: still cozy, but now it’s dressed up for attention.
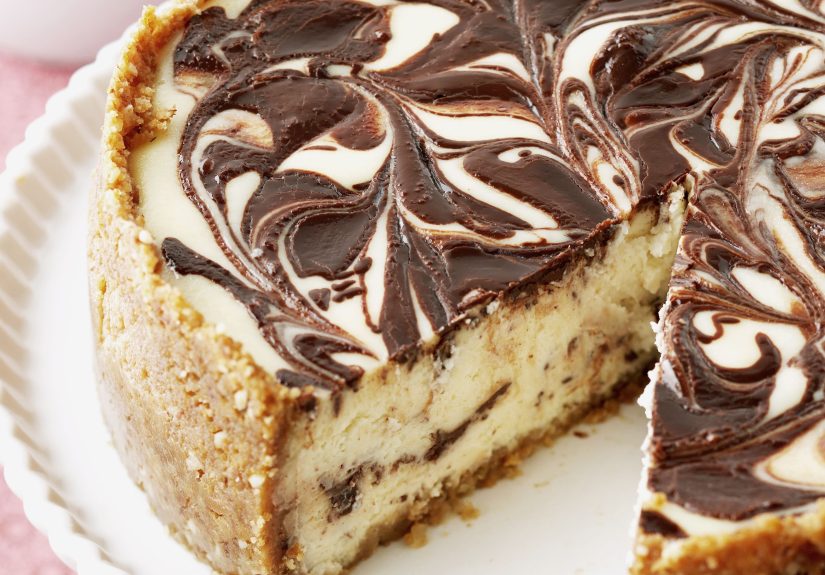
This chocolate swirl cheesecake recipe gives you that bakery-style marbled top, a creamy (not grainy!) center,
and a crust that stays crisp instead of turning into “sad cookie mush.”
Below you’ll get the full recipe plus the real “why” behind each movehow to avoid cracks, how to swirl without making brown-beige chaos,
and how to nail that texture that’s rich but not heavy enough to require a nap schedule.
What Makes This Chocolate Swirl Cheesecake Work
- Room-temperature ingredients = a smooth batter (no cream cheese pebbles).
- Low, gentle heat helps the cheesecake bake evenly so it stays creamy instead of curdled.
- Moist baking environment (water bath or steam method) reduces cracking and over-browning.
- “Just enough” swirling gives a dramatic marbled look without turning everything into one color.
- Slow cooling + long chill turns a good cheesecake into a great one. Patience is the secret ingredientannoying, but true.
Ingredients
For the Graham Cracker Crust
- 1 1/2 cups graham cracker crumbs (about 10–12 full sheets, crushed)
- 2 tablespoons granulated sugar
- 6 tablespoons unsalted butter, melted
- Pinch of salt
For the Cheesecake Filling
- 32 ounces full-fat cream cheese, softened (4 blocks)
- 1 cup granulated sugar
- 2 tablespoons all-purpose flour (optional, helps stability)
- 1/4 teaspoon fine salt
- 1 cup sour cream, room temperature
- 1 tablespoon vanilla extract
- 3 large eggs + 1 egg yolk, room temperature
- 1 teaspoon lemon juice (optional, brightens the flavor)
For the Chocolate Swirl
- 5 ounces semisweet chocolate, chopped (or chips)
- 1/3 cup heavy cream
- 1 tablespoon unsweetened cocoa powder (optional, deeper chocolate flavor)
Optional Toppings
- Chocolate ganache or hot fudge
- Whipped cream
- Chocolate curls or shaved chocolate
- Fresh berries (because we’re adults and we pretend berries make it “balanced”)
Equipment You’ll Want (and Why)
- 9-inch springform pan (classic cheesecake pan; makes unmolding possible without a crowbar)
- Roasting pan (for a traditional water bath)
- Heavy-duty foil (to protect the pan from water leaks if using a bath)
- Hand mixer or stand mixer (low speed is your friend)
- Rubber spatula (scrape often; lumps love hiding at the bottom)
- Instant-read thermometer (optional but great for confidence)
Step-by-Step: How to Make Chocolate Swirl Cheesecake
1) Prep the Pan and Oven
- Preheat the oven to 325°F.
- Lightly grease a 9-inch springform pan. (A thin swipe of butter or cooking spray is enough.)
- If using a water bath, wrap the outside of the pan with 2–3 layers of heavy-duty foil, pressing firmly around the bottom and sides.
Why: Cheesecake is basically a custard with good PR. Custards like gentle, steady heatso we’re setting the stage for calm baking.
2) Make the Crust
- Mix graham cracker crumbs, sugar, melted butter, and salt until it looks like damp sand.
- Press firmly into the bottom of the pan (and slightly up the sides if you like a taller crust edge).
- Bake for 10 minutes. Remove and cool while you make the filling.
Why: Pre-baking helps the crust stay crisp and reduces the risk of a soggy bottom.
(Yes, it’s a baking term. Yes, we all giggle anyway.)
3) Make the Chocolate Swirl Base (Quick Ganache)
- Place chopped chocolate in a heatproof bowl.
- Heat heavy cream just until steaming (not violently boiling), then pour over chocolate.
- Wait 2 minutes, then stir until smooth. If using cocoa powder, whisk it in now.
- Let it cool until warm and pourablenot hot.
Why: If the swirl is too hot, it can thin the batter and blur the marbling. Warm, not scorching, keeps the swirl defined.
4) Make the Cheesecake Batter (Low Speed, Please)
- Beat cream cheese on low for about 1–2 minutes until smooth.
- Add sugar, flour (if using), and salt. Mix on low just until combined.
- Add sour cream, vanilla, and lemon juice (if using). Mix on low until smooth.
- Add eggs and yolk one at a time, mixing on low and stopping as soon as each one disappears into the batter.
- Scrape the bowl well and give one last short mix on low.
Why: Overmixing whips in extra air. Air expands in the oven, the cheesecake puffs, then collapses as it coolshello, cracks.
We want creamy, not soufflé drama.
5) Assemble + Swirl Like You Mean It (But Not Too Much)
- Pour about 2/3 of the vanilla batter over the crust and smooth the top.
- Spoon the remaining vanilla batter in dollops across the surface.
- Drizzle the chocolate ganache in ribbons and dollops over the top.
- Use a butter knife or skewer to make 4–6 gentle figure-eights through the batter.
Swirl tip: Stop while it still looks like a swirl. If you keep going, you’ll get “lightly cocoa-tinted cheesecake,” which is fine,
but not the dramatic marbling you came here for.
6) Choose Your Baking Method
Option A: Traditional Water Bath (Most Foolproof for Smooth Tops)
- Place the wrapped springform pan in a large roasting pan.
- Pour hot water into the roasting pan until it comes about 1 inch up the side of the springform.
- Bake at 325°F for 60–75 minutes, until the edges are set but the center still jiggles like gelatin.
Option B: Steam Pan Method (Less Leak Risk)
- Place a metal pan on the bottom rack of the oven.
- Place the cheesecake on the middle rack.
- Carefully add boiling water to the lower pan (about 1 inch deep), then close the oven door right away.
- Bake at 325°F for 60–75 minutes as above.
How to know it’s done: The outer ring should look set and slightly puffed, while the center (about 2–3 inches wide) should wobble.
If you have a thermometer, the center is often in the neighborhood of 150°F when properly baked.
7) Cool Slowly (This Is Where Cracks Go to Die)
- Turn the oven off, crack the door open, and let the cheesecake rest inside for 45–60 minutes.
- Remove from the oven and let it cool on the counter until no longer warm (about 1 hour).
- Run a thin knife around the edge to loosen it from the pan.
- Cover and refrigerate for at least 6 hours, preferably overnight.
Why: Sudden temperature changes can make the top contract too fast. Cheesecake hates surprises. Be kind. Chill it slowly.
Common Cheesecake Problems (and How to Fix Them)
Why did my cheesecake crack?
- Overmixed batter: Too much air = puff and collapse.
- Overbaked: If the center doesn’t jiggle at all, it’s gone a bit too far.
- Fast cooling: Big temperature swings stress the top.
Fix: Cover cracks with ganache, whipped cream, or berries. Nobody complains about “extra topping.”
Why is it lumpy?
Usually cold cream cheese. Next time, let it soften fully and mix on low, scraping the bowl frequently.
If you already have lumps, press the batter through a fine mesh sieve before adding eggs (best rescue move).
Why is the crust soggy?
Water bath seepage is the classic culprit. Try an extra layer of foil, a larger pan that fully supports the base,
or the steam-pan method to keep the moisture in the oven (not in your crust).
Flavor Variations That Still Count as “Chocolate Swirl”
Oreo Cookie Crust
Swap graham crumbs for finely crushed chocolate sandwich cookies (cream included). Reduce butter slightly (to about 5 tablespoons) if the mixture feels very oily.
Mocha Swirl
Add 1 teaspoon espresso powder to the warm cream before making the chocolate swirl. Chocolate + coffee = instant sophistication.
Nutella Swirl Shortcut
Warm 1/2 cup Nutella for 10–15 seconds in the microwave so it’s pourable, then drizzle and swirl. It’s not “cheating.” It’s “time management.”
Extra Chocolate Vibes
Fold mini chocolate chips into the batter (about 3/4 cup), but keep the mixing gentle so the batter stays smooth.
Make-Ahead, Storage, and Freezing
- Make-ahead: Cheesecake is better the next day. Make it 1–2 days early for best texture.
- Refrigerate: Keep covered for up to 4–5 days.
- Freeze: Chill overnight, then freeze whole or in slices. Wrap tightly (plastic wrap + foil), and freeze up to 1 month for best quality.
- Thaw: In the fridge overnight. Avoid room-temp thawing if your kitchen runs warm.
Serving Tips (Because Presentation Is Half the Fun)
- For clean slices, use a long knife dipped in hot water and wiped dry between cuts.
- Let slices sit 10 minutes before serving for the creamiest texture.
- Top with ganache right before serving for that glossy “professional pastry case” look.
Experience Notes: The Chocolate Swirl Cheesecake Journey (The Real One)
There’s a special kind of confidence that appears the moment the batter looks smooth and glossy. It whispers, “This will be perfect.”
And honestly? It usually can beif the next few choices stay calm and deliberate. Most people’s first “experience” with a chocolate swirl cheesecake
happens in the same three emotional chapters: excitement, swirl obsession, and impatience.
The excitement chapter is all about the batter. When the cream cheese is properly softened, mixing feels effortlesslike the ingredients are cooperating
because they respect you. You scrape the bowl, everything looks silky, and you start imagining the compliments. (“Is this from a bakery?” “No, I made it.”
Cue humble shrug.) This is also when people learn the first big lesson: cheesecake rewards quiet mixing. Low speed feels almost too gentle,
especially if you’re used to whipping cakes and cookies into submission. But cheesecake isn’t a cookie; it’s a custard wearing a dessert costume.
The less air you beat in, the fewer surprises you get later.
Then comes swirl obsession. The chocolate drizzle hits the pale batter and suddenly you’re an artist. Or at least you feel like one.
The temptation is to keep swirling until it’s “perfect,” but the swirl has a short window where it looks dramatic. One or two confident figure-eights
can look like a magazine cover; ten figure-eights can look like you gave up and stirred soup. The best experiences usually come from stopping early,
stepping back, and trusting that the oven will do the rest. A funny thing happens: the swirl often looks better after baking than it did raw,
because the top sets and the marbling becomes more defined. So if it’s not flawless in the pan, don’t panicyour cheesecake is still in its “before”
photo stage.
Next is the water bath moment, which is where many home bakers earn their stripes. The classic experience is wrapping the pan like you’re preparing it
for an arctic expedition and still worrying water will sneak in. That worry isn’t irrationalspringform pans can be leaky. The good news is that even if
you skip the traditional bath and use a steam-pan method instead, you can still get a creamy result. What matters is maintaining a gentle environment
so the edges don’t overbake before the center catches up. If you do use a bath, you’ll likely notice the cheesecake bakes more evenly and the top stays
calmerless browning, fewer cracks, and a softer overall set.
And then, the most universal experience of all: impatience. The cheesecake comes out, it smells incredible, and you want to cut it “just to see.”
This is where discipline separates “good dessert” from “legendary dessert.” Warm cheesecake is not finished cheesecake. It needs time to cool slowly,
and then time to chill deeply so the texture becomes dense, creamy, and sliceable. Cutting early often creates messy wedges and a center that looks looser
than you expectednothing is actually “wrong,” it’s just not done becoming itself yet. Waiting overnight can feel dramatic, but it’s the easiest upgrade
you’ll ever make: zero extra work, huge payoff.
Finally, there’s the serving experiencethe moment people take a bite and stop talking for a second. That’s when you know you nailed it.
The chocolate swirl gives little pockets of deeper flavor, the tang of the cream cheese keeps it from being overly sweet, and the crust adds that buttery
crunch that makes every forkful feel complete. If the top cracked? Nobody cares once ganache shows up. If the swirl is more subtle than planned?
People still go back for another slice. The true experience of this dessert is that it looks impressive, tastes even better, and teaches yougentlythat
the best baking is less about speed and more about timing. Cheesecake is basically a delicious life coach.