Table of Contents >> Show >> Hide
- Before You Pick a Layout: The Fast Planning Checklist
- The 5 Bathroom Layouts
- 1) Three-Quarter Bath Layout (No Tub)
- 2) Full Bath Layout (Classic Tub + Toilet + Vanity)
- 3) Versatile Primary Bathroom Layout (Two-Wall “Shared but Not Crowded” Plan)
- 4) Large Primary Bathroom Plan (10' x 12' and Up)
- 5) Dream Primary Bathroom Floor Plan (Full Spa Mode)
- Layout Mistakes to Avoid (So You Don’t Cry Into a Box of Tile Samples)
- Conclusion: Pick the Layout That Serves Your Real Life
- Real-Life Bathroom Layout Experiences (A 500-Word Reality Check)
Designing a bathroom layout is a little like planning a road trip: if you pick the route first, everything else (snacks, playlists, pit stops)
falls into place. Pick the route last, and suddenly you’re doing a three-point turn with a towel rack while your toothbrush rolls under the vanity.
The good news: you don’t need a mansion to build a bathroom that feels calm, functional, andyesdreamy. You just need the right layout for
how you actually live. Below are five proven bathroom layouts (from compact guest baths to full-on spa vibes), plus practical planning tips,
real-world examples, and a “learn-from-my-mistakes” experience section at the end.
Before You Pick a Layout: The Fast Planning Checklist
1) Decide what “dream” means in your house
- Guest bath? Prioritize easy cleaning, privacy from the doorway, and simple storage.
- Kid bath? A tub often matters more than a fancy shower niche the size of a studio apartment.
- Primary bath? Two people getting ready at the same time changes everything (traffic flow, counter space, and morning peace treaties).
2) Protect the “plumbing wall” when budget matters
Moving plumbing can quickly balloon costs. If you keep major fixtures near existing supply/drain lines (often on one main “wet wall”),
you typically save money and reduce construction complexity. If you’re remodeling, treat plumbing relocation like ordering guacamole:
doable, but it adds up fast.
3) Design for clearances, not just fixtures
Fixtures have footprints, but people have elbows. Plan comfortable standing space in front of the sink and toilet, room to open drawers,
and a shower entry that doesn’t feel like boarding a budget airline seat.
- In many U.S. jurisdictions, minimum front clearance in front of fixtures is often around 21 inches (code minimum), while
~30 inches is a widely recommended comfort target. - A shower is commonly required to meet a minimum interior size (often 30″ x 30″ or equivalent area), but bigger showers are
dramatically nicer in daily use. - For toilets, a typical minimum is 15 inches from the centerline to a side wall/obstruction (so 30 inches total width minimum).
Note: Codes vary by location, and accessibility needs can change targets dramatically. Use local requirements as the final authority.
4) Think in zones (dry → semi-wet → wet)
A bathroom feels more “hotel” when it behaves like one: vanity and storage stay dry, toilet sits in a calmer middle zone, and the shower/tub lives
where water belongs. This zoning mindset also helps reduce slippery floors and makes cleaning less of a full-contact sport.
The 5 Bathroom Layouts
1) Three-Quarter Bath Layout (No Tub)
A three-quarter bath typically includes a toilet, sink, and showerno bathtub. Think: ideal guest bath, teen bath, or a second bath
where speed matters more than bubble-bath poetry.
Best for
- Guest bathrooms
- Homes that already have at least one tub elsewhere
- Anyone who prefers “shower now, conquer day” energy
Why it works
- Efficiency: You can get a roomy shower without increasing the overall footprint.
- Better resale flexibility: As long as the home still has a tub somewhere, many buyers love a big, modern shower.
- Cleaner sightlines: With careful placement, you can avoid the classic “door opens to toilet: jump scare” moment.
Smart upgrades
- Glass panel instead of a swinging shower door to reduce collision risk and make the room feel larger.
- Recessed shower niche for storage that doesn’t steal elbow room.
- Floating vanity (or furniture-style legs) to show more floor and visually expand the space.
Example footprint
A compact three-quarter bath can work in many small footprints; what matters most is keeping the shower comfortable and maintaining workable
clearances in front of fixtures and through the entry path.
2) Full Bath Layout (Classic Tub + Toilet + Vanity)
This is the classic full bathroom: vanity, toilet, and tub/shower combo (or separate tub and shower in larger versions). It’s common in
hall baths and smaller homes because it fits a lot of function into a predictable rectangle.
Best for
- Hall bathrooms
- Families with kids (bathtime is basically a sport)
- Homes where at least one full bath is needed for resale expectations
Why it works
- Simple planning: The tub often anchors one end of the room, making fixture placement straightforward.
- Budget-friendly potential: Many full-bath layouts keep plumbing clustered, which can reduce labor in remodels.
- Versatility: Works as a guest bath, family bath, or “everyone share it and try not to argue” bath.
Layout tips that actually matter
- Door swing: If the door opens directly toward the toilet, consider a pocket door (if feasible) or rehang the swing to open toward a wall.
- Vanity depth: In tight rooms, a slightly shallower vanity can improve circulation more than you’d expect.
- Tub vs. shower decision: If you already have a tub elsewhere, a larger shower can make the room feel upgraded without adding square footage.
Example footprint
Many full baths are long and narrow. A common approach is lining fixtures along one wall (or along the length) so the opposite side stays open
for circulation and storage.
3) Versatile Primary Bathroom Layout (Two-Wall “Shared but Not Crowded” Plan)
This layout spreads fixtures across two wallsfor example, vanity and toilet on one side and the tub/shower on the other. It’s a sweet spot
when you want a primary bathroom feel but your square footage is more “cozy boutique” than “five-star resort.”
Best for
- Primary bathrooms with limited space
- Couples sharing one bathroom
- Anyone who wants a double vanity (or at least double personal space)
Why it works
- Better traffic flow: Two people can use the room without performing an awkward synchronized dance.
- Flexible vanity options: You can go double-sink, one large sink with more counter, or split “sink + makeup station.”
- Improved privacy: The toilet can be placed off-axis from the doorway or partially screened by the vanity geometry.
Smart upgrades
- Walk-in shower with a fixed glass panel to keep the wet zone contained while preserving openness.
- Alcove storage near the tub/shower wall for towels and daily items (so the vanity top can stop looking like a convenience store shelf).
- Layered lighting: overhead + vanity task + a softer “night light” option for midnight visits.
Example footprint
Think “medium primary bath” where you can place fixtures on opposite walls and still maintain a comfortable aisle through the middle. If you want
a double vanity here, plan for enough width so the room doesn’t become a shoulder-check arena.
4) Large Primary Bathroom Plan (10′ x 12′ and Up)
Once you hit “large primary bath” territory, the layout game changes. You can create distinct zones: vanity zone, shower zone, tub focal zone,
and (if desired) a private water-closet zone. This is where the bathroom starts acting like a retreat instead of a utility closet with better tile.
Best for
- Primary suites
- Homeowners who want a separate shower and tub
- Anyone designing for long-term comfort (aging in place, accessibility-friendly choices)
Why it works
- Zoning becomes easy: You can keep the vanity dry, the shower wet, and the tub as a calm centerpiece.
- Double vanities shine here: More counter, more storage, fewer “why is your stuff on my side?” negotiations.
- Privacy options: You can tuck the toilet into a separate nook or room without sacrificing overall openness.
Design moves that elevate the space
- Place a tub under a window (when practical) to create a natural focal point.
- Use a glass shower enclosure to keep sightlines open and make the room feel bigger and brighter.
- Reserve one wall for tall storage (linen cabinet, tower, or built-ins) so towels and toiletries don’t colonize every horizontal surface.
Example footprint
A common “luxury-but-still-realistic” setup includes a double vanity, a toilet area with added privacy, and a shower large enough to feel relaxing
rather than strictly functional. If your budget allows, this is also a great footprint for universal-design features like a curbless shower entry.
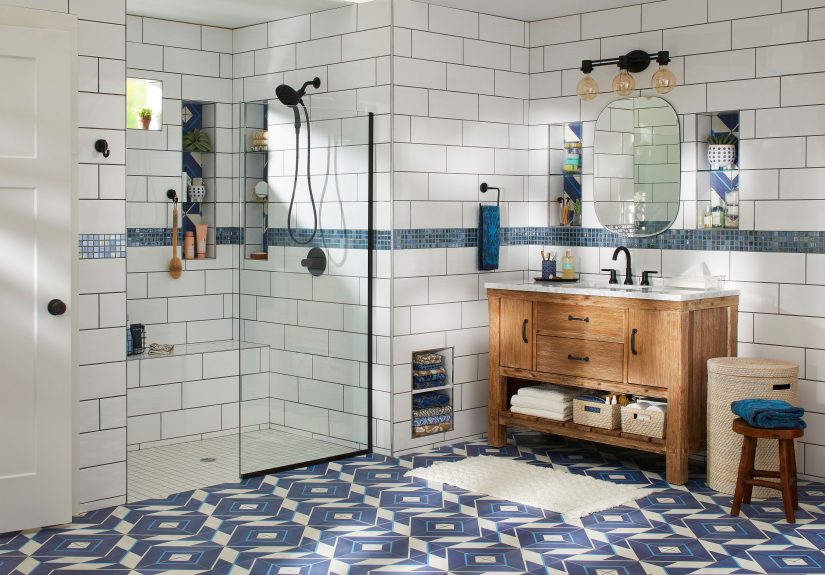
5) Dream Primary Bathroom Floor Plan (Full Spa Mode)
This is the “I want to walk in and immediately forgive my email inbox” layout. Dream primary baths often feature:
generous vanities, a large walk-in shower (sometimes with a drying area), a freestanding tub, and a private toilet room.
Architectural featureslike bay windows or a dramatic focal wallhelp it feel intentional, not just “big.”
Best for
- Homeowners building new or doing a major renovation
- Primary suites where the bathroom is part of the lifestyle experience
- People who want a true wet/dry separation for comfort and cleanliness
Why it works
- Two-person readiness: Separate grooming stations reduce bottlenecks.
- Cleaner floors: A big shower with a defined wet zone helps contain splash and humidity.
- More intentional features: Makeup station, seated area, towel warming zone, or extra storage can be built into the layout.
Dream-level details (that are still practical)
- Dedicated “dry-off” space near the shower so you’re not dripping across the room like a confused sea lion.
- Separate toilet room sized comfortably (and ventilated well) so it feels private, not claustrophobic.
- Storage that’s where you use it: linens near the shower, daily items near the vanity, cleaning supplies in a discreet cabinet.
Layout Mistakes to Avoid (So You Don’t Cry Into a Box of Tile Samples)
- Forgetting drawers and doors: A vanity can be “perfect” until the drawer hits the toilet. Test swings and pulls on your plan.
- Ignoring the view from the doorway: If possible, avoid placing the toilet as the first thing you see when the door opens.
- Under-lighting the vanity: One ceiling light creates “campfire ghost story” shadows. Add task lighting at the mirror.
- Overstuffing the room: A bathroom that’s too tight feels stressful. Prioritize circulation space as a feature, not leftover scraps.
- Moving plumbing without a plan: Relocation can add cost quickly; confirm feasibility early and budget realistically.
Conclusion: Pick the Layout That Serves Your Real Life
Your dream bathroom isn’t defined by the fanciest faucet or the rarest marble. It’s defined by how smoothly your mornings run and how relaxing
your evenings feel. Start with your needs, choose the layout that supports them, then add the style layerstile, lighting, storage, and finishes
on top of a floor plan that actually works.
Whether you’re building a simple three-quarter guest bath or a full spa-like primary suite, the right layout is the cheat code. Everything else is
just the fun part (plus a small amount of dust that will somehow end up in rooms you didn’t remodel).
Real-Life Bathroom Layout Experiences (A 500-Word Reality Check)
Here’s the most honest thing I can tell you about bathroom layouts: the drawing is never the bathroom. The bathroom is what happens when two
humans, a towel, and a cabinet door try to occupy the same square foot at 7:42 a.m.
The first “experience lesson” usually arrives during the tape-on-the-floor phase. If you haven’t taped out your plan at full size, do it.
Blue painter’s tape is cheaper than reordering a vanity because the drawer can’t open. Walk the path from the door to the sink. Pretend you’re
half awake. Now pretend you’re half awake and holding a laundry basket. If the route feels tight, it will feel even tighter once you add a bath mat,
a trash can, and that one decorative stool you swore you’d use daily.
Next comes the “toilet reveal” moment. A lot of layouts look fine on paper and then you realize the first thing you see from the hallway is the toilet,
like it’s auditioning to be your home’s greeter. Rotating a toilet a few degrees isn’t usually an option, but shifting sightlines often is:
a slightly different vanity position, a privacy panel, or even choosing a layout where the toilet sits off to the side can make the room feel more
comfortable without adding a single inch.
Then there’s shower design, which is where dreams meet physics. Everyone wants a big, open showeruntil the water leaves the shower.
The best layouts create a wet zone that behaves: good slope, smart drain placement, and enough room at the entry so you’re not stepping onto
a puddle every time. If you can, plan a small “dry-off landing” right outside the shower. That one move can make a bathroom feel twice as calm.
The sneakiest experience lesson is storage. People don’t run out of bathroom space; they run out of surfaces. If you don’t plan a home for
toiletries, they will settle wherever they canlike tiny squatters with skincare routines. A recessed medicine cabinet, a vanity with real drawers,
and a tall linen cabinet placed where you actually reach for towels can keep the room looking “designed” even on a chaotic weekday.
Finally: lighting and outlets. Great layouts make grooming easy and safe. Bad layouts make you apply mascara in a shadow while your hair tool
fights for the only outlet behind the door. Place outlets where you’ll use them, and layer light so the mirror area is bright and flattering.
Your future self will thank youprobably while sipping coffee and enjoying a bathroom that no longer feels like a morning obstacle course.