Table of Contents >> Show >> Hide
- Before You Start: Quick Pumpkin Painting Tips That Make a Big Difference
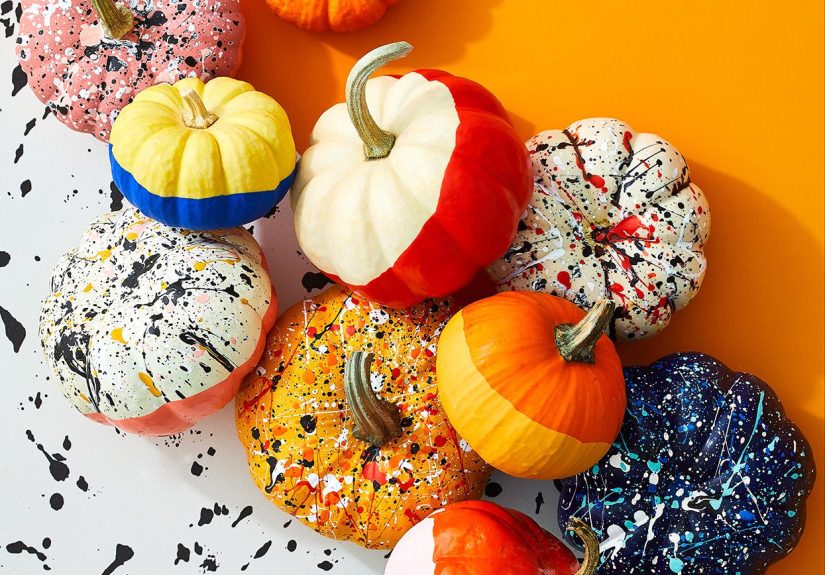
- 46 Easy Pumpkin Painting Ideas for Fall Decorations
- How to Make Painted Pumpkins Look Better (Even If You’re a Beginner)
- Common Pumpkin Painting Mistakes to Avoid
- Final Thoughts
- Experience-Based Notes: What People Usually Learn After a Pumpkin Painting Night (Extra 500+ Words)
Generated with GPT-5.2 Thinking
Pumpkin carving gets all the Halloween glory, but let’s be honest: sometimes you want the look of festive pumpkins without a kitchen-table crime scene full of seeds, stringy guts, and one suspiciously bent plastic scoop. That’s where pumpkin painting comes in. It’s cleaner, safer for kids, friendlier for beginners, and wildly versatile for fall decoratingfrom spooky porch displays to polished Thanksgiving centerpieces.
This guide rounds up 46 easy pumpkin painting ideas you can actually make, even if your artistic résumé currently reads: “Once painted a wall by accident.” You’ll also get practical tips on choosing the right pumpkin, selecting paint, and making your painted designs last longer indoors or outdoors. Whether you love cute, creepy, modern, farmhouse, glam, or kid-friendly decor, there’s a no-carve pumpkin idea here with your name on it.
Before You Start: Quick Pumpkin Painting Tips That Make a Big Difference
Pick the right pumpkin
For the easiest results, choose a pumpkin with a smooth surface, a flat bottom, and minimal soft spots. White pumpkins are especially great because they act like a ready-made canvas, but orange, green, blue-gray, and pale heirloom varieties can create gorgeous fall color stories too.
Best paints and tools for painted pumpkins
Acrylic craft paint is the go-to for most projects because it’s affordable, easy to layer, and available in every finish from matte to glossy. Spray paint is perfect for base coats and metallic finishes, while paint pens make crisp lines, lettering, and tiny details much easier. If kids are helping, washable paint or washable paint pens can keep cleanup from becoming your least favorite autumn memory.
Prep like a pro (without turning this into a science experiment)
Wipe the pumpkin clean with a damp cloth (or gently wash and dry it completely) before painting. If you’re using tape or stickers, make sure the surface is fully dry. For outdoor displays, a clear sealer or varnish can help protect the design from moisture and fading. And if you’re lighting pumpkins, use battery-operated LED lights instead of real candles to reduce heat and help the pumpkin last longer.
Design rule that saves every project
Use the pumpkin’s natural ribs as built-in guides for stripes, vines, faces, plaid lines, or repeating patterns. In other words: the pumpkin is already doing part of the design work for you. Let it.
46 Easy Pumpkin Painting Ideas for Fall Decorations
Classic & Cute Pumpkin Painting Ideas (1–10)
- Polka Dot Pumpkin: Paint a solid base color, then add bold dots with a foam pouncer or the back of a paintbrush for easy, cheerful style.
- Striped Pumpkin: Use painter’s tape to create clean stripes in black-and-white, candy colors, or muted neutrals for a modern farmhouse look.
- Plaid Pumpkin: Layer thick and thin crossing lines in two or three colors to create a cozy plaid pattern that looks tailor-made for fall.
- Color-Block Pumpkin: Divide the pumpkin into geometric sections and paint each shape a different color for a crisp, design-forward finish.
- Ombre Pumpkin: Spray or sponge darker color at the top and fade downward for an easy centerpiece that looks way more expensive than it is.
- Confetti Pumpkin: Add multicolor dots, tiny dashes, or glittery paper confetti shapes over a painted base for party-ready Halloween decor.
- Heart Pattern Pumpkin: Paint mini hearts in rows or scatter them randomly on white pumpkins for sweet fall porch decor with a playful twist.
- Starry Night Pumpkin: Use a dark navy or black base, then dot on stars and tiny constellations with metallic paint pens.
- Daisy Chain Pumpkin: Paint simple white daisies with yellow centers around the ribs for a soft early-fall display that transitions beyond Halloween.
- Checkerboard Pumpkin: Alternate squares in cream and black, terracotta and blush, or orange and ivory for a retro-cool pumpkin painting idea.
Spooky but No-Carve Pumpkin Ideas (11–20)
- Spider Web Pumpkin: Paint a black or white base, then draw web lines with a paint pen and add a tiny spider for instant Halloween drama.
- Ghost Face Pumpkin: Keep it simple with a white pumpkin, black oval eyes, and a surprised mouth for a classic but cute spooky look.
- Bat Silhouette Pumpkin: Paint or draw flying bats across a white pumpkin for high contrast that reads perfectly on a front porch.
- Witch Hat Pumpkin: Paint a fun witch face and top it with a mini craft hat or painted hat shape for extra personality.
- Mummy Pumpkin: Use white paint plus thin gray lines and googly eyes to fake wrapped bandages without touching a carving knife.
- Skeleton Bone Pumpkin: Paint a matte black pumpkin, then add bone or skull motifs in white for bold, graphic Halloween pumpkin decorations.
- Monster Googly-Eye Pumpkin: Paint bright green, purple, or teal and glue on a ridiculous number of eyes because subtlety is overrated.
- Dracula Pumpkin: Use green or pale paint, cardstock features, and a black hairline for a funny vampire pumpkin with cartoon charm.
- Candy Corn Pumpkin: Use cone-shaped pumpkins or mini stacks and paint yellow, orange, and white bands for a nostalgic seasonal favorite.
- Potion Label Pumpkin: Paint dark matte colors and add hand-lettered labels like “Witch Brew” or “Moon Dust” for apothecary vibes.
Food-Inspired Pumpkin Painting Ideas (21–28)
- Donut Pumpkin: Paint the top like frosting and add sprinkle dots, dashes, or puffy paint squiggles for a dessert-themed display.
- Ice Cream Scoop Pumpkin: Use pastel colors and top with paper “sprinkles” for a whimsical pumpkin that looks sweet enough to confuse guests.
- Pineapple Pumpkin: Paint the pumpkin yellow, add black diamond accents, and create a leafy top with foam or cardstock.
- Watermelon Pumpkin: Paint green stripes outside and red sections with “seeds” on mini pumpkins for a funny summer-meets-fall mashup.
- Cupcake Pumpkin: Add scalloped frosting swirls and a pom-pom “cherry” on top for a bakery-window look.
- Coffee Pumpkin: Paint latte tones and letter it with “Pumpkin Spice,” “Brew,” or “Cozy” for kitchen counter decor.
- Candy Wrapper Pumpkin: Use bright color blocks and faux candy logos or stripes to create a trick-or-treat inspired display.
- S’mores Pumpkin Set: Make a trio: one “graham cracker,” one “chocolate,” and one “marshmallow” pumpkin for a cute grouped arrangement.
Modern, Chic & Stylish Painted Pumpkins (29–36)
- Neutral Minimalist Pumpkin: Paint in cream, taupe, clay, or sage and add simple line art for elevated fall decor that doesn’t scream Halloween.
- Gold Metallic Pumpkin: Spray paint faux pumpkins gold for glam mantels and reusable Thanksgiving tablescapes year after year.
- Black-and-White Typography Pumpkin: Use letter stencils or paint pens to spell “BOO,” “FALL,” or your family name for entryway decor.
- Shibori-Inspired Pumpkin: Paint a deep navy base, then add metallic or white brush strokes for a rich, artisanal look.
- Terrazzo Pumpkin: Paint a neutral base and add irregular colorful flecks in coral, mustard, green, and blue for modern design lovers.
- Marbled Nail Polish Pumpkin: Use nail polish in water for swirled mini pumpkins with glossy marble effects and almost no brushwork.
- Stained Glass Pumpkin: Add tissue paper pieces over a painted base with decoupage medium for jewel-toned texture and layered color.
- Matte Monochrome Pumpkin Trio: Paint three pumpkins in one color family (like dusty blue shades) and vary patterns for a polished grouped display.
Kid-Friendly Pumpkin Painting Ideas (37–42)
- Finger-Paint Pumpkin: Let kids create abstract dabs, handprints, and swirls on mini pumpkins over a drop cloth for a fun no-rules craft.
- Emoji Pumpkin Set: Paint different facesheart eyes, sunglasses, laughing tearsfor an easy party activity and photo prop station.
- Animal Face Pumpkin: Turn pumpkins into lions, owls, cats, foxes, or frogs using paint plus felt ears and paper details.
- Rainbow Drip Pumpkin: Pour or paint bright colors at the top and let them drip down for a dramatic result that’s very beginner-friendly.
- Sticker-Resist Pumpkin: Add stickers first, paint over them, then peel away to reveal clean shapes, letters, or stars underneath.
- Pom-Pom Pumpkin: Paint the base a bright color and glue pom-poms in patterns, flowers, or random polka dots for texture and charm.
Porch, Party & Centerpiece Pumpkin Ideas (43–46)
- House Number Pumpkin: Paint a white pumpkin and add your address numbers with stencils for a practical front porch accent.
- People Stack Pumpkins: Paint funny faces on stacked pumpkins and add yarn hair, hats, or glasses to create a custom “pumpkin family.”
- Coastal Landscape Pumpkin: Use a cream pumpkin as a canvas for marsh grass, waves, or sunset scenes for region-inspired fall decorating.
- Seasonal Centerpiece Letter Pumpkins: Paint and stencil a set of pumpkins to spell “FALL,” “BOO,” or “THANKS” for a dining table focal point.
How to Make Painted Pumpkins Look Better (Even If You’re a Beginner)
1) Start with a base coat when needed
White, cream, or black base coats make colors pop and help patterns look cleaner. If your pumpkin is dark orange and you want pastel paint, don’t skip this step.
2) Use thin coats, not one heroic coat
Multiple thin coats dry faster, crack less, and look smoother. One thick coat usually leads to streaks and regret.
3) Mix materials for texture
Paint is just the beginning. Try pom-poms, felt, tissue paper, paper straws, googly eyes, ribbon, or washi tape to create easy no-carve pumpkin decorating ideas with more dimension.
4) Think in color families
Want your porch to look “styled” instead of “every craft supply in one pile”? Limit your palette to 3–5 colors and repeat them across multiple pumpkins.
5) Display smart
Keep real pumpkins in shaded areas and off damp surfaces when possible. Group them with mums, lanterns, baskets, or hay for fuller fall porch decor and a more finished look.
Common Pumpkin Painting Mistakes to Avoid
- Painting a wet pumpkin: Paint won’t adhere well and tape won’t stick cleanly.
- Skipping cleanup: Dust and dirt can ruin smooth finishes.
- Using only one brush: Large areas and detail work need different brush sizes.
- Ignoring dry time: Smudges happen fast, especially with kids and curious adults.
- Using real candles in decorative pumpkins: Heat shortens pumpkin life; LEDs are safer and easier.
Final Thoughts
The best thing about easy pumpkin painting ideas for fall decorations is that they work for every style and every skill level. You can make a polished designer display with neutral painted pumpkins, a spooky Halloween porch with bats and webs, or a kid-friendly craft station full of googly-eyed monstersand never touch a carving saw.
If you’re decorating for the whole season, start with versatile designs (plaid, metallics, florals, neutrals), then add a few playful Halloween pumpkins closer to the holiday. That way your decor feels fresh in September, festive in October, and still useful for cozy fall entertaining.
Experience-Based Notes: What People Usually Learn After a Pumpkin Painting Night (Extra 500+ Words)
If you’ve never hosted a pumpkin painting night, here’s the honest version: it starts out looking like a cute fall activity and ends up becoming a surprisingly memorable mini event. In the best way. One person arrives saying, “I’m not creative,” then somehow leaves with a black-and-gold pumpkin that looks like boutique decor. Another person starts with a simple polka dot plan, then adds spiders, glitter, lashes, and a tiny hat because the project “just evolved.” Pumpkin painting has that effect on people.
A common experienceespecially with familiesis realizing that no-carve pumpkin decorating gives everyone a better chance to participate. Little kids can paint base coats, add stickers, or press on pom-poms. Older kids can handle patterns, faces, or lettering. Adults can take over the detail work or pretend they are “just helping” while quietly making their own pumpkin masterpiece. It turns into a low-pressure creative activity where the point is not perfection; it’s the laughs, the color, and the “wait, that actually looks amazing” moment.
Another thing people notice quickly: the setup matters more than talent. When there’s a drop cloth, paper towels, a few brush sizes, and a simple color palette ready to go, everyone relaxes. When there’s no setup, someone paints on the table, someone else sits down on a wet project, and suddenly the dog has a metallic tail. The funniest part is that even the “disasters” often become favorites. Smudged paint becomes a ghostly effect. A crooked line becomes a plaid pattern. A drip turns into “modern art.”
People also learn that grouping pumpkins makes average designs look incredible. One pumpkin may look cute. Three pumpkins in coordinating colors with different patterns? That looks intentional. Five pumpkins with mixed heights, textures, and a lantern in the middle? Now it looks like a styled magazine vignette. This is why beginner decorators often get the biggest confidence boost when they stop judging each pumpkin individually and start styling them together on a porch step, coffee table, or entry bench.
There’s also a seasonal rhythm to it. Early in fall, people tend to choose softer looks: neutrals, florals, plaid, muted greens, or metallic accents. As Halloween gets closer, the same people suddenly crave bats, spider webs, monster faces, and dramatic black paint. Pumpkin painting is one of those rare fall crafts that can shift with your mood. You can start elegant and end spooky without buying a whole new decor collection.
Maybe the best experience of all is how forgiving the craft is. If you mess up, paint over it. If the color is wrong, add another coat. If the design feels boring, add dots, stripes, or a painted stem. Unlike a lot of DIY projects, pumpkin painting rewards experimentation. And because pumpkins are naturally quirkylumpy, ribbed, irregularthey don’t demand perfect symmetry. In fact, the imperfections are part of the charm.
So if you’re on the fence, start simple. Pick one pumpkin, one base color, and one pattern. By the end, you’ll probably be planning a second round, grabbing mini pumpkins for “just one more idea,” and explaining to your household why the dining table is now a temporary pumpkin studio. That, right there, is peak fall behavior.