Table of Contents >> Show >> Hide
If beginner guitar chords had a villain, B minor (Bm) would be twirling a mustache in a dark corner of the fretboard.
Almost every new player has the same thought the first time they try it: “Why are my fingers doing yoga… and why does it still sound terrible?”
The good news? The Bm chord isn’t some impossible boss level. It’s just a slightly more demanding shape that rewards patience.
Once you crack it, whole worlds of songs in keys like D and A open up: moody ballads, classic rock riffs, and plenty of pop hits that lean on that
dramatic minor sound.
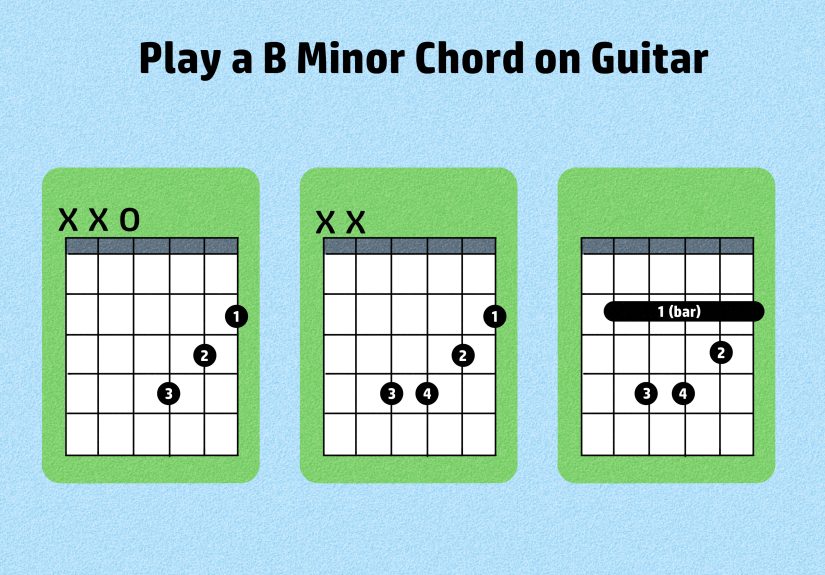
In this guide, inspired by the step-by-step style of wikiHow but written from scratch, you’ll learn three practical ways to play the Bm chord on guitar:
- Way 1: The classic full Bm barre chord (the “real deal” version)
- Way 2: An easier, no-full-barre Bm for beginners
- Way 3: Higher-neck Bm shapes that sound sweet and are surprisingly comfortable
Along the way you’ll get troubleshooting tips, practice ideas, and a bonus section with real-world experiences and mindset tricks to help you finally
make peace with this notoriously fussy chord.
What Is a Bm Chord, Really?
Before you twist your fingers into a pretzel, it helps to know what you’re actually trying to play. A B minor chord is built from three notes:
- B – the root
- D – the minor third (this is what makes it “sad” rather than “happy”)
- F♯ – the fifth
Every Bm shape you’ll ever play is some combination of those three notes in different octaves. The reason it feels harder than something like Em or Am
is simple: there’s no easy open-chord version that uses lots of open strings. Most standard shapes ask you to fret multiple strings at the same time,
often using a barre.
You’ll run into Bm all over the place in songs in D major, A major, and G major. It shows up in
rock, pop, country, worship music, and singer-songwriter tuneseverywhere players want a moody, emotional chord that still fits a familiar progression.
Way 1: The Classic Bm Barre Chord (Standard Shape)
Let’s start with the version most teachers mean when they say, “Play a B minor chord.” This is the Bm barre chord at the 2nd fret,
built from an A minor–style shape that’s been moved up the neck.
Finger Placement (Bm Barre at 2nd Fret)
Try this step by step on your guitar:
- Index finger (1): Lay it across the strings at the 2nd fret, at least from the 5th string (A) to the
1st string (high E). Lightly touch or mute the 6th string (low E) with the tip or side of this finger so it doesn’t ring. - Ring finger (3): Place it on the 4th fret of the D string.
- Pinky finger (4): Place it on the 4th fret of the G string.
- Middle finger (2): Place it on the 3rd fret of the B string.
Now strum from the A string down (strings 5 through 1). If everything is fretted cleanly, you should hear a rich, full B minor chord.
Common Problems (and Fixes) with the Bm Barre
Problem 1: The notes buzz or sound dead.
- Roll your index finger slightly toward the bony edge instead of the fleshy pad. That firmer surface often gives a cleaner barre.
- Move your barre finger closer to the fret wire (toward the body), not directly in the middle of the fret.
- Press from behind the neck with your thumb, roughly opposite your middle fingernot wrapped way over the top like a baseball bat.
Problem 2: Your hand gets tired immediately.
- Relax between attempts. Think “short bursts” instead of clamping down for 30 seconds straight.
- Do “barre-only” reps: set the barre, pick each string, then release. Add the other fingers after the barre feels more secure.
Problem 3: The low E string rings and makes the chord muddy.
- Let the tip of your index finger or your fret-hand thumb lightly touch the low E so it stays muted.
- Strum with a slightly shorter motion, aiming your pick mainly at strings 5–2.
This version is worth the effort. Once your hand understands this Bm shape, you can move the same barre/minor pattern up and down the neck to create
other minor chordsC#m, Dm, Em, and so on.
Way 2: An Easier Bm Shape (No Full Barre Required)
If the full barre still feels like trying to crush a coconut with your bare hands, you do not have to wait until you “deserve” to play
songs with Bm. There are easier versions that sound good and let you start using the chord right now.
Easy Bm on the Top Three Strings
One of the friendliest Bm shapes for beginners lives on the top (thinnest) strings. It uses only three fingers and no full barre:
- Index finger (1): 2nd fret of the high E (1st) string.
- Middle finger (2): 3rd fret of the B (2nd) string.
- Ring finger (3): 4th fret of the G (3rd) string.
Now either:
- Pluck just those three strings (G, B, E) for arpeggios, or
- Strum gently from the G string down, while muting the lower strings with your picking hand or by lightly touching them with your fretting hand.
You’re still playing the three notes that make a B minor chordB, D, and F♯just in a lighter, smaller voicing. This is fantastic for fingerpicking,
quieter sections of songs, or whenever your hand needs a break from full barre duty.
“Half-Barre” Easy Bm (Four-String Shape)
Ready for a small upgrade, but not the full barre? Try adding one more string:
- Index finger (1): Press the 2nd fret on both the high E and B strings (a mini-barre with one finger).
- Middle finger (2): 3rd fret of the B string (if you prefer, you can skip the mini-barre and just fret one string).
- Ring finger (3): 4th fret of the G string.
- Pinky (4) – optional: 4th fret of the D string.
When you strum from the D string down (4–1), you get a fuller Bm sound that’s still friendlier on your hand than the full barre at the 2nd fret.
Think of these as “training wheels” versions: completely valid, musical, and great stepping stones to more demanding shapes.
Way 3: Bm Chord Shapes Higher Up the Neck
Once you’re comfortable with the basic idea of Bm, try moving it up the neck for new tones and textures. Higher-register Bm shapes sound brighter
and cut through a mix nicely, especially if you play with another guitarist who’s hanging out in the lower positions.
Bm as an A-Shape Barre at the 7th Fret
If you know your A minor chord, you can transform that shape into a Bm higher on the neck:
- Make an A minor shape (open position) just to visualize it: open A, 2nd fret on D and G, 1st fret on B.
- Now imagine sliding that shape up so that your “nut” moves to the 7th fret. That’s where the barre comes in.
On the guitar, it looks like this:
- Index finger (1): Barre the 7th fret from the A string down (strings 5–1).
- Ring finger (3): 9th fret of the D string.
- Pinky (4): 9th fret of the G string.
- Middle finger (2): 8th fret of the B string.
Strum from the A string down. You’ll hear the same Bm chord, but brighter and tighter than the 2nd-fret version. Great for choruses, riffs, or when
you want a more melodic, chiming tone.
Triad Shapes Up the Neck
You can also use small three-note shapes (triads) around the 7th–10th frets for Bm:
- On the D, G, and B strings, look for combinations that contain B, D, and F♯.
- These are perfect for hooks, fills, and lead-style rhythm parts.
The big idea: Bm is not stuck in one place. Once you know the note layout on the neck, you can find this chord in multiple positions and pick the
version that fits the song and your hands.
How to Practice Bm So It Finally Sticks
The secret to mastering the Bm chord isn’t “having magical small hands.” It’s breaking the process into small, repeatable steps.
1. Start with Short, Focused Reps
- Set a timer for 2–5 minutes.
- For that short window, work only on forming the Bm chord and releasing it.
- Each rep: form the chord, strum once or twice, check notes one by one, then relax your hand.
This trains accuracy and hand position without exhausting your fingers. It’s far better than squeezing one bad shape for a full song and
getting discouraged.
2. Pair Bm with Friendly Chords
Since Bm often shows up with D, G, A, and Em, practice mini progressions like:
- D – Bm – G – A
- G – D – Em – Bm
- Bm – G – D – A
Move slowly at first. Don’t worry about the original tempo of any songyour job is to make the shapes clean and consistent. Speed comes later, usually
faster than you expect once the movement is programmed into your muscle memory.
3. Use the Easy Bm as a “Safety Net”
When you practice along with recordings or backing tracks, it’s totally fine to:
- Use the easy three-string Bm when the tempo is fast or your hand is tired.
- Switch to the full barre Bm whenever you have a little more time to set up the chord.
Over time, the barre version will feel less intimidating, and you’ll reach for it more often without even thinking about it.
Extra Tips for a Clean, Confident Bm Chord
- Stay relaxed. If your shoulder is creeping up toward your ear, you’re wasting energy. Drop the shoulder, loosen your jaw, and breathe.
- Angle the guitar neck slightly up. A higher neck angle gives your fretting hand a better reach and minimizes wrist strain.
- Check each string individually. Pick one string at a time while holding Bm. Any string that buzzes or dies tells you where to adjust.
- Mute ruthlessly. It’s better to mute extra strings than let them ring and muddy the chord. Use unused fingers and your picking hand palm.
- Be patient. For most players, Bm isn’t a “one-week chord.” It’s a “two-to-six-weeks with steady practice” chord. That’s normal.
of Real Bm Experience (So You Don’t Feel Alone)
Almost every guitarist has a Bm story, and most of them start with frustration. It usually goes like this: you’ve learned your
open chordsG, C, D, Em, maybe A and E. You’re feeling good. Then you open a chord chart for your favorite song and see it: “Bm.” You try the diagram,
your fingers stack up at weird angles, and what comes out of the amp sounds like a bag of loose screws.
The first big mindset shift is accepting that Bm is supposed to feel weird at first. It’s not a sign that you’re bad at guitar;
it’s a sign that you’ve graduated to the next level. You’re asking your hand to do something it’s never done beforespread, straighten, and hold
multiple strings with one finger while the other fingers land precisely on higher frets. That’s a pretty athletic move for such small muscles.
One useful approach is to treat Bm like a little project rather than a single problem. For example, you might decide:
- Week 1: Get comfortable just placing the index-finger barre cleanly at the 2nd fret.
- Week 2: Add the ring and pinky on the 4th fret of D and G, still slowly checking each note.
- Week 3: Add the middle finger on the 3rd fret of B, and start practicing ultra-slow transitions in and out of the shape.
Breaking it up like this keeps you from feeling like a failure because it doesn’t sound perfect on day one. It also lets your hand build strength and
coordination in stagesmuch kinder than brute-forcing the full chord for hours.
Another common experience: Bm suddenly “clicks” on a random day. You might struggle for weeks, then one afternoon your fingers land just right and you
think, “Wait, did I just… do it?” That’s how muscle memory often works. Your brain and hand have been quietly processing all those messy attempts,
and then the circuit completes.
It also helps to give Bm a musical job, not just a technical one. Instead of treating it like a chore, put it in a progression that
actually sounds good to you. Maybe you grab a backing track in D major and practice cycling through D – Bm – G – A. Or you learn a favorite song that
leans on Bm in the verse or chorus. When your ear hears the emotional impact of that chord change, your motivation spikes. You’re not just fighting
with a shapeyou’re chasing a sound.
Players with smaller hands sometimes assume they’ll never get barre chords, but plenty of pros with short fingers put that myth to rest. The trick is
good positioning and efficiency, not brute strength. A slight wrist angle, a thumb that’s more behind the neck than over it, and the willingness to use
easy versions when you’re tired can make all the difference.
Finally, give yourself permission to sound bad for a while. Nobody posts the first week of their Bm journey on social media; they just post the “after”
version. What you don’t see are the hundreds of ugly, buzzy, half-clean chords that came before. If you’re hearing some noise, some buzz, some muted
notesthat means you’re doing the work. Keep going.
One day, maybe sooner than you think, you’ll look at a chord chart, see “Bm,” and shrug. Your fingers will jump into place automatically, your strum
will sound rich and confident, and you’ll realize: that “impossible” chord quietly became part of who you are as a guitarist.
SEO JSON